
Forget everything you’ve ever read about shredding and soaking newspaper for days to make paper logs. There’s a much faster and easier way to recycle your newspaper and create effective long-burning paper bricks.
Here’s how I make compressed paper bricks, quickly and easily, to use in my wood-burning stove.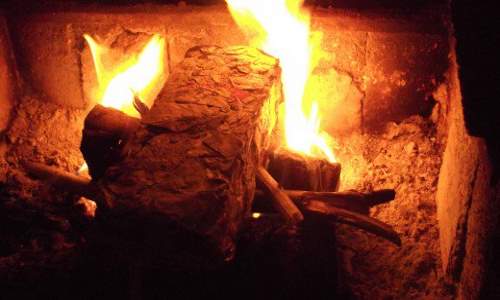
Compressed Paper Bricks / Logs
I make bricks from newspaper to use as fuel in my wood-burning stove. Because I live off the grid, I cannot flick the switch on an electric heater to keep warm while my paper bricks dry so I need the process to be quick and easy. Fire keeps my family warm during winter.
Living off the grid without electricity, I rely heavily on solar power during summer and I need my wood-burning stove to operate constantly during the colder months.
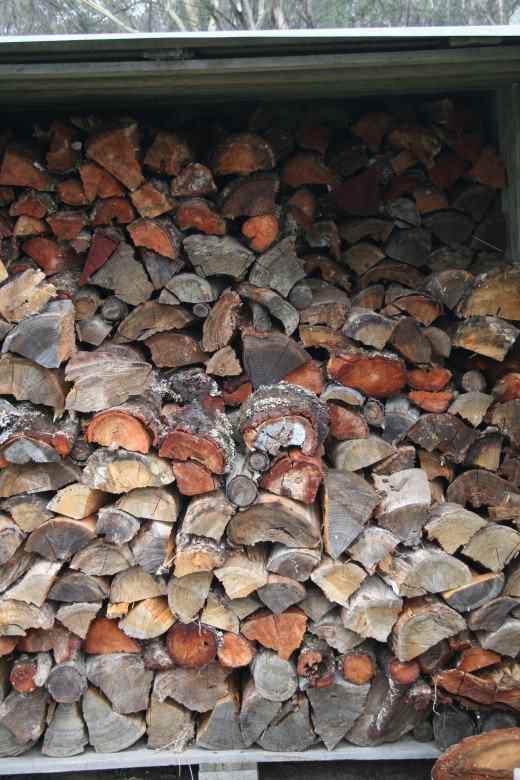
We burn split logs and fallen branches from the many trees near our home, but I also use recycled newspaper compressed into bricks to supplement the wood. Compressed paper logs burn hot which is useful if we’ve been out or away long enough for the fire to die down, plus they make extremely effective fire-starters.
Their heat is intense which means there is no delay in generating warmth, plus the flame helps even large logs ignite. If there’s no dry wood on hand, paper logs can be encouraged to burn a long time. There’s no need to fill the chamber of the fire with paper logs; you can burn them one at a time and still receive warmth.
So what can you do to make your own paper bricks – ready to use within days instead of waiting for weeks as recommended?
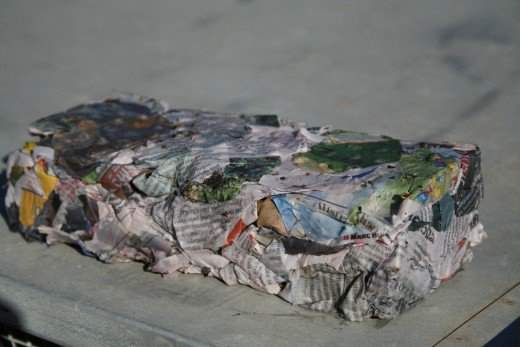
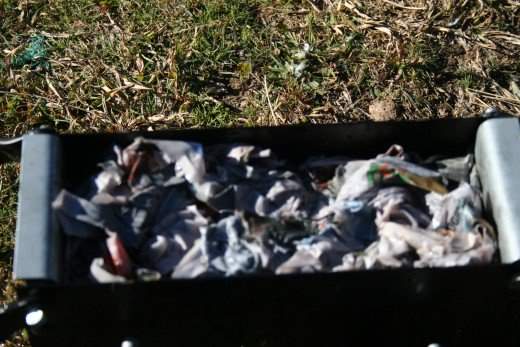
Freshly Made Newspaper Brick
I believe life is too short to waste hours shredding paper and then wait days for the paper to soak before making something that will only be tossed in the fire and burned. I’m not creating a work of art or a family heirloom. I want the process of making paper bricks to be quicker and easier than that.
There’s a hard way and an easy way to achieve just about every goal in life. For a tedious task like creating hand-made logs for a fire, I prefer the easier option.
Yes, I did follow the standard instructions for creating my very first newspaper brick. I tore the paper into little strips and soaked it longer than I believed was necessary, then packed it into the paper brick maker and struggled to push all the water out – gripping the handles and pushing down as hard as I could.
The thought of repeating the process to make my second paper brick was enough to make chopping wood seem very attractive.
A few weeks later I had another attempt, this time not bothering to shred the paper. I experimented with a number of different approaches.
I am pleased to report my efforts were successful and I discovered a quick and easy way to make my own paper bricks. If you have a brick maker (or ‘log maker’ as the people at Amazon call it), here’s the LTM way to use it.
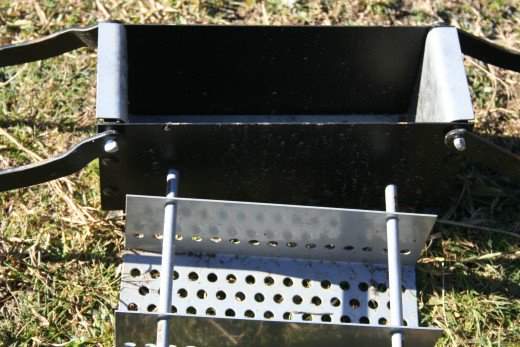
Here’s My Brick Maker, Ready For Work
Don’t Shred Your Newspaper!
The single most important piece of advice I can offer anyone who wants to make their own paper bricks from recycled newspaper, is “Don’t shred your newspaper”. You’ll have to trust me on this. Everyone else will tell you it is essential. I am telling you it is wasted effort.
Separate your newspaper into single sheets and scrunch each page individually before putting it in your bucket. Why? Because you’ll drive yourself mad if you try to scrunch the paper after it is wet.
Sit outside in the sunshine with a nice cup of a herbal tea and the newspaper spread on the table in front of you, read a page (both sides of course) and then when you’ve finished, scrunch it up and drop it beside you.
Okay, so maybe you have a pile of papers you read months ago … just scrunch up each page and make a pile.
Step 1: Scrunch Up Your Newspaper

Just a Quick Dunking In Water
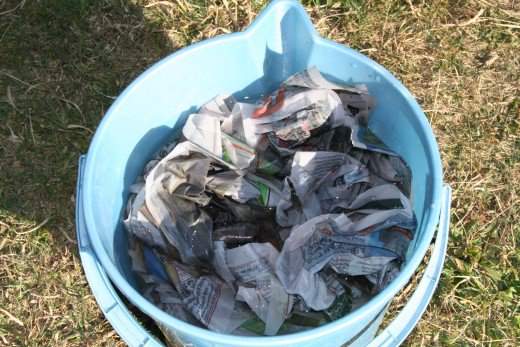
When you have enough scrunched pages to fill a bucket, pile them in and cover them with water. Or start with half a bucket of water and then fill it with the paper balls. I find it easier to add all the paper at the same time so each sheet has a similar amount of time getting wet.
If you leave the paper in for too long, it gets really soggy and starts to fall apart. You are making newspaper logs, not papier mache so you don’t need to make paper mush. Newspaper for paper bricks made my way will be wet enough in less than one minute submerged in water.
Give the paper balls a quick dunking in the water. Don’t soak them. In and out. Yes, that quickly!
In summer I use cold water. In cooler months when I have a big pot of water bubbling on top of my wood-burning stove, I add some hot water to make the mix warm.
I’m not convinced warm water makes that much difference in the construction of the paper bricks, but it certainly helps when I have to put my hands into the water and retrieve the paper on a cold day. 🙂
Step 2: Put Paper In A Bucket & Cover With Water
Paper Brick Making Technique
There will be a certain amount of trial and error as you first begin making your paper bricks. I was surprised when I first began developing this idea by the amount of paper required to adequately fill the frame.
If you don’t pack enough paper into your log-maker, you won’t be able to get the level of compression needed to expel as much water as possible. Therefore your brick will take longer to air dry.
If you put too much paper in, you’ll struggle to compact it properly – and risk breaking your brick maker.
Take your time to perfect your technique. If you pay attention to what works and what doesn’t, you can avoid future mistakes and have a surprisingly easy time making many, many paper bricks from recycled newspapers.
Warning When Making Your Paper Bricks
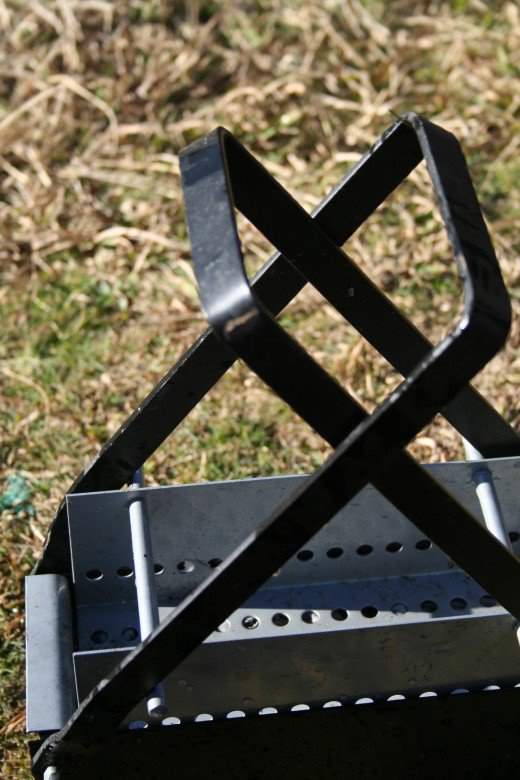
The first thing most people will warn you about when making paper bricks with this type of brick maker is the danger of crushing your fingers. It is easy to avoid finger damage if you use only one hand at a time as you cross the handles into their resting position and determine which way is the ‘right’ way to position them.
If you look where the handles join the base, you’ll see one handle is bent outwards – that is your outer handle and is the last one to lift. Once your handles are raised, push hard enough to settle the metal cover and the handles in place.
After that point, you’ll be using your foot – with a strong boot or shoe on it – so your fingers are in no danger.
To my mind, however, the greater warning is to avoid breaking your handles. Pay attention to exactly how the device is designed.
Even in an empty brick maker, the cover will not drop below a certain point. Look at the photos below. Two small extensions from the cover are pressed by the handles to help push the water out. They will never drop further than the top edge of the black base.
If you insist on trying to push them further than their natural completion point, you are going to break something. Guaranteed.
Step 3: How To Press Your Wet Newspaper Into A Brick
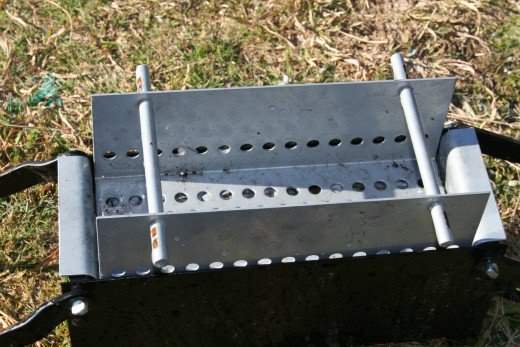
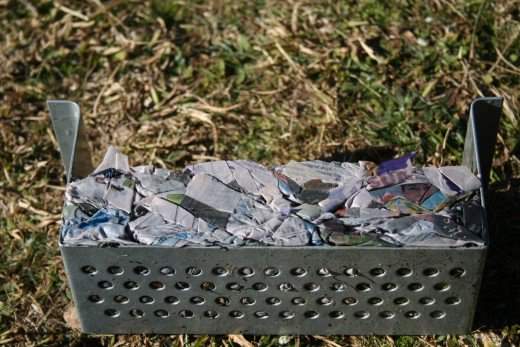
How Paper Bricks Should Look When Pressed
Check out the photo below. See how the paper has been pushed into the shapes of the holes in the cover?
Try getting that effect using your hands. Maybe a 30-year-old weightlifter could achieve it with his bare hands, but it hurts my palms to press hard on a loaded brick maker even when I am wearing gloves – and I have no hope of achieving such a good level of compaction.
Yet this is how my paper bricks look when I put my boot to work. 🙂

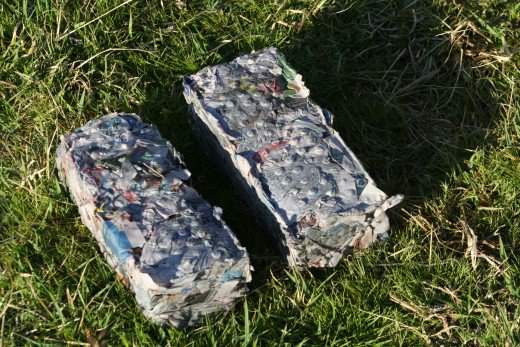
Overlap Paper So New Bricks Look Like This!
The photo above clearly shows how the scrunched pages of newspaper interlock to hold their shape in the finished brick.
Release the edge of any one of those little pieces and you have a ‘wick’ of sorts when it comes time to light the paper brick in your fire.
If your early efforts are not successful, don’t worry. Smaller pieces are also good as fire starters.
When you are packing the wet newspaper pieces into the base, don’t put them in as ‘balls’. Try to make sure they are flattened a little and overlapping each other so when compacted they remain interlocked.
LTM’s Method For Making Newspaper Bricks
|
Process
|
What to do
|
What to avoid
|
|---|---|---|
|
Prepare the paper
|
Scrunch each page individually. Make a dry pile on the ground next to you.
|
Don’t waste time and effort shredding
|
|
Soak the paper
|
Put the scrunched paper into a bucket and cover it with water, or start with half a bucket of water and stuff the paper pieces into it. Less water, same effect.
|
Don’t wait for days, or even hours. You don’t need the paper to fall apart. You just need it to be wet and pliable.
|
|
Pack the brick maker
|
Place the open brickmaker on grassy, flat ground in your garden. Push each little bundle of paper in firmly and flatten it a little so that the other pieces overlap and interlock. They need to be able to ‘grab’ onto each other when the water is pressed out.
|
Don’t stress. Just do it. If your first attempt falls apart, you’ll have little fire starters and more experience to pack the brick maker more effectively next time.
|
|
Place the cover on and prepare to press.
|
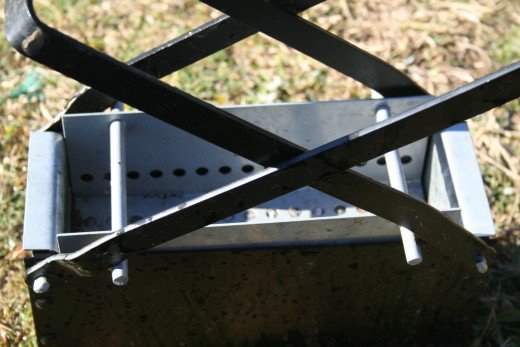
Position the metal plate over the top of the wet paper. It should rest just within the black metal frame. Then using only ONE hand, raise and position the metal cross bars. There’s a right way and a wrong way for the bars to cross. They should rest ‘smoothly’ together. If not, alternate their position.
|
Don’t catch your fingers between the bars. Use one hand, hold the handle, and move each bar individually until you are confident you know how to cross the bars safely..
|
|
Press the water out.
|
Use your FOOT – not your hands. Put on a work boot or strong shoe then position your foot directly over the cross. Gently increase the pressure to squeeze the water from the paper.
|
Don’t jump, bash or break the brick maker. Just step down firmly and evenly where the bars cross. Increase the pressure with your foot, then release it, gently forcing the water out.
|
|
Remove the wet brick
|
Open the cross bars and remove the frame that holds your new brick. There is enough flexibility in the base plate to stretch it out a little as you release the brick. Hold the base plate vertically and release the brick onto its side to rest on a flat surface.
|
If the water is not running freely enough onto the grass below the brick maker, it might pool on the top. Just pour the water off and press with your foot again until the brick has compressed into a firm and solid shape.
|
|
Dry the bricks.
|
You can make these paper bricks at any time during the year, but obviously they will dry faster in summer. I start making mine in summer and stack them in their own ‘wood stack’ under cover when they are dry.
|
Don’t panic if you need to make more during winter. Stack your wet bricks near your fire – with gaps of air circulating between them and they’ll dry within a day or two.
|
|
Burn them!
|
It is easy to release a small amount of paper to act as the ‘lighting point’ on these bricks as you lay them out to dry . When starting a new fire, use a paper brick instead of fire lighters to ignite your wood.
|
Never underestimate the warmth and efficiency of a paper brick made this way. You don’t need to fill a wood-burning stove with paper bricks the way you’d stuff it with sheets of newspaper. Burn one or two bricks at a time with your vent almost closed and you’ll quickly learn how effective they can be. 🙂
|
Use Your Paper Log Maker to Create Bricks Like These
Making Newspaper Bricks In Winter
We are entering spring time here so I let my supply of firewood and paper logs dwindle. I was tricked by a few weeks of warm weather. When another sudden cold and wet period began, I quickly started scrunching newspaper.
No kidding. I made another batch of newspaper bricks yesterday, and I’m burning the first of them tonight. They were quick to make and I used minimal water when I wet them. I stacked the wet bricks on the floor alongside my wood burner stove (with room for air to circulate around them) and placed a couple of the new bricks on top of a baking rack resting on top of the stove while I was in the room to keep an eye on them.
In cold weather like this, we keep the fire burning all day and night. While we were sleeping, the bricks were at a safe but warm distance on the floor. This morning I returned the chosen few to their place on the top of the wood burner stove. Every few hours I turned them over or onto their ends.
Tonight, they are burning brightly in the fire keeping us warm.
If you rely on fire to keep you warm during winter, I encourage you to grab yourself a brick-maker and start generating your own fuel for your fire with newspaper bricks.
Caught in the Cold Without Fire or Heating?
Every winter at least one unlucky soul is caught without heating during a cold spell or freezing blizzard. Either the power goes out unexpectedly, or unforseen circumstances interrupt the fuel supply.
My newspaper bricks dry quickly and effectively, but they obviously need a source of warmth to help them dry.
If you are caught by surprise without any source of fuel for your fireplace, you might need to take emergency measures to keep yourself warm.
This article gives my tips for keeping warm in an emergency when your home is without heat of any kind. It is also helpful in those circumstances when you can’t access your woodpile or your fireplace simply isn’t capable of cranking out enough heat to keep you warm. For instance, in an extreme blizzard.
How Do You Fill Your Wood Pile?
Source : dengarden.com
Learn the lost knowledge of our forefathers. They got things done with no electricity and no modern technology.
Here’s just a glimpse of what you’ll find in The Lost Ways:
From Ruff Simons, an old west history expert and former deputy, you’ll learn the techniques and methods used by the wise sheriffs from the frontiers to defend an entire village despite being outnumbered and outgunned by gangs of robbers and bandits, and how you can use their wisdom to defend your home against looters when you’ll be surrounded.
Native American ERIK BAINBRIDGE – who took part in the reconstruction of the native village of Kule Loklo in California, will show you how Native Americans build the subterranean roundhouse, an underground house that today will serve you as a storm shelter, a perfectly camouflaged hideout, or a bunker. It can easily shelter three to four families, so how will you feel if, when all hell breaks loose, you’ll be able to call all your loved ones and offer them guidance and shelter? Besides that, the subterranean roundhouse makes an awesome root cellar where you can keep all your food and water reserves year-round.
From Shannon Azares you’ll learn how sailors from the XVII century preserved water in their ships for months on end, even years and how you can use this method to preserve clean water for your family cost-free.
Mike Searson – who is a Firearm and Old West history expert – will show you what to do when there is no more ammo to be had, how people who wandered the West managed to hunt eight deer with six bullets, and why their supply of ammo never ran out. Remember the panic buying in the first half of 2013? That was nothing compared to what’s going to precede the collapse.
From Susan Morrow, an ex-science teacher and chemist, you’ll master “The Art of Poultice.” She says, “If you really explore the ingredients from which our forefathers made poultices, you’ll be totally surprised by the similarities with modern medicines.” Well…how would you feel in a crisis to be the only one from the group knowledgeable about this lost skill? When there are no more antibiotics, people will turn to you to save their ill children’s lives.
And believe it or not, this is not all…
Table Of Contents:
Making Your Own Beverages: Beer to Stronger Stuff
Ginger Beer: Making Soda the Old Fashioned Way
How North American Indians and Early Pioneers Made Pemmican
Spycraft: Military Correspondence During The 1700’s to 1900’s
Wild West Guns for SHTF and a Guide to Rolling Your Own Ammo
How Our Forefathers Built Their Sawmills, Grain Mills,and Stamping Mills
How Our Ancestors Made Herbal Poultice to Heal Their Wounds
What Our Ancestors Were Foraging For? or How to Wildcraft Your Table
How Our Ancestors Navigated Without Using a GPS System
How Our Forefathers Made Knives
How Our Forefathers Made Snow shoes for Survival
How North California Native Americans Built Their Semi-subterranean Roundhouses
Our Ancestors’Guide to Root Cellars
Good Old Fashioned Cooking on an Open Flame
Learning from Our Ancestors How to Preserve Water
Learning from Our Ancestors How to Take Care of Our Hygiene When There Isn’t Anything to Buy
How and Why I Prefer to Make Soap with Modern Ingredients
Temporarily Installing a Wood-Burning Stove during Emergencies
Making Traditional and Survival Bark Bread…….
Trapping in Winter for Beaver and Muskrat Just like Our Forefathers Did
How to Make a Smokehouse and Smoke Fish
Survival Lessons From The Donner Party
Get your paperback copy HERE
CHECK OUR survival and prepping solutions
If you found this article useful, please like our Facebook page and stay up to date with the latest articles.
WHAT TO READ NEXT :
HOW TO BUILD AN EARTHSHIP HOUSE ( PROS AND CONS )
HOW TO BUILD AN BULLETPROOF EARTHBAG DOME FOR $300
TOP 20 LOW-COST DIY GARDENING PROJECTS MADE WITH PVC PIPES
HOW TO BUILD A SMOKEHOUSE IN YOUR BACKYARD (WITH PICTURES)
HOW TO MAKE GUNPOWDER THE OLD FASHIONED WAY
HOW TO MAKE A WOOD GAS STOVE FOR YOUR BUG OUT BAG
Works even better if you use 75-90% Horse manure, sheep or goat shit to 10-25% Newspaper.