
 Food storage is one of the first things that people begin to consider when starting their preparedness plans. And this is obviously a smart thing to do, considering the importance of food and the consequences that come from the lack of it. This is particularly important in today’s world where we are so dependent upon others for food and much less self-sufficient than we used to be.
However, a lot of people begin to get overwhelmed when thinking about how to get started and what to do first. They have no game plan and only see it as a mountain of a project. But it really is a simple thing to do, when taking one step at a time.
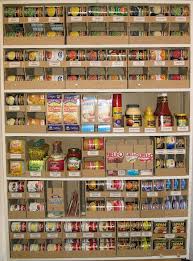
First of all, start with the basic foods that you eat on a daily basis. These would be canned goods, basic staples (sugar, flour, cereal, etc.) and other things you keep stocked in the pantry. Every time you go to the grocery to purchase something you’ll be using that week, buy 2 or more instead of just 1 of that item (remember, we’re talking about pantry goods, not things that need kept in the refrigerator). Doing this will slowly begin to increase the food you have and use. Put the new cans in the back and use the older cans first. This will ensure you are always rotating your food and minimize waste.
With the basic “pantry goods”, you should work on accumulating 90 days worth. This will take a little bit of calculating to figure out. You may want to consider keeping an inventory of what you and your family consume on a daily basis for an entire week. Keep track of the days you eat out and add food to cover meals for those times. During difficult times, you will not be eating out, but will be preparing what is in the pantry. Once you’ve done this, you’ll have a good idea. But it would be wise to increase this number by at least 10%, due to miscalculations. It’s better to store more than to be short. And if you were wise, you’d consider others that may need your help in hard times (elderly parents, grandparents, children who are at college, newlyweds, etc.).
Once you have your 90 day food supply stored (which is probably more than you realize, yet very easy to accumulate), you’ll want to consider the next step… water.
Water is one of those things that is always there, when times are good. But how long can you last without it? If you are like me and live in the Arizona desert, it’s not very long. But what happens if the water supply in the kitchen faucet stops flowing or becomes contaminated? What do you have stored? Consider the following suggestions.
First of all, if your finances allow it, there is a great way to store water and rotate it often. It is called a water cooler. These water coolers accommodate a 5 gallon water jug that fits on the top and provides you with cold, hot and room temperature water, depending on the model of cooler. These can be purchased at many hardware stores, warehouse stores and other locations. You can also rent them for a minimal monthly fee if you’d rather do that. But the storage is in the 5 gallon jugs. These can be purchased at water stores that sell purified water. The cost to fill these up is usually around 25 cents a gallon. So after you’ve purchased the container, you can fill one up for $1.25. Slowly begin to accumulate these containers and find a location to store them. For a while, I was purchasing a new one each time I would go to refill my empty bottles. Soon I had a good collection of them. And they can be stored under a bed (after raising the bed), on the bottom shelf of a pantry (off the floor) or in the basement. Be creative!
For longer term water storage, 55 gallon barrels work great. We found a distributor locally who supplied these barrels used (held soda syrup for Coca-Cola) for around $10 each. We found a couple locations to store these (a couple in the garage, a couple behind the shed, etc) where they were out of the way but accessible when needed. We treated the water with some water treatment and covered them up with 65 gallon industrial garbage bags. It’s a good idea to change the water every year or so, but with the treatment can last longer. This water can be consumed, but is also great for sanitation needs (washing dishes, clothes, body, etc.).
You can also use soda pop bottles, glass bottles, PETE bottles, etc. Do not use milk cartons because they will break down over time.
Then you’ll also want to consider water purification. Things like a Big Berkey, Katadyn water purifiers and purification tablets are good to have. With these, you might be able to find other dirty sources of water and make them clean (parks, canals, lakes, etc). And if you are ever concerned about your own water supply, run it through a purifier just to be safe.
For water storage, you’ll want at least a 2 week supply of water for your entire family, with 3 gallons of water per person, per day. This is a minimum and more is highly recommended. I would personally consider a 2 week supply being very under prepared. But sometimes restrictions keep people from being able to store more (like living in an apartment).
Once you’ve obtained your 90-day supply of normal use food and your water, you’ll want to make sure you have a minimal cash reserve. It is recommended that you have a 90-day reserve of all your expenses so you could continue living and paying your bills if your income was to be cut off. This might include job loss, closure of banks, no access to your money due to computer/electricity failures, etc.
The next thing to do is to begin to accumulate long-term food storage. This is where it begins to feel like an unobtainable task, but is actually easier than most think. It is not accomplished all at once (usually), but a little at a time over a period of months, years, or a lifetime, depending on financial capabilities. One year’s worth of food storage per person is the minimum recommended amount that should be stored, although more would be wise. When the LDS pioneers first settled in Utah, they were commanded to store 7 years of food storage in preparation for hard times. But at least a minimum of 1 year would be wise. Once you’ve got that, you can continue to store according to your needs.
So how much is 1 year of food storage? As I’ve looked at various people’s food storage, I am amazed at what they consider to be a year’s worth of food storage for their family. I’ve seen someone who proudly showed off their one-year’s supply of food storage for their family, who, when told it was only about a month’s worth of food, was very surprised. So unless you’re planning on living on 250 calories a day, you’ll want to know what is a minimum (just to keep you alive, barely).
The following is a minimum recommended amount to store per person, for a 1-year supply:
Grains (400 lbs per person)
Wheat (red and/or white)
Rice
Barley
Oats (regular and/or quick)
Macaroni
Noodles
Cornmeal
Legumes (60 lbs per person)
Beans (black, pinto, kidney, red, white)
Lentils
Peas
Dairy Products (48 lbs per person)
Milk
Cheese
Sugars (60 lbs per person)
Sugar (white, brown, powdered)
Honey
Leavening (6 lbs per person)
Yeast
Baking Powder
Baking Soda
Eggs
Salt (8 lbs per person)
Salt (iodized and/or sea)
Bouillon (beef and/or chicken)
Fats (30 lbs per person)
Butter
Shortening
Cooking oil
As you can see, for a family of 6, this would be a great deal of food. But it still can be done. Growing up, I was used to having boxes of #10 cans of rice, wheat, beans, pasta, etc stored under my bed. We had tables in the family room with a nice table cloth that were simply boxes of food storage with a board on top. Nobody ever new otherwise. But we still had it and there was great comfort in this.
So how do you store all of this? Well, there are many options. You can keep them in PET(E) containers, food-grade buckets, #10 cans, mylar bags, etc. Personally, I use all of these methods, depending on the food I’m using. Each one has its advantages.
I also use oxygen absorbers, which are extremely inexpensive when purchased through the LDS canneries. They come in packs of 100, but I change them into packs of 5 for easier use. By using a food saver, I pre-make 20 small pouches. Then open the large pack of 100 oxygen packs and quickly put 5 in a pouch and using the food saver, suck the air out and seal it. You must work quickly though to preserve the absorbers. Then, if I’m sealing up some rice in a 5 gallon bucket, I have one packet that I open for this task (1 oxygen packet per gallon of food). This eliminates waste. And if I’m storing in some PET containers, I wait until I have 5 of the 1-gallon containers before I open a packet and use 1 per container.
Food can be purchased at very inexpensive prices from places like Costco, Sam’s Club and other wholesalers and warehouses. 50 lb bags are a fraction of the price (per lb) than smaller bags at the grocery stores. When done slowly with financial wisdom, a great deal of food can be accumulated by buying a 50 lb bag here and there, especially when on sale.
For containers, I have my own personal preferences. I use #10 cans for things I’m probably not going to be using unless it’s an extreme emergency. These I keep in boxes (6 cans per box) and store in places that I’m not going to be seeing very often or needing to move them around in. In other words, I put them away until I move or times are really bad.
I also use 3 gallon, 5 gallon and 6.5 gallon food-grade buckets. Some have mylar bags in them, some don’t. If you want to be really safe, use mylar bags inside the buckets. They are very inexpensive and will definitely add protection to your food. My 3 gallon buckets hold things such as powdered milk and items that go bad faster. I do this so that when I open it up, I have less exposed. I also store things that we don’t use very much in the smaller buckets. The 5 gallon buckets hold most of my storage. And the 6.5 gallon buckets hold items that we have the most of and use the most of (rice, wheat, etc).
Along with the buckets, we have a few that have Gamma lids on them. These are lids that can screw off and on, giving you access to the contents inside while still offering protection against bugs, rats, etc. We keep a 5 gallon bucket for each of the main staple items (rice, flour, sugar, wheat, etc) so that as we use it, we can refill it easily. It is also good to have so that when the time comes that you are using your long-term food storage, you can pour the contents from your cans or other buckets into the bucket with a screw top for easy access. I also keep my MRE’s in a bucket with a Gamma lid
The PET containers (or PETE, depending on how they label them) are great for keeping in the pantry. We’ll store many items in these containers, which are clear and allow you to see their contents. We also use these containers for pastas, cereal, chocolate chips, pretzels, and everything else you can think of in the pantry. They keep things fresh, keep the bugs out and keep things organized. But they usually start out storing sugar, flour, rice, etc. Then as we use the contents from our storage, we wash them and use them for other items. If used properly, they can store food just as long as the #10 cans.
As food is stored in these various containers, keep a notebook of the items. Put a sticker/label on them stating the date, weight, contents and expiration date (many things last over 30 years). Keep a notebook log with this information so you know what you have, what you need and where you are in your long-term food storage plans. This helps you to better organize your purchases and gives you great confidence in what you have stored.
It is also a good idea to use these items in your meals. Obtain some food storage cook books and try some of the recipes out. You’ll find that many things taste great and will become a favorite of your family. And things like wheat will need slow introduction to your digestive system if you’re not used to eating it. Sudden diet changes to wheat products will twist your insides and have your feet go numb while sitting in a place you’d rather not spend too much time in. 😉
This information should give you a little to think about. Getting prepared with food storage is just like anything else you do. It starts out with a basic plan, followed by small steps, which over time result in big accomplishments. So don’t feel overwhelmed. Just start doing something. And before you know it, you’ll have accomplished great things.