
Shelter: An essential element of survival – along with clothing, food, and water, of course. When we think of shelter, usually the first thing that pops into our minds are our homes, apartments, condo’s, and houses. In an emergency or rescue scenario, shelter may not be such a warm and comfortable place.
Being exposed in the wilderness can leave us open to all sorts of harmful elements, from extreme heat and cold to wind, rain, and snow. Exposure can quickly turn the odds against you when it comes to injuries, illness, wild animals and other dangers. You should always know how to construct a survival shelter out of materials found in nature. This can really save your behind if an emergency were ever to occur that left you stranded with no tent or existing structures for shelter. Whether you get lost in the woods while hiking or stranded in the mountains during a skiing trip, who knows exactly when, where, or why you might need to build a impromptu survival shelter. With the crazy stuff happening in the world all around us on a daily basis, it couldn’t hurt to have mental blueprints – just in case.
Here are 5 quick and crude emergency shelters for wilderness survival:
1. Lean-To
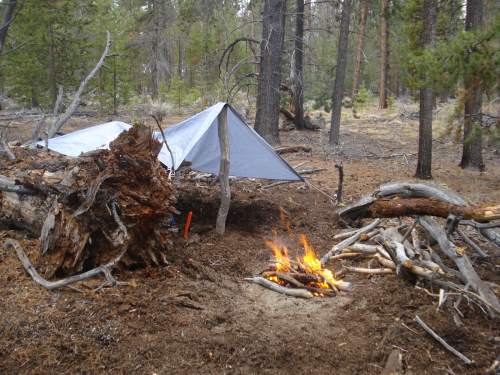
 This is one of the most popular types of shelters for any survival situation. It’s best to look for an area without any heavy branches above, just in case something may fall on your lean-to in the middle of the night. However, if there is a natural ‘wall’ nearby, you may want to use it to your advantage. For example, a tree that has fallen over baring its roots may be useful as a shelter wall against weather or to direct heat from a fire into the lean-to opening.
Nearby vines can be used as rope, if you don’t have any cordage with you. The first step would be to build the support beam. The easiest way is
Lean-to with tarp, Photo by Martin Staviař
to simply find two trees about 10 feet apart from one another and mount a thick branch or limb between them. This will need to hold a fair amount of weight, such as water if it’s raining or snow if it’s snowing. Keep this in mind and test the weight of your design often. Next, you prop branches and wood up at an angle and tie them to the support to act as the main wall. You’ll want to be able to sit or lie down, so try to keep your lean-to branches at about a 45 degree angle. If the weather is severe, you may want to use a steeper angle to keep leaking to a minimum (the closer the better to keep debris from slipping through your branches).
Shovel any nearby debris into a pile on top of your lean-to. Add layers of leaves, pine needles and any other form of insulation you can forage. Throw on an additional layer of sticks, twigs, and finally bark to keep your insulation from blowing away and to somewhat waterproof the shelter.
You can use several different types of materials to construct a more efficient lean-to, such as a tarp, poncho, or mylar emergency blankets. If you have any materials that can waterproof your wall (tarps, plastic sheeting, ponchos, trash bags, etc.) use them. If you repeat this process to the left and right sides of your shelter it will help keep the weather out even more. The lean-to shelter is very open, so it can be great in warm, sunny areas with very little inclement weather as it offers a shade from the sun and basic protection from the elements. However, not ideal if you expect severe weather, a colder environment, or camping out in the unknown where you don’t know what (or who) is watching.
2. Debris Hut
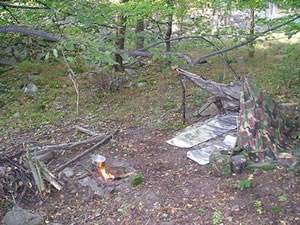
Debris Hut, Photo by JustTooLazy
 This wedge shaped survival shelter is fairly easy to construct, especially if you are in a wooded area and debris is easily accessible. First you will need to gather a LOT of natural debris. Think leaves, long grass, and pine needles. You should be able to find plenty of the following, even under thinner layers of snow
Next, look for a large pole-like log which is about twice your own height for use as a ridge-pole. The straighter the ridge-pole, the better your shelter will turn out. From here, you will want to locate two nearby “Y” shaped branches and prop the pole up with them so your ridge-pole sits at about your pelvic level. You could also us a tree stump or anything else capable of supporting one end of the ridge-pole at the appropriate height. Your ridge-pole should be about the size of your wrist or larger. You don’t want breakable pieces that are rotting and cracking. You want something sturdy that will support the various materials used for insulation. You may want to lie down under your structure to make certain it’s long enough for you to fit without knocking the whole thing over.
Next, search for sticks and limbs which are at least two fingers thick (or again as thick as your wrist). Imagining your “rib bones”, position sticks along the length of your ridge-pole about 6″ apart. After this step has been completed you should begin collecting smaller sticks and dead branches that still have leaves. Line your debris hut survival shelter with them for added protection against the wind and weather. Finish by adding a layer of leaves, grass, and any other debris you can wrangle up. Pile it on thick. Finally, add some large pieces of bark on top of everything. This can somewhat protect your shelter against the rain or snow and help keep the “debris” in place.
When you are ready to retire for the evening, simply climb inside and stomp down any poky branches. Use any soft leftover debris for a bedding area. This structure is great for camouflage and blending in with your natural environment. Also provides full-body protection from most elements, and pretty effective at warding off unwanted guests such as racoons.
3. A-Frame
A-Frame Shelter, Photo by Mitch Barrie
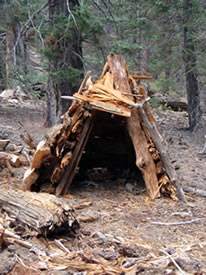 If you aren’t a fan of the lean-to, the A-frame (also known as a double lean-to) may also give you trouble since it’s basically the same structure with an additional wall. You will need to find a straight branch about 10′ long as a means of support. I would suggest using two poles propped up against and tied to the main backbone branch on each side as support. Vines or animal sinew can also be used as a natural cordage.
Use the main backbone branch to hold the support limbs together at the top of your frame (like an A). Tie all 3 together at the point where they meet. This will be the framework for your walls. Again, gather smaller sticks/wood to create the walls and debris to “mud” each side of your shelter. That’s it. The result is somewhat of a cross between the debris hut and lean-to. The debris hut is smaller and forces you to sit much closer to the ground.
Unlike the lean-to, an A-frame shelter can be built to be self-supported by its two walls if you have enough cordage to tie together the majority of your wood or can gather enough “forked” wood pieces so the walls can interlock. A normal lean-to requires some sort of support structure to be either built or suspended between two trees.
4. Quinzee Snow Hut
Photo by U.S. Army Alaska
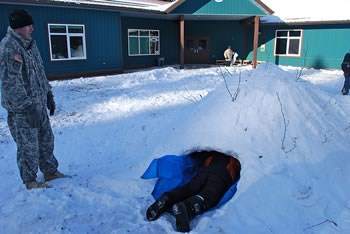 If you find yourself in a situation where you are surrounded by large amounts of snow in temperatures below freezing and have no where to go, consider building yourself a quinzee. This type of shelter requires a bit more time and manual labor than the previous examples. That’s to be expected as it will need to stand up to cold temperatures, wind, and snow. A simple debris structure would collapse under the weight of heavy snowfall. You will probably need to build an alternative form of shelter for the first night, as you must let your snow-hut sit awhile before completion. Try one of the above methods while you are waiting – you still need a place for warmth in the mean time.
To construct a Quinzee, you must first case out a large, open area with plenty of snow. Consider how many people will need to fit inside before you begin. When you’ve got a number in mind, begin digging and packing together a snow pile as high and wide as you feel necessary. Not too high though. That will just create unnecessary work, the last thing you need in such an extreme environment. It should be just large enough to fit you and any tools or resources you happen to have. Next, let your snow mound “sit” over night. This is VERY IMPORTANT for structural sturdiness. Once a few hours have passed begin digging a hole in the middle of your mound, at the very bottom.
Once you’ve been digging for a while, you will be able to climb inside of your mound to complete the process (think igloo). Try to leave the structure a consistent thickness of about 24″. Be sure to add a small ventilation hole in your structure for air to circulate. For this next step you need a small source of heat inside the Quinzee. You can either start a very small fire or use lanterns if you have them. Once your heat source has been going for about 2-3 hours, shut it off. The snow walls will have partially melted and this moisture will refreeze into one solid structure. This process can allow your Quinzee to last an entire season if needed (assuming temps stay at or below freezing). You will want some form of insulation (like hay) to line the floor to prevent having direct contact. It can quickly become icy and dangerous to sit or sleep on.
5. Round Lodge
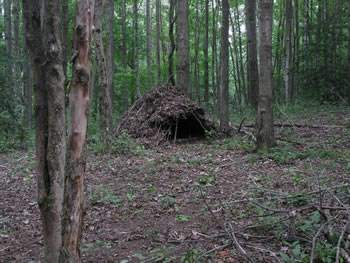
Round Lodge/Wigwam, Photo by Mark Kent
 I consider this type of shelter a hybrid between the tipi, wigwam and debris hut. A round lodge provides excellent protection from the weather; including cold, rain, wind, snow, and sun.
It is built by slanting a large number (dozen or so) of tall poles together in a circular fashion and fastening them together at the top where they all meet using grass, vines, or sinew. The walls can then be thatched with grass, hay, or other suitable materials at hand. Shaped like a funnel, the round lodge is much larger in diameter at the base and gradually narrows toward the top.
Built in a tipi-like manner, this survival structure will typically have a “smoke hole” at the top of the roof for ventilation. Due to their large size and vent hole at the top, a round lodge shelter is ideal for accommodating small fires for heat, light, and protection from wild animals.
Find out more about skills that will save your life in the wild on Conquering the Coming Collapse.
Source: kukriblades.com
4 Replies to “5 Quick and Crude Emergency Shelters for Wilderness Survival”