
There is something that everyone who has taken any kind of survival training has had drummed into his or her head, it’s called the Rule of Threes. A person can survive for:
- Three minutes without air
- Three hours without shelter
- Three days without water
- Three weeks without food
The idea behind the Rule of Threes is a simple one: so you know your priorities in any emergency situation. In the food obsessed modern society we live in, untrained people who find themselves for the first time in an emergency situation, often spend their time running around exhausting themselves finding sources of food, and suddenly its nightfall, cold, raining, or snowing, and they are dead by morning without proper shelter.
Rule 1 – Shelter
In any given survival situation, whether you are lost, stranded, have had to evacuate, or your residence has become unlivable due to a natural disaster, SHELTER is your primary concern. Do not exhaust your energy, looking for food or sources of water, before you have found or built a way for you to survive the elements – or whatever or WHOever else is out there meaning to cause you harm!
“Shelter” in terms of Emergency Management, Preparedness and Survival is a very broad term. As far as natural disasters go, shelter could merely mean grabbing your Go-Bag, and finding a safe haven outside of a disaster zone with a friend, relative, or even within a designated Red Cross or other municipal group shelter. It could also mean taking “shelter” inside of your home, and defending it.
Wherever you decide to hole up, even if that means going to a mass care shelter, you should always plan on taking your Go Bag with you, so you are sure you have the supplies you need. Going to a mass shelter can mean living with a lot of people in a confined space, which can be difficult and unpleasant at best, dangerous at worst. You are going to want your stuff with you to make it more tolerable, defend yourself if you have to, and make it easier to Bug Out from there — if the situation warrants it. Remember if you go to designated Red Cross or FEMA shelter, you will not be permitted to take weapons with you – which in my opinion is reason enough to avoid such places.
Beyond the context of a natural disaster, shelter can also mean the only thing that separates you from the elements in a survival situation, such as being lost or stranded as the result of an incident while traveling on land, sea or air. But, there could also be a natural or man-made disaster, where the destruction is so devastating and complete that you may also need to find, or build a shelter just to survive.
According to the US Army Survival Guide, when you are in a survival situation start looking for shelter as soon as possible. As you do so, remember what you will need at the site. It must contain material to make the type of shelter you need, and it must be large enough and level enough for you to lie down comfortably.
A shelter can protect you from the sun, insects, wind, rain, snow, hot or cold temperatures and predators. It can give you a feeling of well-being. It can help you maintain your will to survive.

Sources of Natural Shelter
Before you expend a lot of time and energy scrounging up materials, and trying to build a shelter, do not overlook natural formations that can provide shelter.
Examples are:
- Caves
- Rocky crevices
- Clumps of bushes
- Small depressions
- Large rocks on leeward sides of hills
- Large trees with low-hanging limbs
- Fallen trees with thick branches
However, when you are looking for a natural shelter, always keep in mind:
- Stay away from low ground such as ravines, narrow valleys, or creek beds.
Low areas collect the heavy cold air at night and are colder than the surrounding high ground. Thick, brushy, low ground also harbors more insects, and can collect rainwater and run-off.
- Check for poisonous snakes, ticks, mites, scorpions, and stinging ants.
- You also need to look for loose rocks, dead limbs, coconuts, or other natural growth that could fall on your shelter.
Whether you are looking for a ready-made natural shelter, or plan on building a shelter – – remember SIZE DOES MATTER. And in this case, you need to forget about spaciousness and the comforts of home. A very common mistake is to make your shelter too big. Any survival shelter needs to be large enough to protect you.
But it also must be small enough to contain your body heat, especially in cold climates – and to be inconspicuous, if your shelter is intended to shield you from the elements, as well as curious and potentially dangerous creatures of both the four-legged, and two-legged variety.
Building Shelter
If you cannot find a natural shelter, then you will have to build one. The key to making a shelter is to build the kind of structure that will give you the most protection in the kind of environment you are in, while expending the least amount of energy to do so. Before attempting to build any kind of shelter, the US Army Survival Manual asks you to ask yourself:
- How much time and effort will you need to build the shelter?
- Will the shelter adequately protect you from the elements (sun, wind, rain, snow)?
- Do you have the tools to build it? If not, can you make improvised tools?
- Do you have the type and amount of materials needed to build it?
The answers to these questions will be driven by what you have with you. If you have put together a Bug Out Bag as described then you will have no trouble building any of the following shelters, to keep yourself and your family safe.
A natural lean-to is one of the simplest, and yet sturdiest shelters you can build. All you need to build this shelter is the material you can find, and your knife.
Basic Lean-to
You will need two trees, or upright poles, just as in the poncho lean-to. They should be about 7 feet (2 meters) apart; one pole about 7 feet long and 1 inch (2.5 centimeters) in diameter; five to eight poles about 10 feet (3 meters) long and 1 inch in diameter for beams; cord or vines for securing the horizontal support to the trees; and other poles, saplings, or vines to crisscross the beams.
- Tie the 7-foot pole to the two trees at waist to chest height. This is the horizontal support.
- Take your 5- 8 beams and lean them at about a 45-degree angle from the horizontal pole to the ground. Lash them to the pole with cord or vines. The nylon utility cord that should be in your Go Bag is ideal for this purpose. As with all lean-to type shelters, be sure to place the lean-to’s backside into the wind.
- Make a lattice by crisscrossing saplings or vines on and laced through the beams.
- Cover the framework with brush, leaves, pine needles, or grass, starting at the bottom and working your way up like shingling.
- Place straw, leaves, pine needles, or grass inside the shelter for bedding. In colder environments, you can increase your lean-to’s comfort and warmth by building a fire reflector wall. Drive four 5-foot long stakes into the ground in a rectangle pattern to support the wall.
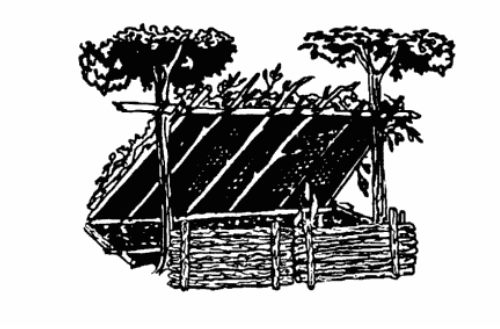
Stack green logs on top of one another between the support stakes. Form two rows of stacked logs to create an inner space within the wall that you can fill with dirt. This action not only strengthens the wall but also makes it more heat reflective. Bind the top of the support stakes so that the green logs and dirt will stay in place.
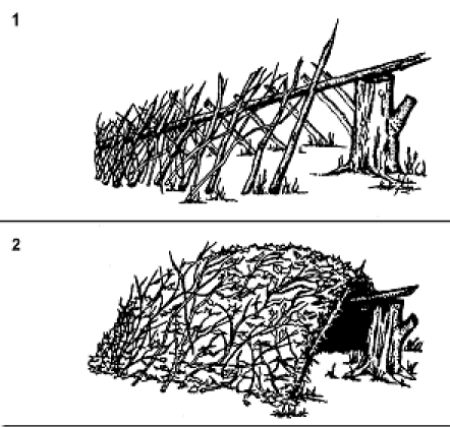
Debris Hut
Next to a Lean-to, probably the simplest shelter you can make from natural materials is a Debris Hut.
To make a debris hut:
- Make a tripod using two short stakes and a long pole – or by placing one end of a long pole on top of a sturdy base, like a boulder or tree stump. The long pole will become the ridgepole running the length of the shelter.
- Secure the ridgepole by lashing with cord to the stakes, or by otherwise anchoring it to the base.
- Prop large sticks along both sides of the ridgepole to create a triangularshaped ribbing effect. Ensure the ribbing is wide enough to accommodate
your body and steep enough to shed moisture.
- Place finer sticks and brush crosswise on the ribbing. These form a
latticework that will keep the insulating material (grass, pine needles, leaves) from falling through the ribbing into the sleeping area
- Add light, dry, soft debris over the ribbing until the insulating material is at least 3 feet thick—the thicker the better.
- Place a 1-foot layer of insulating material inside the shelter.
- At the entrance, pile insulating material that you can drag to you once inside the shelter to close the entrance or build a door.
- As a final step in constructing this shelter, add shingling material or branches on top of the debris layer to prevent the insulating material from blowing away in a storm.
Shelter Tips and Takeaways
Staying Warm
Whether you are in a natural shelter, or something you have built, depending on the time of the year, and geographic location where you have had to shelter– staying warm and maintaining your proper body temperature, could be a major survival issue.
Your best bet to stay warm is being able to start and maintain a fire. A fire provides warmth, heat, light, can help you to be seen, (if that is one of your survival goals) and raises your spirits.
I can get into details on how to use a fire plow or bow and drill to start a fire without matches. It can be done, but it’s not easy. None of the “primitive” fire starting methods are, they take a lot of practice, you should learn them. Here is a great article on primitive fire starting methods. Go out in your backyard and practice the method that seems easiest for you. I suggest the fire plow.
But the point is if you carry redundant sources of “modern” fire starters in your Bug Out Bag, you won’t have to. I can and have used the primitive methods, but it’s a hell of a lot easier with a Zippo! That’s why in your kit you should have waterproof matches, a mercury flint fire strike, windproof lighter (I don’t smoke, but I carry one of these in my pocket everywhere I go) and a few disposable Bics, just for good measure!
Light
For the most part, light is a useful thing to help you see and work through the night. Light provides comfort, and gives you the ability to signal for help.
However, keep one thing in mind when using your lights in a survival situation. Light can be your best friend or your worse enemy. If you are forced to shelter in a high-risk area, or area of turmoil or conflict, light can also attract unwanted attention. You can use your light but minimize the risk of exposure by:
- Using your poncho, jacket, or tarp to cover the light if you are using it to read a map or to provide light for other survival activities at night.
- Some flashlights have a red light, or red filters to give the output a softer light that does not attract as much attention, and also will help you to preserve your night vision.
Rule 2 – Water
Once you have secured your shelter, without a doubt water is an essential element in any survival situation. Water is an item that no emergency supply kit should ever be without.
Water Sources: Safe and Unsafe Water
Remember for as part of your home emergency preparedness you should have stored one gallon of water per day, per person for drinking and sanitation.
If you are sheltering-in- place, and run short, there are several sources of safe drinking water in and around you home, and some you need to avoid.
Safe Water Sources
- Melted ice cubes
- Water drained from the water heater (if the water heater has not been damaged)
DO NOT CONFUSE THE WATER HEATER, WITH YOUR FURNACE
OR HOME HEATING SYSTEM
- Liquids from canned goods such as fruit or vegetable juices
- Water drained from pipes
Unsafe Water Sources
- Radiators
- Hot water boilers/furnace (home heating system)
- Water Beds (fungicides added to the water or chemicals in the vinyl may make water unsafe to use)
- Water from the toilet bowl or flush tank
- Swimming pools and spas (chemicals used to kill germs are too concentrated for safe drinking but can be used for personal hygiene, cleaning, and related uses)
Other Sources of Water in Urban Environments
In a later section I will give you the survival tips I have learned about how to find sources of water “in the wild.” But what if you have not “bugged out” to the great outdoors? If you have stayed in the city, here are some “urban” alternative sources of water you need to be aware of.
Even the most urban of cities will have a park with a lake or some other body of water. In an emergency, you can use this water, but be sure to purify it as described in the next section. Even in cities your best source of water is accumulated rainwater. You can find it in anything that could hold it, but again be sure to purify it as follows. If you live in an apartment building, get a couple of those plastic “kiddie pools” and keep them in a closet. In the event of a disaster, throw them up on the roof for this purpose.
Water Treatment
Even water from the safe sources as identified above should be treated before you use it. Contaminated water can contain germs that cause diseases such as dysentery, cholera, typhoid, and hepatitis. There are basically three water treatment methods, Boiling, Chlorination, and Distillation. None is perfect. Often the best solution is a combination of methods. You should have the necessary supplies to do at least one, if not all of them as part of your Home Emergency Preparedness Kit and or Bug Out Bag.
Boiling
Boiling is the safest and simplest method of treating water. In a large pot or kettle, bring water to a rolling boil for 1 full minute, keeping in mind that some water will evaporate. Let the water cool before drinking.
Chlorination
You can use household liquid bleach to kill microorganisms. Use only regular household liquid bleach that contains 5.25 to 6.0 percent sodium hypochlorite. Do not use scented bleaches, color safe bleaches, or bleaches with added cleaners. Because the potency of bleach diminishes with time, use bleach from a newly opened or unopened bottle. Add 16 drops (1/8 teaspoon) of bleach per gallon of water, stir, and let stand for 30 minutes. The water should have a slight bleach odor. If it doesn’t, then repeat the dosage and let stand another 15 minutes. If it still does not smell of chlorine, discard it and find another source of water.Here is a great article on how to purify water with chlorine.
Distillation
While the two methods described above will kill most microorganisms in water, distillation will remove germs that resist these methods, as well as heavy metals, salts, and most other chemicals. Distillation involves boiling water and then collecting only the vapor that condenses. The condensed vapor will not include salt or most other impurities. To distill, fill a pot halfway with water. Turn the lid of the pot upside down. Tie a cup to the handle on the pot’s lid so that the cup will hang right-side-up. Make sure when you place the lid onto the pot, it dangles above, and not into the water. Boil the water for 20 minutes. The water that drips from the lid into the cup is distilled. Here is a great article with the detailed process of distillation.
You may find yourself in a situation where you need to be able to find natural and other alternative sources of water to survive.
Here are some things you need to know about water, and where and how to find it.
- Water can usually be found in low laying vegetated areas.
- Water can usually be found at the base of mountains & cliffs trapped in between rocks.
- Water can usually be found in the deserts wherever you see anything green – that means there is a source of water below it.
One of easiest and simplest techniques to accumulate water is to gather rainwater, so do not forget to spread out your tarp, or poncho to do so. But even in the absence of any rain, here are three simple methods to obtain water.
You will need:
- Plastic bags.
- Empty water bottles.
- A couple of bandanas or handkerchiefs.
You are in the woods. There is no obvious source of water like a stream or anything around, but you know somehow the trees are getting water. Here is how to make them share it with you. Tie a clear plastic bag over and around a very leafy green branch. Make sure the bag is tightly sealed and you will be able to produce water through condensation.
Now here is where the empty plastic bottles come in. Take a green leafy branch and place it inside the bottle and seal it tightly. Place it in the sun if possible. By the end of a hot sunny day it should yield about 1/3 cup of water through condensation. Of course, the more bags or bottles you use, the more water you’ll be able to produce.
Last but not least, the hankies or bandanas. Just before dawn, or sometimes very late at night -if you tie a couple of bandanas around your ankles and shuffle around through some tall grass…you’ll be able to soak up a lot of wetness. Then just wring them out into something, its pretty makeshift, but effective!
You do not have to be lost in the wilderness to use the above techniques; you can also do them in your own backyard, or with any trees or grassy fields in your neighborhood.
Here is a great article on water purification.
Water Tips and Takeaways
- DO NOT: Drink carbonated beverages instead of drinking water. Carbonated beverages do not meet drinking-water requirements.
- DO NOT: Drink caffeinated drinks or alcohol, these dehydrate the body, which increases the need for drinking water.
- Bees or ants going into a hole in a tree may point to a water-filled hole.
Siphon the water with plastic tubing or scoop it up with an improvised dipper. You can also stuff cloth in the hole to absorb the water and then wring it from the cloth.
- In arid areas, bird droppings around a crack in the rocks may indicate water in or near the crack.
- Green bamboo thickets are an excellent source of fresh water. Water from green bamboo is clear and odorless. To get the water, bend a green bamboo stalk, tie it down, and cut off the top. The water will drip freely during the night. Old, cracked bamboo may also contain water.
- Wherever you find banana trees, plantain trees, or sugarcane, you can get water. Cut down the tree, leaving about a 12-inch stump, and scoop out the center of the stump so that the hollow is bowl-shaped. Water from the roots will immediately start to fill the hollow. The first three fillings of water will be bitter, but succeeding fillings will be palatable. The stump will supply water for up to 4 days. Be sure to cover it to keep out insects.
- Some tropical vines can give you water. Cut a notch in the vine as high as you can reach, then cut the vine off close to the ground. Catch the dropping liquid in a container or in your mouth.
RULE 3 – FOOD
Contrary to popular belief food is lowest priority in a survival situation. How many calories you need to consume on a daily basis varies greatly, from person to person – but between 1500 – 2000 per day is a safe target for anyone. And most people can, and many people do, live on far less then that everyday, either by choice or necessity. You might whine between lunch and diner that “I’m starving”– but the truth is, anyone can go for a pretty long time without food, but that’s not to say that you shouldn’t be prepared.
Your Emergency Stockpile
How much food you should store depends on a lot of things. FEMA, The Red Cross and other Disaster Preparedness agencies all say at least three days. But that really is a bare minimum, and in fact, not something you need to really prepare. On any given day, you probably have enough food in your house to last 2 – 3 days. Storing food in terms of preparedness should start with at least a 1– 2 week supply, and gradually expand. The Special Air Services Survival Handbook recommends you have a store of non-perishable foods that could last for a year!
You should need to consider the following things when putting together your emergency food supplies:
- Try to stick with the foods you are comfortable with, and that your family eats regularly. This will not only ensure that they are eaten, but will help maintain a sense of normalcy.
- Remember to be prepared for any special dietary needs.
- Try to avoid salty, spicy, and other foods that will make you thirsty.
- Choose salt-free crackers, whole grain cereals, and canned foods with high liquid content.
Following a disaster, there may be power outages that could last for several days.
Stock canned foods, dry mixes and other staples that do not require refrigeration, cooking, water or special preparation. Be sure to include a manual can opener and eating utensils.
There are many “emergency” foods such as Military MREs and other specially prepared or freeze- dried foods that have an extended shelf life well beyond that of the ordinary foods. I highly recommend that you include some of these MREs as part of your survival food stores, not only because of the extended shelf life, but because they are easily portable if you should have to bug out.
These specially prepared MREs and backpacking meals can have a storage life of five to seven years, and today are a lot tastier, and more nutritious then the early military “K-rations” I had to deal with back in the day. There a number of commercially available MREs, but most are still manufactured according to military specifications including the requirement that each meal supplies 1,200 calories. MREs are lightweight, easy to pack and easy to eat — heating is recommended but not required. For times when you will have no alternative heat source, you should consider the MREs such as the troops actually use that come with portable chemical heaters. You can get these at any Army-Navy store, or anywhere that sells military surplus and supplies.
Less well known than MREs, are survival food bars. These are specially formulated shortbread blocks produced under U.S. Coast Guard guideline specifically for use as emergency life raft and ship rations. They are non-thirst provoking and highly stable in extreme temperatures. They come in 2400 or 3600 calorie sealed packages, but each unit is subpackaged for easier rationing. Most brands have a standard shelf life of five years. Another is “Soldier Fuel.” Formerly known as the Navy Seal’s HOOAH! Bar, it’s been engineered to provide a steady energy boost during sustained field operations.
Preparing Meals Without Power
Power outages are very common with most natural disasters. Believe it or not, there are plenty of ways to cook without a microwave!
- For emergency cooking indoors, you can use a fireplace.
- You can keep cooked food hot by using candle warmers, chafing dishes, and fondue pots. Use only approved devices for warming food.
- Canned food can be eaten right out of the can. If you heat it in the can, be sure to open the can and remove the label before heating.
NEVER COOK ON A CHARCOAL BBQ GRILL INDOORS BECAUSE OF THE RISK OF CARBON MONOXIDE POISONING.

Stay safe,
James
If you found this article useful, please like our Facebook page and stay up to date with the latest articles.
OTHER USEFUL RESOURCES!
Mega Drought USA:(Discover The Amazing Device That Turns Air Into Water)-DIY
Survive The End Days (Biggest Cover Up Of Our President)
Survival MD (Best Post SHTF Medical Survival Guide Ever)
Blackout USA (EMP survival and preparedness guide)
Bullet Proof Home (A Prepper’s Guide in Safeguarding a Home )
Backyard Innovator (All Year Round Source Of Fresh Meat,Vegetables And Clean Drinking Water)-DIY
Conquering the coming collapse (Financial advice and preparedness )
Liberty Generator (Easy DIY to build your own off-grid free energy device)
Backyard Liberty (Easy and cheap DIY Aquaponic system to grow your organic and living food bank)
Family Self Defense (Best Self Defense Strategies For You And Your Family)
Sold Out After Crisis (Best 37 Items To Hoard For A Long Term Crisis)
Awesome article