
This article first appeared on no-dig-vegetablegarden.com
Limited space? No soil? Toxic or rocky ground?
Spare corner? Edge of drive or yard? Here’s bales of advice for you on the straw bale gardening way.

TIP: Kids just LOVE to climb on these irresistible messy playthings, so if it’s feasible, get an extra 1 or 3 bales and put them out of the garden just for fun.
A note about water. . .
Don’t do straw bale gardening because it sounds like fun. It’s not meant to be a gimmicky way to grow plants; it’s a means to use if circumstances make it difficult to grow plants in soil.
It may be that your straw bale garden the first season will be the beginnings of a new garden the following season… then you can build up your growing levels with compost, soil or lasagna layers later.
Unless you have plenty of natural rainfall, handy waste water, or you recycle or pump the runoff from watering your bales, then straw bale gardening is NOT water wise.
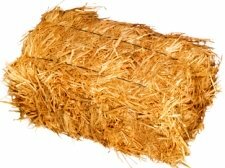
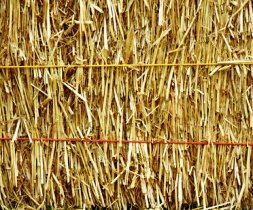
Straw or hay bale gardening is not to be confused with using loose straw in your garden for mulch or compost. What we’re talking about here is the whole bale, as it stands, tied with twine and used for planting plants on the top. For how to use loose straw, see No Dig Materials
Especially good for those with dicky backs, straw bale gardening needs only someone to lug the jolly bales into place and with a minimum of effort you’ll have a marvel of bounty and beauty indeed.
We can learn from others here. There are timely tips on straw bale gardening that will save you angst. Here’s the hoedown:
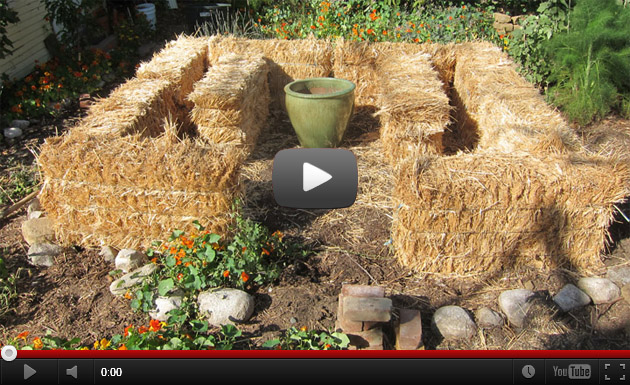
The bale is the garden. Put it on your balcony or path if you want to.
Use one or umpteen bales as you need and in any pattern. Because straw bale gardening is raised, it’s easy to work with, so make sure you allow for handy access.
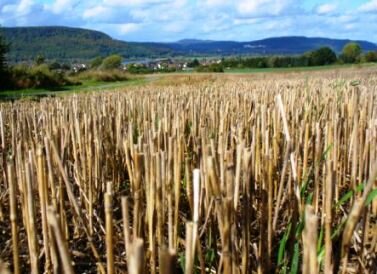
Which straw to use for straw bale gardening?
The best straw bales for a garden are wheat, oats, rye or barley straw. These consist of stalks left from harvesting grain; they have been through a combine harvester and had the seeds threshed from them, leaving none or very few left.
Hay bales for gardening are less popular as they have the whole stalk and seed heads with mucho seeds. They also often have other weeds and grass seeds to cause trouble. Use what you can get locally — it may even be lucerne, pea straw, vetch or alfalfa bales.
Corn and linseed (flax) bales are not so good as they are very coarse, and linseed straw takes a long time to decompose due to the oil residue left on the stalks.
It’s simple to pull out the odd wayward grain seeds with straw bale gardening, but hay bales have tendency to grow the likes of a small lawn! Thus you may need to occasionally give them a haircut rather than try and pull the tenacious new sprouts out.
Hay bale gardening has one up on straw in that it is a nice warm and rich environment with enough nitrogen to continually supply growing plants. Straw is mostly carbon and so nitrogen must be added for plant growth (see further below).
Where to buy straw bales for garden?
Most garden supply centers and nurseries sell straw bales. The big nursery centres often have free trailer use to cart your bales home if you have a towbar and if you need more than one bale that won’t go in your car.
Farmers are your next bet if you live in the country.
Also try animal breeding places and stables as they often buy straw bales in bulk for bedding and may sell you the odd one.
With the popularity of straw bale house building, it’s worthwhile asking at builder’s suppliers for bales for your garden.
Local councils, public road or transport control organisations are also worth a try for buying straw bales for gardening, as they sometimes use bales to buffer traffic and divert rubble from drains etc. If they won’t part with one to you, they should be able to give you a supplier’s contact.
How much do straw bales cost?
Straw bales costs vary from country to country, but your cheapest option is usually going to a farm, where you could be lucky at US$1.per bale. Otherwise prices range from US$2 to $15 per bale. Still good value for an instant little garden!
Arranging your strawbale garden
Put each bale in the exact place, because it’s hard to even nudge these monsters once you’ve got your little straw bale garden factory in full swing.
Just like a normal vegetable garden, your straw bale plants need sun, 4-8 hours if possible, depending on your choice of plants. Leafy greens and some herbs need slightly less sun than vines and tomatoes for example.
If you have a sunny rot-proof wall, you can put your bales against it and grow tomatoes, cucumber or similar up the wall.
A very popular idea for hay bales and straw bales is to make a raised garden bed with the bales as the edge. This limits excessive evaporation from both the garden in the middle and one side of the bale.
If you are starting a no-dig garden and don’t have enough filling to begin with before your compost, kitchen scraps, grass clippings, leaves, mulch or whatever you have, are not ready, then a cheap way for the first year is to buy bales and with a little bit of compost on the top, and a few other ingredients mentioned here, you can get your garden going the first year.
Deter those darn diggin’ moles, gophers, rats or whatever thieves populate your area, by first laying down galvanized wire bird netting before laying your bales down.
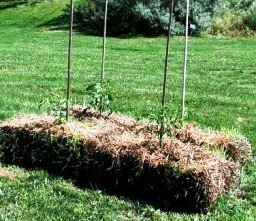
Lay the bales lengthwise to make planting easy by just parting the pads of straw. There are two opinions on which side to lay straw bales…
- Make sure the string is running around each bale and not on the side touching the ground in case it’s degradable twine such as sisal. The straw is now vertical, cut ends up.This means when you water much of it will go straight through the bale and wash away.
- Laying your bale or bales with the twine touching the ground (as long as it’s plastic or wire twine of course), means that the straw stalks are horizontal and water will more likely soak in and not flow through the bale and be wasted.This method of laying down your straw bale lends itself to using a soaker hose better than the vertical way. If using a soaker hose, which are marvelous by the way, lay it under the twine to stay in place. The steady slow drips of water will find it hard to escape through channels, unlike the vertical method whereby the water channels downwards.
Starting your straw bale garden
If you start with aged bales of about 6 months or more, they may already have been through their initial weathering and starting to decompose slightly inside. If they have been wet at all they almost certainly would have lost their cool and done their cooking.
If not and they are still new or in pristine condition, they need to do a bit of stewing before it’s safe to plant in them.
Thoroughly soak with water and add more water so they don’t dry out at all for the next 5 days whilst the temperature rises and cooks them inside. Slowly they will cool over the next 1-2 weeks and then be ready for planting.
You can plant when the bales are still warm which promotes root growth. The bales won’t be composting much inside yet, that takes months, but you don’t want that initial hot cooking of your plants.
Some sneaky people speed up the process of producing microbes and rot by following a 10-day pre-treatment regime of water and ammonium nitrate on the top of each bale. But, hey, organic gardeners are a patient lot aren’t we, so let’s follow nature?
Just so you know, the chemical ammonium nitrate (AN) acts as a catalyst. It is high in nitrogen and encourages and feeds microbes which rot the straw so plants can grow. You may be questioned when buying it due to security reasons, especially if you look like a bomb maker rather than a gardener… 🙁
More natural ways that help speed up that all important burn out, are to spread on a high nitrogen organic fertiliser just before the start of your watering process and watered in each day as detailed above.
Remember though that this fertilizing along with the initial soaking will mean that the bales will continue to cook longer and you will have to wait before planting. It ultimately provides a better base and growing conditions and saves you having to be so worried about getting nutrients to your plants as they start growing.
Some materials to use are:
- A 3cm (1″) layer of fresh chicken manure—double that if aged chicken manure, or
- Other suitable manures such as turkey or rabbit—5cm (2″) layer, or
- A covering layer of 2/3 bone meal to 1/3 blood meal, or
- A very thick layer of milder stuff such as spent coffee grounds.
Also to balance the growing medium, add potassium by sprinkling on a handful of sulphate of potash.
Especially great is urine to add (sneak out at dawn for a… 🙂
Watering a Straw Bale Garden
Keep watered. That’s going to be your biggest task — twice a day if necessary. Straw bale gardening uses more water than a normal garden, so set up a system now. It may be that swilling out the teapot on it each day is enough in your area, or you may need to keep the hose handy.
A soaker hose system set in place is perfect.
A DIY drip feed is another option for when you can’t be there over a hot period. For a DIY, take a large plastic bottle such as soft drink or milk container. Take out thin lining from inside cap and make a tiny hole in cap with a hot needle, pointy scissors or smallest drill bit. Now pierce the thin cap lining separately with 5-6 tiny pin-prick holes and put back inside lid, and put lid back on bottle.
Fill bottle with water and place, cap end down into soil near a plant. Put a few stones in first so the hole doesn’t get clogged up with dirt.
Depending on size of holes the water should slowly drip out over 1-6 days. You can also add diluted fertilizer, such as seaweed or compost tea to this bottle.
Another bright idea is to poke some water soaked remnants of old cloth, (babies nappies/diapers to some, or toweling are ideal) down the bottom of the space you plant each plant in before you put soil in. These will eventually rot along with the straw.
If you have room for more than one bale, group them side by side to minimize evaporation from the sides. You should still be able to reach and tend to the plants this way.
Anything you can put on the exposed sides of your straw bales will help conserve water and stop them drying out in the sun. Low bushes or herbs, planks or bricks and so on will work. I don’t believe in buying new plastic, but if you have some already, and don’t mind the unnatural look in your garden, then put that around the sides.
Keep the twine there to hold it all in place for as long as possible, and if it does rot, bang some stakes in at both ends. If your straw bale is on a balcony or concrete, you may need to chock up the ends with something heavyish, like rocks, bricks, boxes or plant containers.
Straw bale gardening — plants to plant
Annuals of vegetables, herbs or flowers will love it. Remember your bales will be history in 1-2 years. Young plants can go straight in. Pull apart or use a trowel and depending on the state of the straw, put a handful of compost soil in too, then let the straw go back into place.
Seeds can be planted on top if you put a good 5cm (2″) layer of compost soil there first.
Top heavies like corn and okra, are not so good, unless you grow dwarf varieties. With straw bale gardening it’s hard to put solid stakes in so big tomato plants are out, although they will happily dangle over the edge.
Each bale should take…
- Up to half a dozen cucumbers, trailing down, or
- Squash, zucchini, melons — maybe 3 plants, or
- A couple of tomato plants per bale with one or two herbs and leafy veggies in between, or
- Four pepper plants will fit, or
- 12-15 bean or pea plants, or
- A mix of the above or any other plants you like.
There’s no limit and why not poke in around the side some flower annuals for colour and companion if you like.
Once a week or more often when your plants are in full growth water in a liquid organic feed, such as compost tea or fish emulsion. Tip some worms on top if you want to use your bales only one season.
If you are using hay bales instead of straw bales, this liquid feed can be spaced much further apart because hay bales have a more nutrient dense environment.
You’ll get one good season out of a hay bale garden, and usually two with a straw bale, albeit with a bit of sag. It makes for great compost or mulch when finished with.
One of the neatest ideas ever, it’s not too late for you to give straw bale gardening or hay bale gardening a go somewhere around your place.
Source:no-dig-vegetablegarden.com
Want to be as self-sufficient as possible? Want to master all the lost skills our grandfathers had? Then you really need this amazing step-by-step guide. It is called The Lost Ways and it contains all the knowledge of our forefathers.
Here’s just a glimpse of what you’ll find in The Lost Ways:
From Ruff Simons, an old west history expert and former deputy, you’ll learn the techniques and methods used by the wise sheriffs from the frontiers to defend an entire village despite being outnumbered and outgunned by gangs of robbers and bandits, and how you can use their wisdom to defend your home against looters when you’ll be surrounded.
Native American ERIK BAINBRIDGE – who took part in the reconstruction of the native village of Kule Loklo in California, will show you how Native Americans build the subterranean roundhouse, an underground house that today will serve you as a storm shelter, a perfectly camouflaged hideout, or a bunker. It can easily shelter three to four families, so how will you feel if, when all hell breaks loose, you’ll be able to call all your loved ones and offer them guidance and shelter? Besides that, the subterranean roundhouse makes an awesome root cellar where you can keep all your food and water reserves year-round.
From Shannon Azares you’ll learn how sailors from the XVII century preserved water in their ships for months on end, even years and how you can use this method to preserve clean water for your family cost-free.
Mike Searson – who is a Firearm and Old West history expert – will show you what to do when there is no more ammo to be had, how people who wandered the West managed to hunt eight deer with six bullets, and why their supply of ammo never ran out. Remember the panic buying in the first half of 2013? That was nothing compared to what’s going to precede the collapse.
From Susan Morrow, an ex-science teacher and chemist, you’ll master “The Art of Poultice.” She says, “If you really explore the ingredients from which our forefathers made poultices, you’ll be totally surprised by the similarities with modern medicines.” Well…how would you feel in a crisis to be the only one from the group knowledgeable about this lost skill? When there are no more antibiotics, people will turn to you to save their ill children’s lives.
And believe it or not, this is not all…
Table Of Contents:
Making Your Own Beverages: Beer to Stronger Stuff
Ginger Beer: Making Soda the Old Fashioned Way
How North American Indians and Early Pioneers Made Pemmican
Spycraft: Military Correspondence During The 1700’s to 1900’s
Wild West Guns for SHTF and a Guide to Rolling Your Own Ammo
How Our Forefathers Built Their Sawmills, Grain Mills,and Stamping Mills
How Our Ancestors Made Herbal Poultice to Heal Their Wounds
What Our Ancestors Were Foraging For? or How to Wildcraft Your Table
How Our Ancestors Navigated Without Using a GPS System
How Our Forefathers Made Knives
How Our Forefathers Made Snow shoes for Survival
How North California Native Americans Built Their Semi-subterranean Roundhouses
Our Ancestors’Guide to Root Cellars
Good Old Fashioned Cooking on an Open Flame
Learning from Our Ancestors How to Preserve Water
Learning from Our Ancestors How to Take Care of Our Hygiene When There Isn’t Anything to Buy
How and Why I Prefer to Make Soap with Modern Ingredients
Temporarily Installing a Wood-Burning Stove during Emergencies
Making Traditional and Survival Bark Bread…….
Trapping in Winter for Beaver and Muskrat Just like Our Forefathers Did
How to Make a Smokehouse and Smoke Fish
Survival Lessons From The Donner Party
Get your paperback copy HERE
CHECK OUR survival and prepping solutions
If you found this article useful, please like our Facebook page and stay up to date with the latest articles.
WHAT TO READ NEXT:
HOW TO MAKE YOUR OWN BACON (STEP BY STEP GUIDE)
A RETURN TO THE OLD PATHS: HOW TO MAKE PEMMICAN LIKE THE NATIVE AMERICANS
20 LOST RECIPES FROM THE PIONEERS: WHAT THEY COOKED ON THEIR JOURNEY WESTWARD
SEVEN CLASSIC GREAT DEPRESSION ERA RECIPES GRANDMA USED TO MAKE
POTTED MEAT: A LOST SKILL OF LONG TERM MEAT STORAGE
BACK TO BASICS: HOW TO MAKE AND PRESERVE LARD
THE BEST WAY TO STOCKPILE VEGETABLES OFF-GRID
OLD FASHIONED PRESERVING-GRANDPA’S RECIPE FOR CURED SMOKED HAM
HOW TO MAKE GUNPOWDER THE OLD FASHIONED WAY
SURVIVAL HERBAL RECIPES FROM OUR ANCESTORS
HOW TO PRESERVE MEAT FOR SURVIVAL LIKE OUR GRANDFATHERS
OTHER USEFUL RESOURCES:
The 3 Pioneer Survival Lessons We Should Learn
The Most Effective Home Defense Strategies
Old School Hacks for Off-Grid Living
The Medical Emergency Crash Course