
While mainstream media is busy making up the next round of ratings gold conspiracy theories, they have consistently failed to report on the state of our nation’s bread basket.
People living in those areas can tell you that many farmers were unable to plan crops in the spring, and may have also missed several other crops in the last year because of bad weather. This all points to what is likely to be a food shortage paired with higher prices, especially if our nation has a harder time negotiating for foreign food.
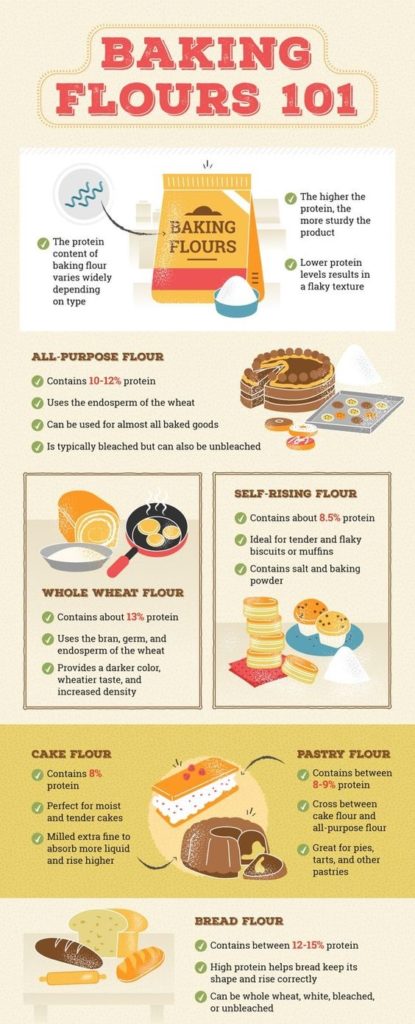
One of the most important staples of a healthy diet is flour. It does not matter whether you are talking about bread, crackers, soup or stew thickeners, cookies, or pies. The fact is if you don’t have flour, you will have a very hard time surviving.

Today, most people realize that flour does not have to come exclusively from wheat. In fact, as more people embrace a gluten free diet, or seek to get away from GMO wheat, other plant and animal based sources are taking wheat’s place. If you are concerned about a potential shortage of wheat, here is a basic recipe you can use to make flour from a range of other foods.
Basic Steps for Making Flour
Gather Food Source – just about any food can be used to make flour. The important thing is to gather enough material (about 3 – 4 cups) to make at least ½ cup of flour. Depending on the moisture content or the volume occupied by air, it may take several cups of material to get a relatively small amount of material.
On the flip side, you can and should think of non-wheat flours as a concentrated food source. Do not forget that when you condense 3 or 4 cups of material into ¼ cup, you are still getting the same calories in nutrients in a smaller space. As an added bonus, the edible life of flour is easily weeks to months beyond what you would get from the fresh version of the food.
In a time of major food shortages, you may not be able to get enough of one food to make flour. You can combine different foods to obtain sufficient volume. Just remember to process and store each item separately. Different foods will rot faster than others, even if they have been properly processed and stored correctly. I also don’t recommend storing flours that were processed on different dates for this reason. Aside from that, the last thing you will want is for a bad batch to ruin all the others that you store in the same container.
Pre-Soaking in Vitamin C Solution[1]
Right now, you may not give much though to food safety unless there is news about a recall. Unfortunately, the foods you are eating may be contaminated with aflatoxin and several molecules made by molds, spores, and fungi. Even though you may not have any symptoms of illness, these molecules can cause harm to your liver and other organs.
When wheat is not available, there is a good chance you will turn to several foods that may already be contaminated with various pathogens. No matter whether you harvest peanuts, have an insect farm, or gather plants from a wild setting, there is no real way to tell what kinds of pathogens you are dealing with, or how deeply they have contaminated the food.
In the case of aflatoxin and some other toxins, you can soak foods in a Vitamin C solution for about 10 minutes to kill off pathogen and also neutralize the toxin. Since some pathogens actually become more heat resistant as oils or moisture are driven off, it is important to pre-soak before roasting or cooking.
Roasting or Drying
This is one of the most important parts of making flour. Make sure that the food reaches an internal temperature of at least 212 degrees F. Here’s why:
- Most disease bearing organisms will be killed off at around 165 degrees F (internal temperature) for 15 minutes. Very few organisms will survive 212.
- Higher temperatures result in more drying. When making flour, it is very important to drive off as much oil, water, and other forms of moisture as possible. The less moisture there is, the longer your flour will last.
Grinding
Once the food has been processed to eliminate both moisture and pathogens, your next step is to actually turn it into flour. The only way to do this is to grind the material down so that the particles are the same size as you would get in a bag of wheat flour. Here are some tips:
- Don’t waste your time with a coffee grinder or a food processor. Even machines with very strong motors won’t function very long when grinding up well roasted materials such as chick peas, corn and nuts. To add insult to injury, any given food shortage may also come with a power outage. If you are going to make flour in an emergency, there is no point to needing electricity at this stage of the process.
- If you can, get a manual flour mill or grinding mill. A well designed mill can last for years on end and rarely, if ever, need new grinding plates.
- Always be careful when transferring foods in and out of the grinder. Only use sterilized equipment, and avoid handling food with your bare hands. If you already know how to use a dehydrator, use the same precautions.
Storing
Always store flour in an airtight container in a cool, dry, dark location. For added safety and freshness, you can also put flour in the refrigerator or freezer.
Figuring Out Conversion Rates Between Food Sources and Wheat Flour
When I first started using potato, nut, and other non-wheat based flours, it was quite an adventure! With the notable exception of chickpea flour, most other forms absorb water at different rates and simply don’t respond the same way as wheat flour. Part of the problem is most of the flour sources you will have onhand won’t have gluten in them. Compensating for that, especially in baked goods can be difficult. Here are some tips for developing your own conversion tables, especially for unusual foods that you might need to use:
- Start off by seeing how much water the flour absorbs compares to wheat flour. Take ¼ cup of material and add 2 – 3 tablespoons at a time. In another bowl, do the same with wheat flour.
- Wait about 2 hours before looking in on the bowls. Make note of the water to flour ratio at which the flour separates out from the water. Wheat flour will settle to the bottom and leave almost clear liquid on top unless the ratio of water to flour around ½ to 1. Other flours may separate at a much lower ratio.
- Once you know how much water the flour will absorb, your next task is to figure out how other ingredients will absorb water and other liquids. Balancing recipes from this point forward usually involves increasing/decreasing water, increasing oils, or using other binders that will hold more moisture.
What About When You Can’t Do Without Gluten?
Over the years, I’ve tried all kinds of food preparation challenges including vegan, paleo, solar oven, and gluten free cooking. Without a question, when it came to baking breads, cakes, and pizza, gluten free was the hardest. There are two basic additives you can try, although I can’t say either was as satisfying as gluten obtained from wheat and other grains that contain it. Nevertheless, you can give these additives a try and learn more about how to make them at home.
- Guar Gum – this gluten substitute is made from guar, or cluster (not castor!) beans. These beans are similar to the green beans you might grow in your garden; however these originate in India and Pakistan. You would need to do some experiments with roasting and grinding guar beans to make a suitably refined guar gum.
- Xanthan Gum – made from fermenting sugar with the Xanthomonas campestris bacteria. Since this can be a complex process with a lot of room for error, I don’t recommend getting into it unless you already have experience with culturing yeasts and bacteria for cheeses, wines, and breads. There is a huge difference between culturing a sourdough starter and handling these bacteria!
Being able to make your own flour is a critical skill that you may be overlooking. Today, there are a number of good quality manual flour mills that can be used to grind corn, nuts, beans, or anything else you might need to turn into flour. Remember, even if you stockpile wheat flour, the supply can be seized, damaged, or simply used up before you have a chance to obtain more. At the very least, when you know how to make flour from other resources, it will be easier to maintain a safe and nutritious food supply.

Source: survivopedia.com
WHAT TO READ NEXT:
HOW TO MAKE YOUR OWN BACON (STEP BY STEP GUIDE)
A RETURN TO THE OLD PATHS: HOW TO MAKE PEMMICAN LIKE THE NATIVE AMERICANS
20 LOST RECIPES FROM THE PIONEERS: WHAT THEY COOKED ON THEIR JOURNEY WESTWARD
SEVEN CLASSIC GREAT DEPRESSION ERA RECIPES GRANDMA USED TO MAKE
POTTED MEAT: A LOST SKILL OF LONG TERM MEAT STORAGE
BACK TO BASICS: HOW TO MAKE AND PRESERVE LARD
THE BEST WAY TO STOCKPILE VEGETABLES OFF-GRID
OLD FASHIONED PRESERVING-GRANDPA’S RECIPE FOR CURED SMOKED HAM
HOW TO MAKE GUNPOWDER THE OLD FASHIONED WAY
SURVIVAL HERBAL RECIPES FROM OUR ANCESTORS
HOW TO PRESERVE MEAT FOR SURVIVAL LIKE OUR GRANDFATHERS
Survival Books
THE LOST BOOK OF REMEDIES-All Medicinal Plants and Lost Cures of North America
THE LOST WAYS-Learn the long forgotten secrets that helped our forefathers survive famines,wars,economic crisis and anything else life threw at them
EASY CELLAR-AMERICA’S NATURAL NUCLEAR BUNKERS: FIND THE CLOSEST ONE TO YOUR HOME
THE LOST WAYS 2-This lost super-food will bulletproof you against any food shortage or famine
BLACKOUT USA-EMP survival and preparedness guide
DIY HOME ENERGY-Follow the step-by-step guide from A to Z and you will have a working system to reduce your electricity bills and save energy
MY SURVIVAL FARM-This hidden survival garden will keep you well fed when SHTF
CARNIVORE’S BIBLE -THE REAL HOMEMADE AND HEALTHY MEATY TREATS OUR GRANDPARENTS USED TO MAKE…