
Every gardener wants their soil to be better and there are many different ways to do this but one of the best and easiest ways to make your soil better is by adding dead life to it.
I’m not talking about the human or even animal form, but more in the form of foods that you have finished eating and do not want anymore. Also, dead leaves and grass from mowing or raking leaves.
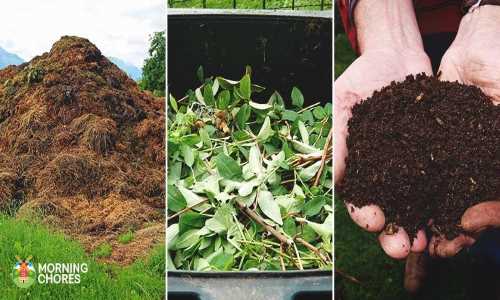
Composting is easy and manageable even in the urban home. Read on to find out more about the different types of compost.
Different Composts and How to Make Them
Before We Begin…
Here’s a short list of things you can add to your compost bin:
- Coffee and tea Grounds – heads up, if you do not drink coffee or tea, Starbucks donates their leftover coffee grounds, all you have to do is call them and you can go pick them up.
- Banana Peels – if you are vermicomposting in a small container, do not use them too much and I do advise that you break them down a bit to help speed up the composting process no matter which style you use.
- Kitchen rinse water – do this on occasion (more for bigger piles, less for smaller ones) as it helps keep the pile moist.
- Cardboard shredded into small pieces. If you’ve just moved or have a lot of cardboard, then recycle most; otherwise, put them to good use in the compost pile!
- Dryer Lint – yes! Finally, we found a good use for it!
- Flowers – not just for decoration.
- Grape Pomace from wine making.
- Grass clippings.
- Hair.
- Manure from herbivores – such as cows, horses, pigs, sheep, chickens, or rabbits.
- Newspaper and paper.
- Vegetable and fruit peels and scraps (but not citrus)
Isn’t it great that you don’t have to trash those items now but can put them to good use instead? In an effort to make sure you do not go overboard, here is a list of things not to put into your compost bin and why:
- Fish and meat – it can coat material that is trying to break down and stop the process, and let’s be honest it also boils down to the smell. Nobody wants to smell decomposing meat.
- Dog or cat poop because their waste contains microorganisms and parasites not wanted in the compost pile.
- Citrus Peels and Onions – their acidity will actually kill the helpful bugs and worms that are decomposing your waste (please note, this is EXTRA important if you are doing Vermicompost, which we will talk about first).
- Glossy paper – we’re talking about magazines here. This added layer of protection for the pages contains toxins and won’t decompose properly. Toss those babies in the recycle bin! (Side note: This counts for PLU stickers on fruits and vegetables as well).
Now, let’s get on to the good stuff…
1. Vermicomposting
Vermicomposting is the best method for an urban setting. It means you will be sharing your space with many worms, typically red worms.
Don’t worry, they will have their own container and they will pull their weight as well. Vermicomposting is one of the quickest ways to get fresh compost quickly. You should have usable compost in four months.
One pound of mature worms, which is approximately eight hundred to a thousand worms, can eat up to half a pound of matter a day.
Even better, the bins can be easily made as shown here, or you can purchase one on Amazon. It is important that you have well-prepared bedding, bury the scraps and separate out their casings from the rest of the food.
Naturally, the bins need to be sized to match the volume of food scraps that are turned into casings. These casings can be used for potting soil or turned into compost tea which is used as a liquid fertilizer for houseplants or gardens.
With vermiculture, you need to make sure your house stays between fifty-five and seventy-seven degrees Fahrenheit and stay shaded if you are adding it to arid areas. This is why vermicomposting is the more popular method.
LEARN MORE ABOUT VERMICULTURE - WATCH VIDEO HERE
2. Cold Composting
This type of composting require some land, although we are not talking about one hundred and fifty acres or anything like that.
I will say this, and this is my whole reasoning for adding this section before I moved on, with both hot and cold composting you are going to need a container. The first time I composted, I chose an open container and only built four walls to contain my yard clippings and scraps.
This is the bare minimum of what you will need either way you chose to go because it keeps the items in and the deterrents, like animals, out.
With cold composting, you are doing the same things as with hot composting only you don’t have to do as much work but will not reap the benefits of the compost until almost a year, or more, later.
Essentially what you are doing is piling organic materials, such as leaves, grass clippings, and manure from herbivores as a bottom layer. From there you want to add your kitchen scraps in the middle and do a top layer of organic material.
This type of compost is perfect for someone who lives in a suburban area or a small family with little waste.
It’s important to note that you do not want to add weeds to this pile because with cold composting it will not have time to decompose the weeds.
If you are not down with an open pit you can purchase an enclosed bin. These bins benefit from having low maintenance but have the advantage of not causing much smell. Purchasing one that is black will help the process to be sped up, so that is something to consider.
3. Hot Composting
Hot or active composting has several ways you can achieve your desired method and the former takes much more of a hands-off approach. It’s all in how you want to do it. This type of composting also require some space.
When I started composting, this was my method of choice. We had a perfect spot at the edge of our yard, behind the shed, where I could create the contained area and it wouldn’t bother anybody. I kept an old ice cream bucket to hold the kitchen scraps and once it got full, I took it out to the area.
Just like with cold composting, you start with a layer of organic material. Most of my organic material came from mowing our one-acre lot twice a week. Next, add a layer of soil.
Then add a layer of the kitchen scraps and put another layer of soil over the top.
The good news is since hot composting decomposes much quicker, you can continue to add multiple layers. As a matter of fact, they recommend you make the pile two to three feet high. When the pile begins to decompose it shrinks in size.
Here’s what makes hot compost different than cold compost: aerating it! Put holes throughout the pile and check the temperature periodically. You want the compost to be between 110 and 140 degrees Fahrenheit.
Side note: I highly recommend that the thermometer you use for your compost pile is not used for anything else.
Once a week, go out with a garden fork and move all of the material around. This will give the heap more heat and keep the air flowing through it. The more you turn it, the quicker it decomposes.
Types of Hot Composting
Now that we understand how hot composting works, here’s a heads up on the multiple ways you can choose to compost.
- Pit Composting. This is digging a hole in your yard and putting down the compost. The pit should be, at a minimum, three feet wide and eighteen inches deep. If requires regular maintenance.
This method has the advantage of quick composting time and you do not need to transport the compost from one area to another. Just wait for the compost to be finished and plant!
- Sheet composting. Done in the fall, you put a thin layer of organic materials and rake it into the soil of the garden. Over the winter the material breaks down and gives new life to the soil.
This one is easy but the drawback is you are not getting to use the precious waste from the apple cores, half chewed carrots from your kids, etc… so this one might be good as an addition.
- Rolling Bins. This one would be fun for kids and adults alike and has the advantage of being out of sight (though make sure it doesn’t go out of mind).
Place the scraps we’ve talked about in the bin and roll it around for a bit. Maybe roll it to one another. Then roll it to an area where no one can see it, if you so desire, and bring it back out in a day or two.
Be careful though not to fully load the bin or it might become too heavy to roll around!
- Compost Tumblers. The great thing about this one is you can determine how big you want your tumbler to be. For example, if you have a large garden you can purchase a larger tumbler.
The tumblers sit off the ground, so if bending down is a struggle this one is ideal for you. It does exactly what it sounds like, you come out every couple of days and turn the crank, which turns the machine around and around.
The only downfall is the same as the rolling bins, when it gets full it gets harder to crank and then you have to wait to add more materials.
Conclusion
No matter what you prefer: the longer time, the simpler method or the ready in several months option. But these ways all shows you how easy it is to get into composting, how great it would be for your garden, and how you could substitute soil completely for container gardening.
The advantages of being able to have an abundant garden from materials you are already getting rid of means you don’t have to use as many commercial additives, providing an extra advantage. I would call that a win-win.
Source : morningchores.com
One Reply to “3 Different Compost Making Techniques (and the Advantages of Each)”