
Mine was truly a lovely childhood. I grew up on salt pork that was stored hanged in our root cellar. Almost anything in our pantry was home-made. The fatback is delicious, and if you keep it in a cool, dry place, it can last up to a year and sometimes even longer.
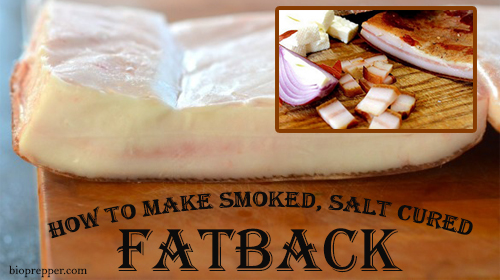
My dad slaughtered and preserved a hog a year for us when I was growing up, I still make and love to eat what we all called “fatback” or salt pork fat with the skins still on. It is simply delicious. In my opinion every homesteader should know how to cure and preserve his meat. Meat would be the first one to go once you lose electricity, but spoiling can be prevented using old-fashioned techniques. Methods such as smoking and curing are just two examples used for a long time, and are efficient when it comes to keeping meat from spoiling. Curing is a technique which basically involves preserving the meat in salt. This was one of the most common ways of keeping meat fresh in the days before refrigeration. We still use it today, but now it is more about enhancing the flavor of the meat, not about preserving it. Home cured meats are way better and healthier than store bought ones. Dad also made hams, sausages and potted meat. Boy that was good. I still do it for my kids these days. I want my kids to learn this almost forgotten art so they can pass it on to their kids. The best time to make cured fatback is during the winter months because it requires air drying after the salting process. To make really good fatback you need that fat to be at least an inch thick skin on.
 Ingredients for the dry cure for 2 pounds of fatback:
- 2 pounds high-quality pork back fat, in 2 pieces
- 25 grams kosher salt
- 5 grams smoked salt (optional)
- 100 grams sugar (The sugar is necessary in order to counterbalance all of the salt, and will also give the meat a distinct flavor.)
- 4 grams Instacure No. 2
- 10 grams garlic powder
Instructions
- Mix together all the salts and spices. Divide it in half by
weight.
- Massage the mixture into each slab of fat back, keeping them separated.
- Set the pieces in a container, either stacked or side by side, then put a plate or lid on them that is smaller than the top of the container. Weigh down this lid with something heavy, like some heavy canned goods.
- Cure the fat for 3-5 days, flipping the pork every day. This helps distribute the cure evenly.
- Remove the fatback and rinse it well. Pat it dry, then poke a hole about 1/2 inch away from one corner so you can run string through it to hang. Hang the pork for at least 3 days, and preferably 5 to 8 days in a dark place that is between 45°F and 60°F. If you are curing other things with your fatback, you might want to wrap it in cheesecloth, and then again loosely with foil. The foil blocks the light when you open the curing fridge door. In the winter months there’s no need of a fridge. The winter temperatures will do the job just fine.
After the curing process I like to smoke my fatback for a plus of flavor and a longer shelf life. It can last up to a year and if stored properly up to 2 years.
Smoke has the same effect as salt of keeping away bacteria from your meat. It also gives it a very tasty flavor which is why it is still used today. You will need a smoker. If you have basic carpenter skills I recommend this
DIY guide. It is not that complicated to do it. I use the cold smoking process.
The cold smoking process
Cold smoking uses much lower temperatures below 100 degrees Fahrenheit. This method is only used for flavoring the meat rather than actually cooking it. I smoke my fatback for about 4 to 6 hours. The best wood to use for smoking is oak (in my opinion)
Brining your fatback:
The process described above is referred to as dry curing, but there is also a method for wet curing, also known as brining. This technique involves you keeping the fatback submerged in a salty solution. Adding about a pound of salt and half a cup of sugar to three quarts of water should do. Feel free to mix in other ingredients such as herbs and spices. Repeat this process until you have enough water to cover the fatback. Make sure it is completely submerged. If you are having problems, place a weight on top. Take it to your storage area. Unlike dry curing, the fatback will need your attention on a weekly basis. Each week you will have to take it out of the container, stir the brine well and then place it back. After four weeks of repeating this process, your fatback is ready. If you find the brine to be getting too thick, you will need to replace it with a fresh batch.
There you have it: two ways to prepare and preserve your fatback for long periods of time. You should choose the one which is most accessible to you and meets your needs.
Want to be as self-sufficient as possible? Want to master all the lost skills our grandfathers had? Then you really need this amazing step-by-step guide. It is called Carnivores’s Bible and it contains all the knowledge of our forefathers.
Get your copy HERE
CHECK OUR survival and prepping solutions
If you found this article useful, please like our Facebook page and stay up to date with the latest articles.
OTHER USEFUL RESOURCES:
The 3 Pioneer Survival Lessons We Should Learn
The Most Effective Home Defense Strategies
Old School Hacks for Off-Grid Living
The Medical Emergency Crash Course