
There are many reasons why you may want to grind your own grains at home. Making your own flour is a rewarding experience, and your product will still have all of the nutrients and flavor that commercial milling takes away.
In a survival situation, you may only have access to grains, nuts and seeds and will need to know how to make your own flour from what you have.
Milling at home is also a great way to blend unique flours so that you can make baked goods with distinctive flavor, nutritional, and texture profiles. It’s also amazingly simple and requires very little time.
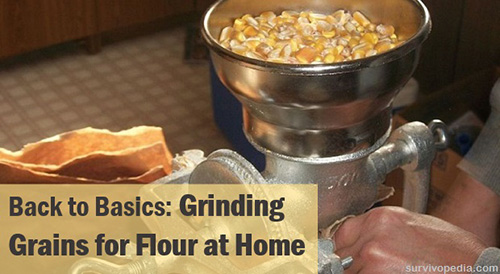
Equipment Needed for Grinding Grains
Many grains are easily ground just by using a food processor or even a good blender. Others require heavier equipment such as a flour mill. Other tools that can be used include the old school mortar and pestle, spice mills, manual or electric coffee grinders and small electric grinders made specifically for home milling.
What Kinds of Grains Work Best?
Traditional flours are made predominantly from wheat, barley, and rye. Corn is also up there on the list, especially for people who enjoy cornbread or corn tortillas.
{adinserter backyardliberty}You don’t have to limit yourself to making flour from just grains. You can make it from nuts, seeds, beans, rice, and roots as well. These lend beautiful flavors and distinctive textures to your finished flour and may also be a viable alternative to those who don’t want the gluten that’s in wheat, rye, and barley.
You do need to know that if you’re not using wheat, barley, or rye in your flours, they will behave differently because they lack gluten, the protein that gives those types of flours elasticity and also helps them bind and rise. You can always add xanthan gum or guar gum to other flours to mimic that if you need to but the textures won’t be quite the same.
Here is a list of just a few of the products that you can use to make flour at home:
- Wheat
- Barley (though it’s bitter – you don’t want to use it alone)
- Rye
- Spelt
- Corn
- Oats
- Buckwheat
- Millet
- Quinoa
- Nuts such as almonds, hazelnuts, cashews, pecans, macadamias, and walnuts
- Seeds such as sunflowers, hemp, pumpkin, amaranth and flax
- Potatoes (yes, potatoes)
- Arrowroot
- Tapioca
- Coconut
- Soybean
This is by no means an inclusive list but it’s a starting point. How you grind them depends upon how hard they are. With the exception of some beans, the products above all grind well in a coffee grinder or food processor.
Grinding Your Own Grains, etc.
Using a mortar and pestle may very well be your only option if SHTF (Shit Hits The Fan) but we recommend being well-prepared for making your own flour if that’s what you plan to do.
 You can pick up a manual coffee grinder at yard sales, flea markets and even the store for very little money. Make sure to grab an heir and a spare, too. If one breaks, you’re going to need a backup.
Depending upon where you live, you may have access to some sort of nut, seed, or grain even if you don’t stockpile any. If you live near soybean fields or have a walnut or pecan tree, you’re golden. You can, of course, always grow corn, sunflowers, and pumpkins, too.
Until then, you may wish to use your food processor or mill since you have electric because it’s much easier.
If you’ve purchased grains, corn or seeds for grinding, you can mill them just as they are. If you’d like, you can always toast the seeds and nuts to add a bit more flavor. Now, let’s get started.
- Make sure that your product is clean and dry. Often there are bugs, rocks, or other debris in there and you don’t want to grind those up into your flour. As a matter of fact, though the bugs may add more protein (kidding!), the rocks will be pretty hard on your grinder, so pick through carefully.
- Fill your grinder or food processor up no more than 2/3 of the way. Half is better so that the product can reach the blades and be ground equally.
- Grind until you have smooth, fluffy flour.
- Open your grinder and pick out the larger chunks. You can grind a bit more or just pick them out and grind them alone, which is probably the better option. Toss them in with the next turn, if you’re doing more, or just do them alone. No need to waste them.
- Repeat the process until you’ve made all of the flour that you need.
- Sift the flour (you don’t have to but we like to for some recipes and for some products because it gets out the rest of any little chunks. A chunk of nut is ok, but we’re not big fans of having half of a garbanzo bean in our brownies!
- Store your flour in an airtight container in a cool, dry place, preferably the freezer or fridge. Because it’s fresh and isn’t packed full of bleach and preservatives, your “live” flour won’t last as long as the “dead” store-bought ones.
Helpful Tips:
- If your grinder sounds like it’s bogging down, check for nuts, seeds, or grains that are stuck under the blades. If it’s clear and still sounds like that, you may have too much in there. Pour some out and grind two batches.
- Always be sure that your equipment is clean because these flours will go rancid quickly. If there is still flour stuck in there from the last time, you’re adding gross flour and other nasties into your fresh batch.
- Don’t over-grind your nuts. Otherwise, you’ll have nut butter instead of flour. Pulse them until they’re flour but be careful. Though almond butter is delicious, it’s not nearly as good for dredging pork chops in as almond flour is!
Difference between Meal and Flour
You have undoubtedly heard of cornmeal and possibly even almond meal, but what’s the difference between a meal and flour? Meals are ground more coarsely. They’re great for several different uses because they add a heartier flavor and more texture to your goods. They’re bad, though, if you’re shooting for something nice and light to make a cake with.
 To make meal, just don’t grind your product as long. When it starts to get a crumbly texture, you’re done. Compare it mentally to cornmeal. You want to keep that grainy feel. This is really good when you’re making a hearty loaf of country bread but if you’re shooting for hot rolls, grind longer.
Grinding your own grains is a wonderful idea for surviving a SHTF scenario because you’re getting a ton of nutrition from your flour. Commercial white flour has practically no nutrients other than carbohydrates, and there’s not really any fiber in there to help slow down the digestion.
Though white bread is better than starving to death, freshly ground flours offer nutrition and fiber that will help you be hearty and full regardless of your circumstances. And they taste great, too!
If you grind your own grains at home, we’d love to hear about your experience in the comments section below.
This article has been written by Theresa Crouse for Survivopedia.
Want to Know How Our Forefathers Built Their Sawmills, Grain Mills,and Stamping Mills? Then you really need this amazing step-by-step guide. It is called The Lost Ways and it contains all the knowledge of our forefathers.
Here’s just a glimpse of what you’ll find in The Lost Ways:
From Ruff Simons, an old west history expert and former deputy, you’ll learn the techniques and methods used by the wise sheriffs from the frontiers to defend an entire village despite being outnumbered and outgunned by gangs of robbers and bandits, and how you can use their wisdom to defend your home against looters when you’ll be surrounded.
Native American ERIK BAINBRIDGE – who took part in the reconstruction of the native village of Kule Loklo in California, will show you how Native Americans build the subterranean roundhouse, an underground house that today will serve you as a storm shelter, a perfectly camouflaged hideout, or a bunker. It can easily shelter three to four families, so how will you feel if, when all hell breaks loose, you’ll be able to call all your loved ones and offer them guidance and shelter? Besides that, the subterranean roundhouse makes an awesome root cellar where you can keep all your food and water reserves year-round.
From Shannon Azares you’ll learn how sailors from the XVII century preserved water in their ships for months on end, even years and how you can use this method to preserve clean water for your family cost-free.
Mike Searson – who is a Firearm and Old West history expert – will show you what to do when there is no more ammo to be had, how people who wandered the West managed to hunt eight deer with six bullets, and why their supply of ammo never ran out. Remember the panic buying in the first half of 2013? That was nothing compared to what’s going to precede the collapse.
From Susan Morrow, an ex-science teacher and chemist, you’ll master “The Art of Poultice.” She says, “If you really explore the ingredients from which our forefathers made poultices, you’ll be totally surprised by the similarities with modern medicines.” Well…how would you feel in a crisis to be the only one from the group knowledgeable about this lost skill? When there are no more antibiotics, people will turn to you to save their ill children’s lives.
And believe it or not, this is not all…
Table Of Contents:
Making Your Own Beverages: Beer to Stronger Stuff
Ginger Beer: Making Soda the Old Fashioned Way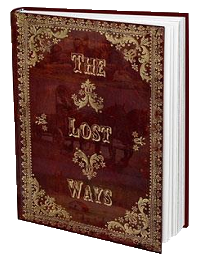
How North American Indians and Early Pioneers Made Pemmican
Spycraft: Military Correspondence During The 1700’s to 1900’s
Wild West Guns for SHTF and a Guide to Rolling Your Own Ammo
How Our Forefathers Built Their Sawmills, Grain Mills,and Stamping Mills
How Our Ancestors Made Herbal Poultice to Heal Their Wounds
What Our Ancestors Were Foraging For? or How to Wildcraft Your Table
How Our Ancestors Navigated Without Using a GPS System
How Our Forefathers Made Knives
How Our Forefathers Made Snow shoes for Survival
How North California Native Americans Built Their Semi-subterranean Roundhouses
Our Ancestors’Guide to Root Cellars
Good Old Fashioned Cooking on an Open Flame
Learning from Our Ancestors How to Preserve Water
Learning from Our Ancestors How to Take Care of Our Hygiene When There Isn’t Anything to Buy
How and Why I Prefer to Make Soap with Modern Ingredients
Temporarily Installing a Wood-Burning Stove during Emergencies
Making Traditional and Survival Bark Bread…….
Trapping in Winter for Beaver and Muskrat Just like Our Forefathers Did
How to Make a Smokehouse and Smoke Fish
Survival Lessons From The Donner Party
Get your paperback copy HERE
CHECK OUR survival and prepping solutions
If you found this article useful, please like our Facebook page and stay up to date with the latest articles.
WHAT TO READ NEXT:
HOW TO MAKE YOUR OWN BACON (STEP BY STEP GUIDE)
A RETURN TO THE OLD PATHS: HOW TO MAKE PEMMICAN LIKE THE NATIVE AMERICANS
20 LOST RECIPES FROM THE PIONEERS: WHAT THEY COOKED ON THEIR JOURNEY WESTWARD
SEVEN CLASSIC GREAT DEPRESSION ERA RECIPES GRANDMA USED TO MAKE
POTTED MEAT: A LOST SKILL OF LONG TERM MEAT STORAGE
BACK TO BASICS: HOW TO MAKE AND PRESERVE LARD
THE BEST WAY TO STOCKPILE VEGETABLES OFF-GRID
OLD FASHIONED PRESERVING-GRANDPA’S RECIPE FOR CURED SMOKED HAM
HOW TO MAKE GUNPOWDER THE OLD FASHIONED WAY
SURVIVAL HERBAL RECIPES FROM OUR ANCESTORS
HOW TO PRESERVE MEAT FOR SURVIVAL LIKE OUR GRANDFATHERS
OTHER USEFUL RESOURCES:
The 3 Pioneer Survival Lessons We Should Learn
The Most Effective Home Defense Strategies
Old School Hacks for Off-Grid Living
The Medical Emergency Crash Course
The Smart, Easy Way to Food Independence
How to Survive the Coming 100 Years Long Drought
Recipe sources:
http://allrecipes.com/recipe/homesteader-cornbread/
http://glutenfreecooking.about.com/od/glutenfreeingredient1/ht/makealmondmeal.htm
i would love to do this but i want to do it with tje old timey ways without electric grinders do they even make those