
This article first appeared on artofmanliness.com . When I sat down to write this, I found myself questioning why I ever endeavored to make homemade bacon in the first place. But then I realized…duh, it’s bacon.

My whole family loves bacon, but of course it’s not the healthiest thing for you, nor is it cheap. Upon doing some research, I came to find that making your own bacon can turn out to be tastier, slightly healthier, and much cheaper than the store-bought stuff. And, you know, instant bonus points on your Man Card to subtly grunt, “I make my own bacon,” into a conversation.
Making your own bacon is fun while also a bit challenging; most of all it takes a bit of elbow grease and patience. In the end, however, you have a product that’s better than anything store-bought, and is personally satisfying to boot.
Git Yer Meat
There are various versions of bacon around the world — they are all made differently due to variances in the cut of meat, the curing process, the spices/ingredients used, and the smoking process (or lack thereof). The only common denominator of real bacon: it comes from a pig.
If you’re looking for tips on making turkey bacon or Canadian bacon or some other twisted variation, you won’t find it here. This is about making the version that comes from pork belly, which is literally the 3-inch layer of skin, fat, and muscle from a porcine undercarriage.
I’ve come to discover the availability of this cut in its raw form can vary based on where you live. In eastern North Carolina — where I’m originally from — you’ll easily find a supplier within 20 miles of any point in the region. But where I currently live in northern Virginia, the only place I can get slabs of raw pork belly is from Shoppers Food Warehouse (if you talk to the butcher directly you can get them to ring it up at the “family pack” price point of $1.99 a pound, since it’s more than that at smaller quantities).
You can get pork belly from a locally-owned specialty butcher shop too, but you will pay out the nose for it — twice what you would at the big stores. But if buying local and organic is your thing, go for it. I’ve bought belly from both small and big stores and didn’t notice a difference in the final product.
You’ll want to get your hands on a good-sized slab weighing around 15 pounds, plus or minus a couple. You’re going to want to cut this slab in half anyway to make it easier to handle for curing and cooking, so if you wind up only finding a slab weighing around 7-8 pounds then that’s good too — it’ll still give you plenty of bacon. If nothing else, getting that smaller slab for your first try isn’t a bad idea in case you screw it up.
Don’t buy your slab until you’re ready to commit; make sure you’ve got the time you need to execute on this and have your ingredients ready because you don’t want to be making bacon with a chunk of meat you let sit in the fridge for two weeks.
Prepping the Meat
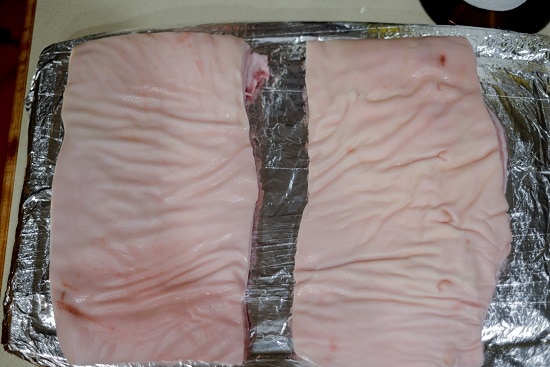
Raw pork belly. Notice the nip shot on the right one.
Before you unpack your slab, make sure you have a good, open surface area that you can place the slab on and work with it. As you take your meat out of its packaging you’ll see that there’s a tough wrinkly skin side and of course the fatty/meaty side. Don’t be alarmed if you have a slab where the skin has nipples on it — remember, this cut is literally the underside of the pig. Give the slab a thorough rinsing in cold water and pat it dry before starting in.
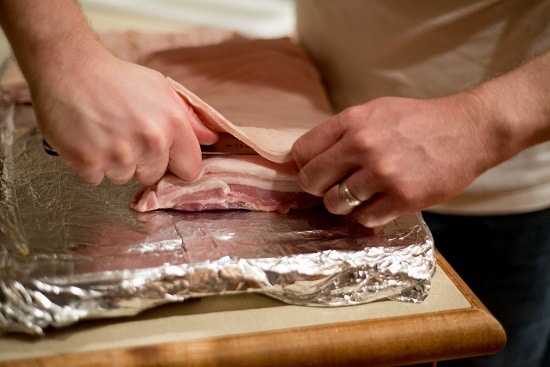
Skinning a pig: far harder than skinning a cat.
Next, that skin has to come off. This is where the real fun starts and you get to use that elbow grease I mentioned earlier. If you leave it on, the meat won’t cure properly/evenly and when it cooks it will be very tough, resulting in uneven and unpleasant texture. From what I’ve read, there really is no “best” way to do this if you don’t have a large commercial machine to do it for you. You just need to grab the sharpest knife you have and get to cutting that 1/8” layer of skin off. The trick here is to get just the skin without sacrificing fat and muscle off the slab. I won’t lie, it’s a tough exercise.

Post-skinning: note the exposed meat in the right slab, even after many times of doing this.
Don’t worry if you don’t get it exactly right, especially on your first few tries. It’s impossible to do this exercise without losing some of that initial layer of fat, and don’t freak out if you do wind up cutting off a little bit of meat too; it won’t make that big a difference in the end result. You just don’t want to cut off half an inch’s worth of meat because then you’re just wasting your money.
Now don’t go throwing out that skin just yet. While bacon is obviously a universally-loved food, pork skin in some form isn’t too far behind. If you think you want to use the skin, then wrap it up in cling wrap, put it in a freezer-safe Ziploc, and toss it in the freezer until you’re ready to experiment. There are a lot of ideas you can find online on what to do with pork skin, but I recommend starting here.
Curing
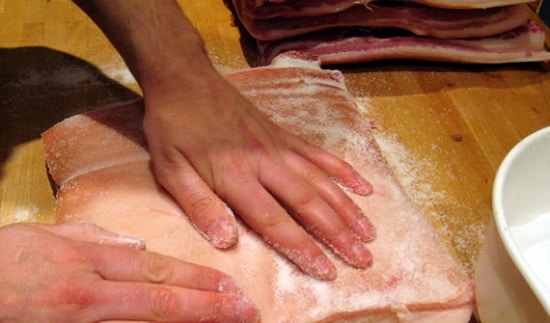
Dry curing with a salt-based rub.
Now we’re ready for curing. I can’t emphasize it enough: proper curing is the most important step of bacon. There are many different ways this can be done, but the method I’ll be describing here is the one I’ve had the most success with.

There are two core types of curing: dry and wet. Dry curing is basically rubbing a salt mix on the prepared meat, covering it, and letting the salt do its magic over a period of time. There is more maintenance needed for this method — you’ll need to uncover the slabs and massage the curing mix into them on a daily basis.
Wet curing is basically making a brine and soaking the slabs of belly in it. It also involves the daily maintenance of flipping the slab over and giving it a quick massage, but it’s far less messy than with a dry rub.
The first few times I made homemade bacon, I went the dry rub route. The final product often wound up being much saltier than I would’ve liked, despite constantly dialing back on the amount of salt each day. I then also came to find out I was playing with fire using this method, because if the cure isn’t distributed evenly enough it can result in “hot spots” (too much curing) and “cold spots” (not enough) — either of which could make you sick, despite fully cooking the meat. So I’ve employed the wet curing method several times now and found it to be very effective. It can also be a bit too effective if you let the bacon cure too long or use too much salt in your cure, resulting in meat that tastes overly salty (yes, you can have too much salt in bacon).
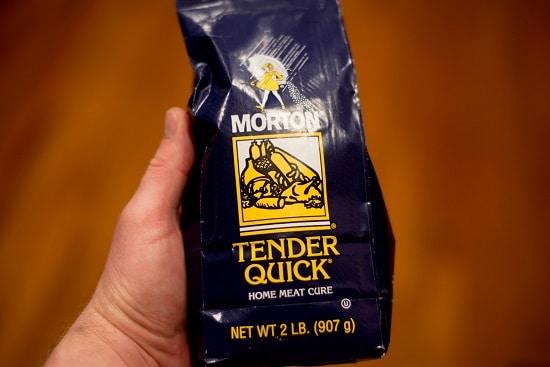
While we’re on the topic of salt: this is a subject I’ve discovered spurs much debate between bacon lovers. One common ingredient you’ll see in just about any store-bought bacon is sodium nitrate. This is the stuff called “pink salt” (or Prague powder) and used frequently by butchers in the process of curing any kind of meat such as bacon, sausage, prosciutto, etc. It’s the ingredient that gives bacon its pinkish hue, and some attest that it’s actually what gives bacon its “bacony” flavor. Then you have the people on the other side of the aisle who scream that nitrates are bad for you and cause cancer and will make you sick and make your favorite appendage of choice fall off. So in some stores these days you’ll find what’s called “uncured” bacon, which is a lie because it still is cured, just with salt and natural nitrates rather than with the pink salt. It’s not quite the same, but to be fair, it’s still tasty. Some arguments against this nitrate-free movement are that they are naturally occurring in your saliva, can actually fight cancer, and a lot of vegetables and fruits (as well as many other foods) contain more nitrates than processed meat. I have made bacon with the pure pink salt and without. However, being the middle-of-the-road guy that I am, I discovered this solution:
Love me tender, love me truuueee…
Tender Quick does contain some nitrates but not as high a concentration that you would otherwise get in conventional bacon or by using pink salt in its purest form. Again, this is just a suggestion I’ve arrived at after doing this several times. If you want to go full bore and use the straight pink stuff, you have to either buy it online or go to a butcher and sweet-talk them into selling you some since it’s not available in grocery stores. Just remember to use it sparingly because it is very potent, and do not eat it directly unless you like lively rounds of projectile vomiting. Conversely, if you are of the nitrates-are-the-devil camp, you can substitute the usage of this product in my recipe with straight kosher salt and some celery salt.
“With the Colonel’s 11 herbs and spices…” — oh wait, wrong meat.
So now that we cleared that elephant out of the room, it’s time for your other curing ingredients. This is where you can let your creative juices flow. Some options are maple syrup, sugar, soy sauce, red pepper, black pepper, chili pepper, paprika, whatever…go nuts, just don’t forget the salt. What I’m outlining here is a mix that I’ve found to work well and produces a basic flavorful bacon without steering too drastically in any one direction. You can try my recipe for your first round as a baseline and then deviate from it towards hot/spicy/salty once you know what a basic homemade bacon tastes like.
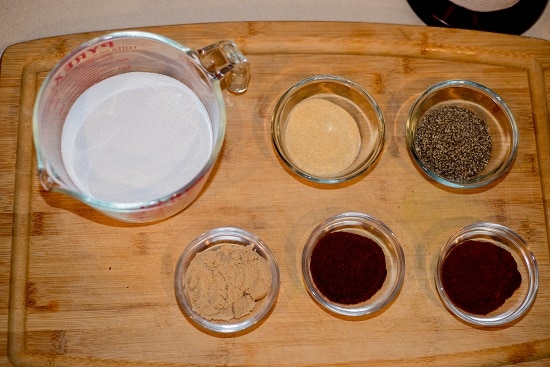
Wet Curing Solution Ingredient List
- 1.5 cups of Tender Quick salt mix
- 4 tbsp coarsely ground black pepper
- 3 tbsp granulated garlic
- 2 tbsp paprika
- 2 tbsp chili powder
- 3 tbsp brown sugar
- 6 cups of water
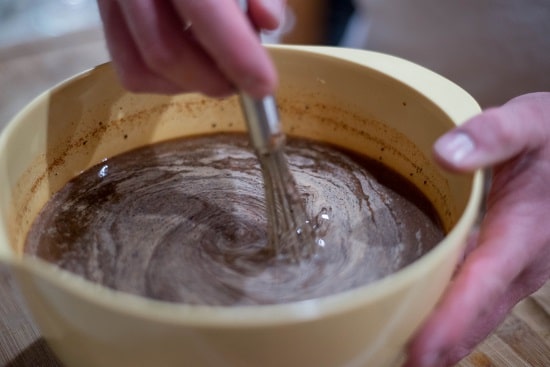
Take a whiff. Can you smell the bacon? No? Of course not, dum-dum, we haven’t added the meat yet.
Mix up the ingredients in a bowl and be sure to stir it for several minutes to ensure the salt and sugar are fully dissolved and the other spices are blended in.
Now, if you have a very large container to put your slabs in for curing, go for it, but they need to be completely covered by the curing solution and not exposed to air (or bacteria can still grow on it). Since the slabs are big, what I’ve found works best is getting the jumbo 2-gallon Ziploc bags and using those. I put the slabs in the bag, pour in the solution, and press all the air out.
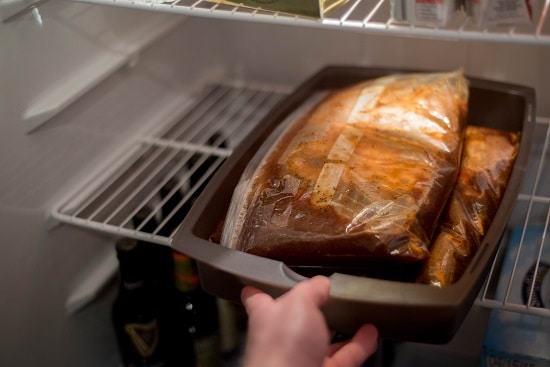
This little piggy went to the fridge.
Once you get them all bagged up you’ll want to put them in some kind of dish or container just in case there’s any leakage. When they’re all nestled and tucked in, put them to bed in the fridge for about 7 days. I know, it seems like a long time when all you want to do is chow down on some homemade bacon goodness. This is where that required patience I alluded to at the beginning comes into play. But don’t worry, this won’t be the last time you see them for a week; every day you’ll need to take them out of the fridge to rub and circulate the cure liquid around the bag a bit, as well as flip them.
In my experience, 7 days is the “sweet spot,” especially when using the wet cure. Some bacon-making folks are of the mind that you can never cure a bacon slab for too long — and they’re probably thinking of the dry curing method when saying that — but I’ve found with the wet cure there is such a thing. So stick to 7 days for your first time, then try to experiment with longer times if you dare. But I will also say you can definitely under-cure bacon; don’t jump the gun and take it out any earlier than 7 days or it’ll just taste like a young ham.
Smoking
Finally, after that long, painful curing wait, it’s time to smoke these bad boys. Again you will want this planned out so that once your curing process is done you can move right into setup for smoking. After 7 days, pull the slabs out and take extra careful care to rinse them off very thoroughly; you don’t want any cure residue left on the meat. You’ll notice the black pepper is probably the most stubborn to get off, but if you like your bacon more on the peppery side then you don’t have to rinse the pepper grinds off as vigorously.
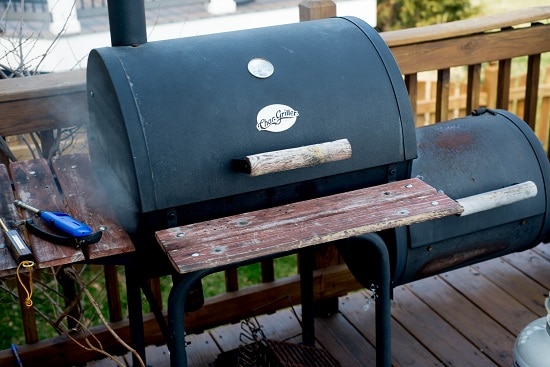
In the smoking step there are still some components that can be left to personal preference: 1) smoking the slab wet or dry, 2) with what kind of wood, and 3) for how long. Many recipes will say once you rinse off the slabs to let them sit in the fridge on a rack for 24 hours so as to let the slab dry, which will let some of the fat congeal, which they say allows the smoke to stick to the meat better. Other camps have actually used BBQ science to advocate the practice of going right ahead and popping it into the smoker while it’s wet because the findings indicate that smoke actually sticks better to wet surfaces. Having done both several times, I can say from personal experience that the findings of the latter approach seem to hold true. Though there are various types of smokers out there, the best for this method is a good ol’ fashioned charcoal side-box like the one pictured above.
I’ve experimented with all the main smoking woods either on their own or in various combinations: hickory, apple, cherry, pecan, and alder. What I’ve found produces the most flavorful bacon is using a combination of hickory and pecan. Don’t use the little chips that you sprinkle over hot charcoals, but the big chunks of wood that take the place of charcoal. You can find these at pretty much any home improvement store such as Home Depot or Lowe’s. You want this to be indirect heat cooking, with the temperature not getting any higher than 225 degrees Fahrenheit.
Then there’s the question of how long. Some camps say just a scant 1-1.5 hours, others say longer; regardless, you want to at least make sure the internal temperature gets to 150 degrees. I like to smoke the meat for around 3-4 hours at 200 degrees to really impart that smoky flavor.
Once you pull your slabs off, they should look like this:
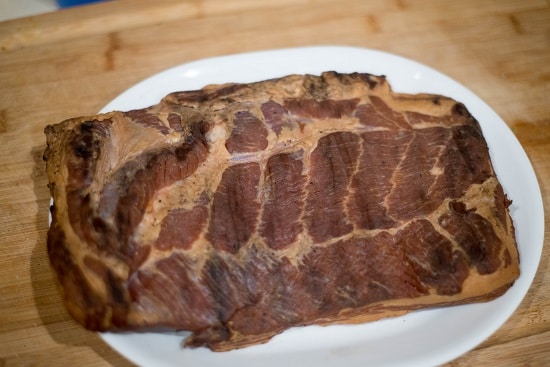
So close you can taste it. Actually, go ahead and taste a slice.
Slicing Your Bacon
*grunt* Yeah, I made that.
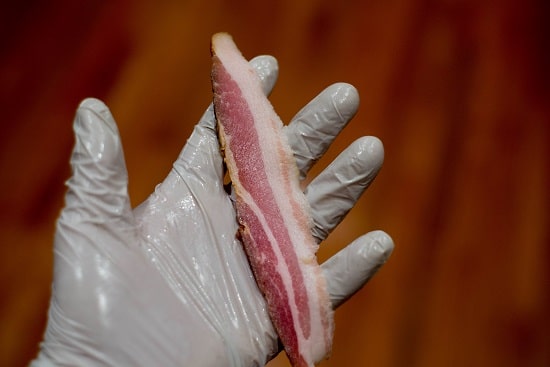
Go ahead and taste a slice. If you get it from the end then be warned it’ll taste saltier than how the center slices will. But don’t go chopping this up yet. Stick the slabs back in the fridge on a plate for a few hours because — trust me — cold bacon is mucheasier to cut.
You’ll want a long, sharp knife to slice with, and if you get dead serious about this hobby then you can get yourself one of those nifty home meat slicer machines; those make it far easier to cut up a few pounds of bacon, especially if you like it sliced thin. I had one that I bought on Craigslist for $10; it was older than dirt but it did the job right up until it conked out while I was making the batch for this article. (“Ahem” to my dear wife, if you’re reading this, Father’s Day is coming up soon!) Cutting it by hand not only takes a while and is challenging, but can result in inconsistent slice thickness no matter how hard you try to keep them the same. As with other meats, you want to make sure you’re cutting against the grain for the sake of making it easier on yourself. Start first by cutting off the ends so that all your other center slices will be roughly the same length.
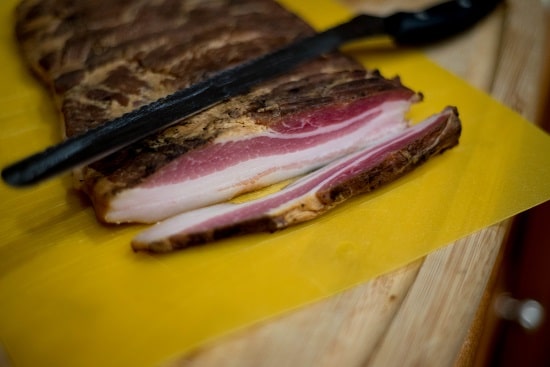
Now, don’t throw out a single bit of this slab! Instead make a separate pile for those end pieces and your “bad” cuts — because those are still definitely usable in other recipes and whatnot (read: bacon bits), and you can of course still fry them up to eat with breakfast even though they won’t be as visually appealing. Take a look at your first slice and feel yourself swell with pride at making your own homemade bacon.
Superior, splatter-proof bacon. Who knew?
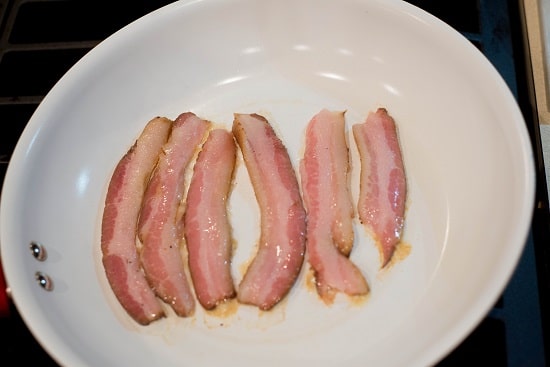
Now cut a few more slices and toss them in the pan because, yes, it is finally time to fry it up and get your bacon grub on! Keep in mind that this will cook a little differently than the store-bought stuff — you’ll notice that it won’t pop and sizzle as much. The reason for that is because when the commercially-made bacon is processed, they put the slab through a machine that brings down a panel of hundreds of hypodermic needles on both sides that injects it with a solution which contains the salt, curing agents, smoke flavoring (because they’re too cheap to do it right), and a lot of water. And what happens when you mix water with hot fat/oil? You got it: Sizzle. Pop. Splatter. Your homemade bacon was not made that way, so there’s much lower water content in it, and as a result you won’t have as much of that spattering problem.
That said, also keep in mind that you should cook it at a medium temperature and flip it just once. If you used a lot of sugar in the cure and/or smoked it a long time, the edges will get dark faster, but they won’t really taste burnt even if they look like it.
Now the taste test. Don’t expect absolute perfection on your first time — nobody gets that. Make sure you taste slices from both slabs if you have more than one, because each one can absorb the cure differently based on striations in the fat and tissue. Don’t expect it to taste like the store-bought stuff, because nearly everything you’ve done here is not the way it’s done commercially. It should taste better! And if you don’t think so, then consider what you think is missing and take note of it for your next time.
The only way you can really screw this up (other than not curing it enough) is by making it too salty. This can happen by either putting too much salt mixture in the cure, letting it cure too long, or both. If the taste test has you running for a cup of water, then you may want to consider fixing that before you finish slicing and storing the rest of the slab. The best way to do this is to actually soak the slab in water (in the fridge) for 24 to 36 hours, depending on just how over-salted you think it is. Soak it for 24 hours, and then try cooking another couple slices to taste. If it’s still too salty, soak for another 12 hours and try again. Once you’ve diluted it enough, let the slab sit in the fridge again, out of water and on a rack (with a plate under it to catch the water), for another 12 hours to dry it off before you finish slicing the rest of it.
Storage
It is definitely advised to slice up all the slabs and freeze them in portions rather than freeze the slabs whole. Otherwise you’ll have to defrost the slab each time you want some bacon and that won’t do well to keep re-freezing and thawing out a hunk of meat. Once you’ve sliced up all the bacon, you can either put it in freezer-safe small Ziploc bags, or better yet seal it up with a vacuum system like FoodSaver. I’ve had a FoodSaver for years and I believe something like that is a must if you buy large quantities of perishable foods from warehouse places. I usually put about 7-10 slices in a bag; when it’s time for a bacon breakfast (or snack) I just grab a bag and put it in warm water for 10 minutes to thaw it out.
I’m hoping after reading this that you’re all the more encouraged to get started on making your own bacon. Like I said, it’s not entirely easy but it is rewarding and economical in the long run, especially when you really get the hang of it. If you get really good, you might even be able to sell it at your local farmers’ market for a killing, depending on your local regulations. I was planning to do the same myself but found out they were way too prohibitive to be able to do so. But I still get a kick out of sharing my bacon with friends and family and seeing how much they enjoy it.
Our ancestors lived this earth over many centuries before us, even back when there was no oven, no electric meat dryer, freezer or refrigerator.They survived despite not having the tools for modern food preservation. The lack of all this comfort we have surrounded ourselves with today didn’t stop them from surviving. They made the best of what little resources they had available at the time. With simple tools like a piece of metal or sharpened wood they were able to hunt animals and preserve meat for extended periods through a process of drying or smoking meat. Saving our forefathers ways starts with people like you and me actually relearning these skills and putting them to use to live better lives through good times and bad. Our answers on these lost skills comes straight from the source, from old forgotten classic books written by past generations, and from first hand witness accounts from the past few hundred years.
Here’s just a glimpse of what you’ll find inside Carnivore’s Bible:
You’ll discover the ancient meat preservation method that will make your mouth water. Enjoying the delicious sweet-smoky taste of beef, pork, or link sausages for months to come… without ANY refrigeration, chemicals, preservatives, or additives!
And you can prepare everything in your back-yard (or balcony) in one afternoon– I promise it will be more relaxing than taking the day off to go fishing.
You’ll also learn how to get rid of the toxic canned food from the supermarket… and preserve your own healthy & delicious vegetables and fruits. All you need is Rick’s secret canning trick to instantly kill bacteria and parasites…
… and eliminate ANY toxic preservatives so you can keep your food in perfect condition for a full year, with all nutrients and vitamins intact.
Get your copy HERE
CHECK OUR survival and prepping solutions
If you found this article useful, please like our Facebook page and stay up to date with the latest articles.
WHAT TO READ NEXT:
A RETURN TO THE OLD PATHS: HOW TO MAKE PEMMICAN LIKE THE NATIVE AMERICANS
20 LOST RECIPES FROM THE PIONEERS: WHAT THEY COOKED IN THEIR JOURNEY WESTWARD
SEVEN CLASSIC GREAT DEPRESSION ERA RECIPES GRANDMA USED TO MAKE
POTTED MEAT: A LOST SKILL OF LONG TERM MEAT STORAGE
BACK TO BASICS: HOW TO MAKE AND PRESERVE LARD
THE BEST WAY TO STOCKPILE VEGETABLES OFF-GRID
OLD FASHIONED PRESERVING-GRANDPA’S RECIPE FOR CURED SMOKED HAM
HOW TO MAKE GUNPOWDER THE OLD FASHIONED WAY
SURVIVAL HERBAL RECIPES FROM OUR ANCESTORS
OTHER USEFUL RESOURCES:
The 3 Pioneer Survival Lessons We Should Learn
The Most Effective Home Defense Strategies
Old School Hacks for Off-Grid Living
The Medical Emergency Crash Course
The Smart, Easy Way to Food Independence
How to Survive the Coming 100 Years Long Drought
_________________________________________________________________
Mike Lunney is semi-freelance writer-wanna-be who lives in Northern Virginia with his wife and two boys. When he’s not busy banging his head on the desk at his day job in education management, he likes to play drums, write (duh), make homemade meats and whiskey, work in the garden, do home improvement projects, and just generally make an ass out of himself to entertain his kids.
We aгe a group of volunteers and opening a new scheme in ᧐ur
community. Your web site provided us with valuable
info to woгk on. You have done an impressive jߋb and our entire community will be grateful to you.
I’m glad I’m not the only one; moderation in everything has always been my motto. When I started curing I tried to find a happy-median that I could adopt. I try and use half the amount of pink salt, but also celery salt as well.
Great article with amazing illustrating images, I’ll have to try them :))