
You’ve shot the deer, or maybe you’ve butchered a cow or one of the rabbits that you’ve raised. You’ve field dressed it and butchered it, but you have no idea what to do with a hide. For the most part, hides are discarded, and that’s not only a waste of a valuable commodity, it’s disrespectful to the animal.
The problem is that having a hide tanned is expensive, but why not tan the hide yourself?
There are many different ways to tan a hide, but traditionally, it was done using brains. Since that’s probably not the method that most people would use, that’s an article for another day. There are also tanning methods that require harsh chemicals, and we aren’t ever going to write that article because it’s not what we’re about.
As preppers, we want to be able to use what we have on hand, and though some of these may require an initial trip to the drugstore or superstore, everything is readily available.
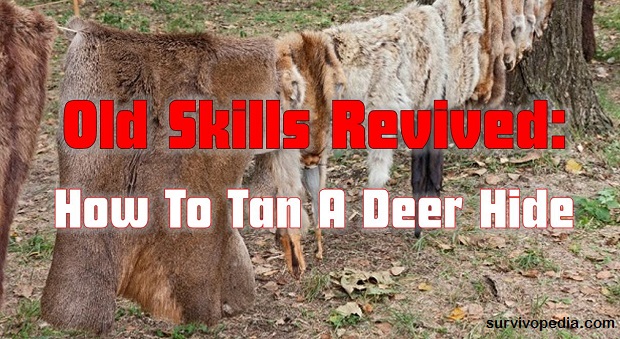
Now, the next question is whether or not you want to tan your hide with the hair on or the hair off. If you leave the hair on, it’s a great decorative item, or can be used to build a shelter, make a coat or a pair of boots, or just about anything else that you can think of. If you decide to take the hair off, you have leather that you can use for endless purposes.
Removing the hair requires some extra steps, but we’ll cover both ways. I’d like to make a suggestion here. It may be a good idea to try this with something small like a rabbit hide because a full deer hide can be a bit overwhelming for your first time.
If you’re tanning a cow hide, consider at least cutting it in half down the spine. Quartering it will make it even more manageable. The process for any hide is essentially the same with the exception of drying times. Obviously, bigger, thicker hides will take longer to soak and dry than little rabbit hides will.
Old Skills Revived: How To Tan A Deer Hide
What You’ll Need to Tan a Hide
We’re going to focus on tanning a deer hide to keep things relatively manageable but within the broad range of animals that most people hunt.
You’re going to need non-iodized salt, ammonia alum, and neat’s-foot oil. If you’re removing the hair, you’ll also need hydrated lime powder and wood ashes. If you’re dealing with a hide with greasy hair, such as a bear, you’ll need to degrease the hide too, but that’s a messy job that we’re not going to get into here.
Prepping the Hide for Tanning
OK, now that you’ve skinned the deer, you can either head directly into the tanning process or store the hide until the weather warms up, which is a good idea because you’re going to be working outside in water. Do you really want to do that in freezing weather?
Also, a frozen hide is much harder to work with than a warm one is. Another reason to wait is that the first step, salting, helps soften the meat and makes it easier to remove it from the hide.
We’re starting with a freshly-butchered hide. Salt the back side (non-hair side) liberally, then roll the hide up with the hair on the outside and put it in a garbage bag, then freeze it. You can also leave it to air dry, but if you do this, be ready to remove the meat within a few days.
Here’s an example of salting:
Video first seen on Starry Hilder.
When you’re ready to tan the hide, remove the hide from the bag, unroll it, and begin removing the meat from the back of the hide. You want to get all of the flesh off the hide so that all you have left is the hide. Use a dull knife, a paint scraper, a putty knife or some other tool sharp enough to scrape but not sharp enough to cut the hide.
Carefully scrape all of the meat off the hide, then resalt the hide, roll it back up, and refrigerate it for 3 or 4 days. Remove the hide, give it one more good scraping, then rinse the hide in water to remove the salt. Hang it up to drain.
Now you’re ready to tan the hide if you’re leaving the hair on. If so, skip the next step.
Remove the Hair from the Hide
For this step, you’re going to need a garbage can. Put the hide in the garbage can and cover it with a solution made of water, hydrated lime, and wood ashes. Use 1/4 cup lime and 1/2 cup ashes per gallon of water. Stir it around every couple of days and when the hair is starting to slip off the hide, remove it from the water.
Use your dull scraping tool to remove the hair from the hide. If there are still spots where the hair won’t come off, put the hide back in the solution for a couple more days. Once you have all of the hair off, rinse the hide in a boric acid solution to neutralize the lime.
Use around 1/8 cup of boric acid per gallon of water in the now-clean garbage can. Swirl the hide around as much as you can and drain and repeat a few times, then move forward to the next step to start actually tanning your hide.
Tan the Hide
Now that you’ve got the hide ready to tan, let’s get to it. Mix a solution of alum and salt using 1/2 pound of salt and 1/4 pound of alum per gallon of water. Cover the hide with the solution and let it set for 4 days to a week. Stir daily to keep the mixture evenly distributed and the hide covered.
After a week, remove the hide from the solution and rinse it well with clean running water. Hang it up to drain, but don’t let it dry completely. You’re almost finished tanning the hide, but you’ve got some elbow grease ahead of you!
Oil and Soften the Hide
At this point, the hide is still going to be fairly stiff. You’re about to change that, and this is the part where starting with a smaller hide, or a hide cut into pieces, is going to make your life easier.
While the hide is still damp, rub neat’s-foot oil into the flesh side of the hide and stretch it in all directions. Let that soak in, and apply another lighter treatment of neat’s-foot oil. Work it by rubbing it over the edge of a sawhorse, worktable, chair, or anything sturdy with an edge.
Make sure that you get the whole hide because this step breaks down the grain of the leather, which is critical to soften and tan the hide.
Keep working the hide until it’s soft and supple. You may need to use a dowel, the end of a mallet, or some other smaller, smooth tool to work out tougher spots. If the leather starts to dry out and crack as you’re working it, add more neat’s-foot oil.
Finish Tanning the Hide
The final step to tanning the hide is to smooth the flesh side with fine-grit sandpaper. This will get rid of any rough spots and make it nice and soft to the touch.
That’s it. Now you know how to tan your own hide. There are many directions that you can go with the hide now, but you’ve got a tanned hide to work with.
One cool bit of history is that the Native Americans used the hides on their teepees so that the smoke would waterproof them. Just a factoid. Other ancient secrets of survival are available now for you, just click on the book below to find out more about them!

If you’ve ever tanned your own hide, please share your experience with us below, and if you have any tips to make the job easier, we’d love to hear about it. Even seasoned tanners can learn from others!
This article has been written by Theresa Crouse for Survivopedia.
Do you long for that authentic smoked bacon? Or the taste of juicy mouthwatering ham and link sausages that you just don’t find on supermarket shelves? Well, if you want to enjoy all that and feel like a kid again, waking up in your grandma’s house… while ensuring your family is well fed no matter what the future brings, then…read THIS!
CHECK OUR survival and prepping solutions
If you found this article useful, please like our Facebook page and stay up to date with the latest articles.
WHAT TO READ NEXT:
HOW TO MAKE YOUR OWN BACON (STEP BY STEP GUIDE)
A RETURN TO THE OLD PATHS: HOW TO MAKE PEMMICAN LIKE THE NATIVE AMERICANS
20 LOST RECIPES FROM THE PIONEERS: WHAT THEY COOKED ON THEIR JOURNEY WESTWARD
SEVEN CLASSIC GREAT DEPRESSION ERA RECIPES GRANDMA USED TO MAKE
POTTED MEAT: A LOST SKILL OF LONG TERM MEAT STORAGE
BACK TO BASICS: HOW TO MAKE AND PRESERVE LARD
THE BEST WAY TO STOCKPILE VEGETABLES OFF-GRID
OLD FASHIONED PRESERVING-GRANDPA’S RECIPE FOR CURED SMOKED HAM
HOW TO MAKE GUNPOWDER THE OLD FASHIONED WAY
SURVIVAL HERBAL RECIPES FROM OUR ANCESTORS
HOW TO PRESERVE MEAT FOR SURVIVAL LIKE OUR GRANDFATHERS
OTHER USEFUL RESOURCES:
The 3 Pioneer Survival Lessons We Should Learn
The Most Effective Home Defense Strategies
Old School Hacks for Off-Grid Living
The Medical Emergency Crash Course
The Smart, Easy Way to Food Independence
How to Survive the Coming 100 Years Long Drought
About Theresa Crouse
Theresa Crouse is a full-time writer currently living in central Florida. She was born and raised in the hills of West Virginia, where she learned to farm, hunt, fish, and live off the land from an early age. She prefers to live off the grid as much as possible and does her best to follow the “leave nothing behind but footprints” philosophy. For fun, she enjoys shooting, kayaking, tinkering on her car and motorcycle, and just about anything else that involves water, going fast, or the outdoors. You can send Theresa a message at editor [at] survivopedia.com.
Has anyone ever used a pressure washer with a rotary nasal to deflesh the hide? I have done it and it worked amazingly, but I did not finish the tanning proses.