
While many things improve with age and advanced technology, there are some things that stand the test of time. What worked perfectly a century ago is still just as effective and useful today as it was then. Here are some great gardening tips from the early 1900’s.
100 years ago Gallaher Ltd printed a short “How-To” series, with clever hints for emergency situations. The cards were distributed with packs of cigarettes. All the pictures bellow are part of the George Arents Collection, The New York Public Library. Please enjoy the article.
24 Lost Gardening Tips from 100 Years Ago
 Vegetables
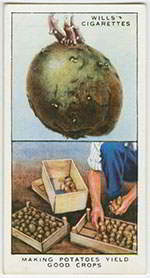
#1. How To Make Potatoes Yield Good Crops
Placing potato tubers in shallow boxes in a light location, safe from freezing temperatures in the early spring gets your crop off to a good start. Leave them there until March or April when it’s time to plant. Small shoots or sprouts should have emerged from the eyes. Leave only a few of the large ones on each tuber by rubbing off the smallest shoots. This will ensure that your crop will contain a minimum of the smaller tubers. Planting potatoes that are already sprouted versus those in a dormant state yields heavier crops.
#2. How To Make a Potato Clamp
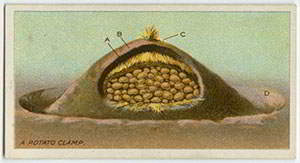 Potatoes, onions, apples, beets, pears and flower bulbs or roots such as dahlias and gladioli can be safely stored out in the open. A layer of straw is first put on the ground which the tubers and others are then placed upon. The second layer of about 6 inches of straw is then put over them. Around this heap, a trench should be dug with the soil being thrown up over the straw until it is also about 6 inches deep. At the top, a ventilation hole of about 6 inches in diameter should be left open and then stopped up with straw. Here is an easy recipe that shows you how to make potato flakes with 5 years shelf life (without refrigeration).
#3. How To Plant Potatoes
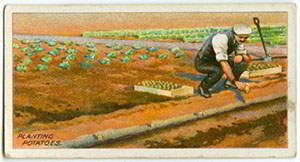 Heavy soil preparation for potatoes starts in the fall with ridging up the ground. Raking it over in the spring and then digging it over just before planting are the next steps. The sprouted and dis-budded tubers are planted in March in rather shallow trenches that are about 2 feet apart and 7 inches deep. Be sure to amend the soil with manure before planting. Tubers are to be placed 12-15 inches apart with the soil lightly raked over them. Earth them up with a hoe once the stems are about 4 inches above the ground.
#4. How To Store Onions
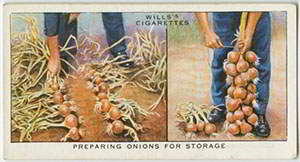 Onions should be pulled up when their leaves have browned. In order to ripen them, lay them on their sides in the sun. If it is wet, place them on sacks in a covered location until they can be put back in the sunshine, turning them several times to ripen evenly. A popular storage method is to plait the onions into a type of rope which can then be hung up on a hook or nail in a sheltered place. This “rope” is made by folding the onion leaves around a straw skein or core and then binding the leaves with heavy string. Find out how to buy and store 260 pounds of food for just $83.
#5. How To Divide and Replant Rhubarb
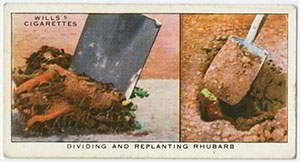 Rhubarb is a plant that can be left alone in one spot for several years. Once it stops growing vigorously it is time to divide and replant. It does best in shady locations as full sun can dry the soil out too quickly. February and March are the best months to divide rhubarb. Use a spade to gently lift and divide large clumps ensuring that each clump has buds attached to the roots. Replant these pieces about 3 feet apart in ground that is deeply dug with manured soil. Cover the tops with approximately 3 inches of soil.
#6. How To Plant Cabbages
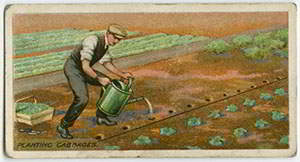 To get a late fall and winter supply of cabbage, they must be planted in March. Sowing more at intervals until the beginning of August will provide spring and summer produce. 1 ounce of seed will cover approximately 5 square yards. The seedlings will need to be thinned in order for the strongest plants to survive and thrive. A spacing of 24 inches is enough for most varieties. Watering should be done before planting versus after.
#7. Cabbage Plants
I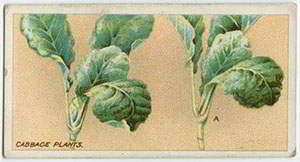 n February early cabbage varieties can be sown in a warm frame in pans or boxes. Hardening them off should happen before they become crowded and before planting. The seedlings will turn quickly and be ready for harvest in the summer. Don’t plant any that don’t have a heart or are blind.
#8. How to Grow Peas
 Peas need to be sown properly to ensure a good crop and to avoid wasting seed. To harvest peas in July and August, plant seeds in intervals of 7-10 days during March and April. Make a drill of about 12 inches wide and 1 ½ inches deep in well manured and deeply dug ground. Each of the drills will accommodate three rows of peas spaced about 3 inches apart and lightly covered with soil. Gorse clippings placed in the drill can help deter mice and rodents.
#9. Raising Early Peas
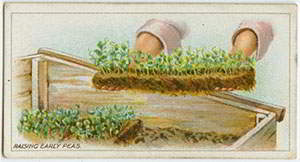 Drench cut turves with a light brine solution and then lay them out (grass-side up) for the birds to clear the bugs and worms. Once this is done, sow the seed in thick lines on each turf, covering them with fine soil. Keep the frame closed until plants begin to appear. To plant seedlings in March or April, lift the turves from the frame and place the strips in the prepared ground. Shore them up with soil and stake them in your preferred manner.
Related: Top 10 Foods to Grow for Survival
#10. How To Plant Asparagus
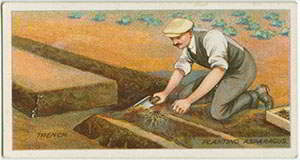 A bed for two rows of asparagus plants needs to be about 3 to 4 feet wide with a trench of about 2 feet wide and 1 foot deep between the beds. Plant the asparagus about 4 inches from the top with the roots spread to each side of the ridges. Do this quickly as their roots are very sensitive to the air. The rows should be 18-24 inches apart with at least 9 inches from the edges of the bed. 18 inches should be left between the plants as they do not like to be crowded or placed in soggy soil conditions.
#11. How To Grow Runner Beans
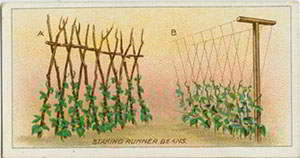 There are two common methods to stake and train your runner beans. The first way is to place pairs of 8-10 foot stakes at intervals of 1 foot. Each pair should be crossed approximately 6 feet from the ground and then attached to a horizontal cross bar or stake. Use twine to secure them.
The second method is to build a support in the shape of a “T” and place it at the ends of each row. Connect the “T”s using three pieces of wire attached at the the bottom of the “T” and one at the end of each arm or crosspiece. Tie pieces of twine from the top wires to the bottom at intervals of about 1 foot.
Fruit Trees
#12. How To Plant Trees
 To plant a tree, dig a hole about a foot deep that is about a foot wider than the roots themselves. Allow for adequate drainage by forking up the bottom, adding 6 or 7 inches of good soil as you go. Before adding the tree, make sure the roots have been soaked and that any stragglers or damaged rootlets have been removed.
Place the tree in the hole with the roots spread out, don’t let them become bunched or knotted up and then cover them with soil. To settle the tree, shake it occasionally as you are backfilling the hole and tread the ground lightly to pack the soil. Don’t forget to drive a stout stake into the ground to help support the stem, but don’t attach it until about a month has passed. Here are the 10 trees every survivalist should know and why.
#13. How to Espalier Apple Trees
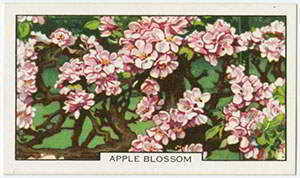 Apple trees in bloom, especially when trained to act as an espalier or hedge between gardens are a lovely addition. Plant two-year-old espaliers with four to five branches already in place in a sheltered location with good soil. During the first two years of growth allow the tree to blossom, but don’t let it set fruit.
#14. How To Prune Young Apple Trees
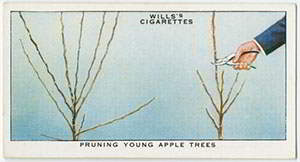 Proper pruning of young fruit trees is important to encourage strong branches that can stand a heavy load. This may mean no harvest for the first two years but will ensure years full of fruit after that.
Plant the apple tree in the fall. That winter cut the branches back to about 18 inches to encourage bud growth in the spring. Make the cuts just above a bud that is pointed in the direction you will want the new branch to grow.
#15. How To Preserve the Flavor of Apples
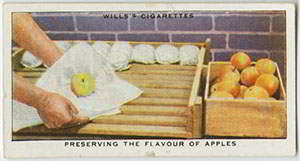 Store dessert apples in a cool, moist location such as a cellar or a small shed with a dirt floor and thatched roof to preserve these late fruits. By wrapping each apple in oiled paper and placing them in either a wooden box or storage tray, you can save them for months.
If you don’t have a storage room or building, you can bury the apples in the ground and cover them with about 6 inches of dirt or make apple sugar. Don’t try this with any varieties but the apples that ripen in the winter and later.

#16. How To Grease Band Fruit Trees
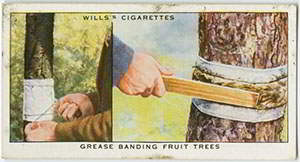 Every September it is common to see bands of grease-proof paper ringing the trunks of fruit trees. This is an important maintenance task to ensure wingless moths won’t be able to lay their eggs in the fall. The caterpillars that hatch from these eggs can destroy entire crops. The bands are coated with a special grease to trap the moths and tied at the top and bottom to make sure the insects can’t go beneath the paper.
#17. How To Prune Root Cordon Fruit Trees
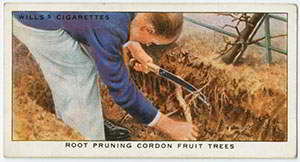 Cordon fruit trees with their one to three stems are welcome in small and large gardens alike. They can be trained to grow on a trellis or against a fence or wall. Summer and fall pruning of branches must be done to keep the tree’s shape. Root pruning is advised as well or the tree will begin to bear less fruit even while growing well. This is best done in late October or November by exposing the thick roots and trimming them back to within about 15 inches of the base. Cover again with fresh soil to protect them.
Berry Bushes, Canes, and Vines
#18. How To Thin Raspberry Canes
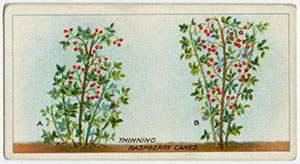 To encourage growth for the next summer, newly planted canes should be shortened and thinned out to a maximum of two suckers. It is always the wisest course to not allow too many suckers to grow as they will weaken the plant and cause a light crop. Keep only the strongest canes and thin the rest in following years.
Related: How to Grow Fruit All Year Round
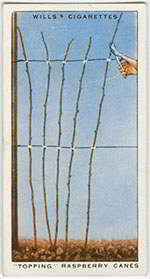 #19. How To “Top” Raspberry Canes
Proper pruning of raspberry canes is the key to a heavy crop. Summer-fruiting raspberries are pruned twice a year. After harvest, the canes are cut to the ground with four or five of the new shoots being tied to the support as their replacements. In February the “topping” is done which consists of pruning the tops of any canes that reach above the wire supports. The fall-fruiting varieties are to be cut down in March.
#20. How To Prune Gooseberry Bushes
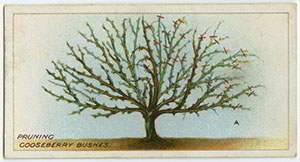 October to the end of January is the best time to prune gooseberries. All wild growth and straggling tips must be removed while leaving the center of the bush open. During the winter the ground needs to be worked up, manure added if needed, and all weeds removed in order for the water and nutrients to sink in.
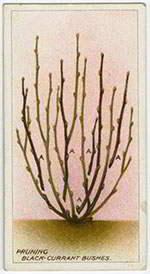 #21. How To Prune Black Currant Bushes
December is when any weak growth or dead wood should be cut away from black currant bushes. You can propagate black currants in two different manners. Take 8-inch cuttings with the buds removed from the lower half and plant them at about 4 inches deep in November.
The second method is removing and then replanting any suckers from October until pruning time in December. Out in the open black currant bushes need about 5 feet of space between them. 3 feet or so is sufficient if they have a wall or support behind them.
#22. How To Prune Young Red Currant Bushes
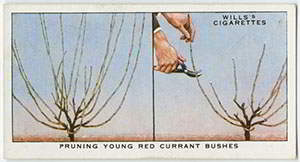 Hard pruning of newly planted red currant bushes is required in winter to ensure well-branched bushes full of fruit buds in the spring. If the pruning is done lightly, the bush will only grow on top and leave the lower half bare. Autumn planted bushes should be taken down by one-half or two-thirds if the plant isn’t hardy in that first winter. If they are being planted in the winter or early spring, prune them before planting. Cut the small, weaker shoots and only leave the strongest branches.
Related: 16 Wild Edibles You Didn’t Know You Could Forage For
Strawberries
#23. How To Protect a Strawberry Bed
A 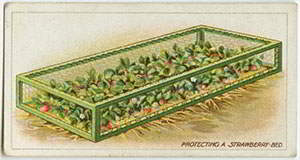 light wooden frame covered with netting is a great way to protect your fruit. Strawberries enjoy a light compost mixture consisting of two parts of rich, sandy loam with one part leaf mold and sand. Mulching with manure in March and surrounding the plants with straw in May will make for cleaner fruit at harvest. Water regularly in June and add a liquid manure fertilizer once the fruit color begins to change.
#24. How To Propagate Strawberries
 Strawberries are easy to multiply by simply pinning down runners from the main plant in June or July. Within a month or two, the new plants have rooted and are ready to be removed and planted elsewhere. For forcing, allow new runners to take root in pots that have been sunk in the soil near the main plant. When well-rooted, they can be potted up and put on an outdoors cinder bed until October. They can then be moved to the frame until January when the greenhouse treatment can finish them off.
This list has only covered a small number of good, old-fashioned common sense gardening tips. What are some of your favorite handy hints? Discover some more tips in the video below!

Source: askaprepper.com
WHAT TO READ NEXT:
5 TECHNIQUES TO PRESERVE MEAT IN THE WILD YOU SHOULD PRACTICE
HOW TO MAKE YOUR OWN BACON (STEP BY STEP GUIDE)
A RETURN TO THE OLD PATHS: HOW TO MAKE PEMMICAN LIKE THE NATIVE AMERICANS
20 LOST RECIPES FROM THE PIONEERS: WHAT THEY COOKED ON THEIR JOURNEY WESTWARD
SEVEN CLASSIC GREAT DEPRESSION ERA RECIPES GRANDMA USED TO MAKE
POTTED MEAT: A LOST SKILL OF LONG TERM MEAT STORAGE
BACK TO BASICS: HOW TO MAKE AND PRESERVE LARD
THE BEST WAY TO STOCKPILE VEGETABLES OFF-GRID
OLD FASHIONED PRESERVING-GRANDPA’S RECIPE FOR CURED SMOKED HAM
HOW TO MAKE GUNPOWDER THE OLD FASHIONED WAY
SURVIVAL HERBAL RECIPES FROM OUR ANCESTORS
HOW TO PRESERVE MEAT FOR SURVIVAL LIKE OUR GRANDFATHERS
OTHER USEFUL RESOURCES:
The 3 Pioneer Survival Lessons We Should Learn
The Most Effective Home Defense Strategies
Old School Hacks for Off-Grid Living
The Medical Emergency Crash Course
One Reply to “24 Lost Gardening Tips from 100 Years Ago”