
Bread provides nutrients and fills bellies. It’s been an important staple on the table for generations.
If you have a few shelf-stable ingredients and a coffee can (or several smaller cans), you have everything you need to prepare bread.
Why Cook Bread in a Can?
With loaf pans readily available, why should you learn to cook bread in a can? Here are six practical reasons.
1. Round loaves
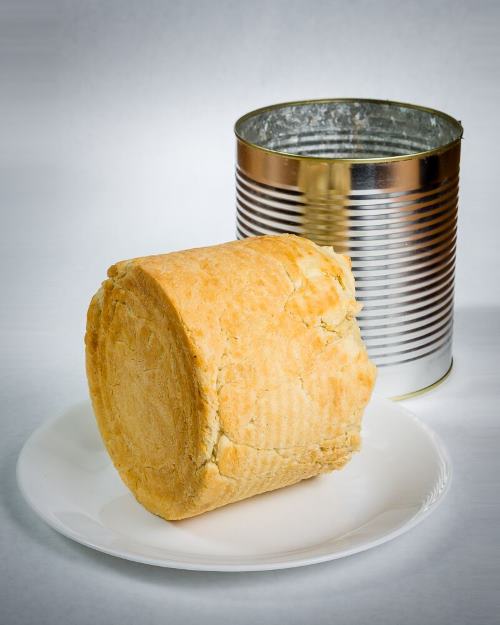
Baking bread in a can gives you beautiful loaves of round bread. They make a great gift for a neighbor or friend.
The shape also lends itself well for breakfast sandwiches with fried eggs and sausage patties.
2. Putting Junk to Good Use
Cans typically wind up in the garbage. When you use them for a different purpose, you’re helping preserve resources.
You can use tin cans in so many ways. Including making bread.
3. Less Crust
Traditional bread has a thicker crust all the way around. Many children (and some adults) don’t really enjoy eating the crust.
But, when you bake bread in a can you nearly eliminate the crust. There’s a bit on the top, but the rest of the loaf has the same soft texture.
4. Saving Money
If you don’t already own a bread pan, you might not want to spend the money on one. Using a can instead helps reduce your costs.
5. Bake Several Loaves at the Same Time
During the Great Depression, people baked bread in cans to preserve fuel. Since the cans took up a smaller footprint in the oven, they could make more loaves in a single session.
6. Learning a New (Old) Skill
Knowing how to bake bread in a can will give you an advantage in a SHTF scenario. You will already be adept at looking for new ways to use old things. You’ll know the importance of making do.
And this will help you survive.
Learn as many old-time skills as you can. Take advantage of all the online resources you can while you still have the Internet. When you need them, you won’t regret the time you invested in learning.
Avoid BPA
Many cans are lined with BPA, a toxin you don’t want to seep into your bread. Make sure you select cans that are labeled BPA free.
If the thought of cooking in a can scares you, there are also stainless-steel “can-shaped” cooking pots you could buy that would work. This would eliminate the concern of chemicals, thought it would add initial costs to your cooking.
If you are bugging out, and don’t have BPA free cans or stainless-steel containers available, burn your cans before cooking in them. Remove the labels and place the can in the fire. Let it burn for a couple of minutes, to burn off as many of the chemicals as possible.
Carefully knock the can out of the fire with a stick and let it cool. Once you can handle it safely, continue with the cooking process.
Three Methods of Cooking Bread in a Can
Here are three different methods of cooking bread in a can.
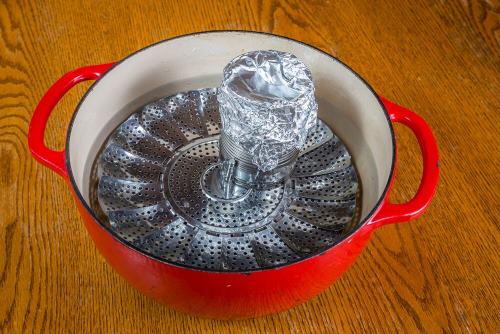
Steam
When you steam bread, you use foil to create a seal over the top of the can. Then, you place the can in a pot with water about 1/3 the way up the sides of the can.
You put the lid on the pot and bring the water to a boil on your stovetop. The steam will slowly cook the bread.
You can also steam bread in the oven. Just use an oven safe pot like a Dutch oven. Then keep the temperature high enough to keep the water boiling.
No matter where you steam your bread, always keep an eye on the water level. Don’t let it boil dry or you’ll burn your bread.
Bake
You can place tin cans directly on your oven rack to bake. Just make sure not to overfill the can with dough. If you do, it will make a mess in your oven if it rises over the top.
Cook it Over Coals
By nesting two cans, you can bake your bread directly in a fire. Put your bread dough in the smaller can. When it’s ready to bake, put an inch of pebbles or sand at the bottom of the larger can.
Put the smaller can into the larger one, resting it on the pebbles. Cover the entire top with foil. Poke a couple of holes in it for circulation.
Bury the larger can a couple of inches down into your hot coals. Let it bake until done.
Three Recipes for Bread in a Can
When you’re ready to give bread in a can a try, use your favorite bread recipe or one of these.
White Bread in a Can
Here’s a simple white bread recipe you can use for sandwiches or as a side to any meal.
To make a loaf in a #10 can you’ll need:
- ½ c warm water
- 1 TBS yeast
- 1 TBS sugar
- 4 ½ c unbleached flour
- 2 TBS sugar
- 2 TBS oil
- 1 tsp salt
- 1 can evaporated milk
Activate the yeast by mixing it in a small bowl with the warm water and 1 tablespoon of sugar. Let it stand for 10 minutes, or until bubbly.
In a large bowl, mix the remaining ingredients. Stir in the yeast mixture.
Knead for ten minutes, or until smooth and elastic. Add more flour if needed.
Grease the can. Add the dough. Cover the can tightly with plastic wrap.
Let rise in a warm location until the bread is just at the top of the can.
Bake at 375 degrees for 50 minutes, or until browned. Let cool until you can handle the can, and then remove the bread.
Let the bread cool before slicing.
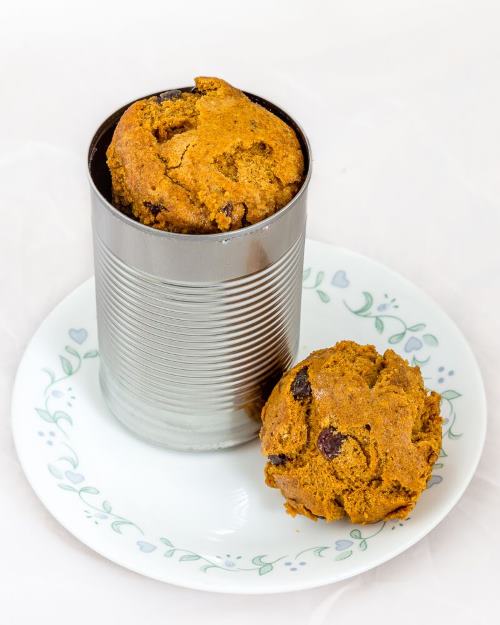
Boston Brown Bread
A New England traditional steamed bread, Boston Brown Bread is prepared in cans. The combination of rye and cornmeal, sweetened with molasses, gives this bread a unique taste.
This recipe makes enough four large tomato cans (28 oz each). You can also use six smaller cans or two larger ones.
You’ll need:
- Soft butter for greasing the cans
- 1 ¾ c cornmeal
- 2 ¼ c rye flour
- 2 c whole wheat flour
- 2 ½ tsp salt
- 3 tsp baking powder
- 2 ½ tsp baking soda
- 2 ½ c buttermilk
- 2 ¾ c molasses
- 5 eggs
- 1 c raisins (optional)
Whisk the dry ingredients in a large bowl. Add the wet ingredients and whisk to combine. Don’t overmix.
The batter should be the consistency of thick pancake batter.
Fill each can no more than 2/3 of the way.
Cover each can with foil.
Place the covered cans in a pot on a steamer rack. Add water to cover the bottom 1/3 of the cans. Place the lid on the pot and bring the water to a boil to create steam.
Continue steaming for about two hours (depending on size of cans used). Check for doneness by sticking a toothpick into the bread. If it comes out clean the bread is done. If not, continue steaming.
Let bread cool for an hour before removing from the can.
No-Knead Bread in a Can
This slow-rise bread is simple to prepare. It fills a three-pound coffee can or a #10 can.
You’ll need:
- 3 cups all-purpose flour
- 2 tsp salt
- 1 tsp active dry yeast
- 1 ½ c warm water
In a large bowl, mix flour, salt, and yeast until combined. Add the warm water and stir until a shaggy dough forms. It will be sticky.
Cover the bowl tightly with plastic wrap. Let rise for 8-15 hours, until the dough is bubbly.
Heat the oven to 450 degrees.
Grease the can.
Punch down the dough. With floured hands, shape the dough so it fits into your can. Let the dough rest while the oven preheats.
Bake for 50 minutes, or until dough is baked through. Check the center for doneness with a knife.
Let cool slightly before removing it from the can.
Final Tips for Making Bread in a Can
Here are three final tips for making bread in a can.
1. Grease the Can
If you forget to grease the can, the bread won’t slide easily out of it. A little bit of melted butter spread on with a pastry brush works well. So does cooking spray. Make sure you get the bottom of the can as well as the sides.
2. Check for Doneness
The size of your can will have a significant impact on cooking time. Coffee cans and #10 cans will take quite a while to bake. Make sure to test for doneness with a knife, skewer, or toothpick.
3. Use a Knife to Help Release
When it’s time to remove the bread from the can, turn it over and give it a whack on the bottom. If the bread doesn’t slide out easily, use a butter knife to separate the bread from the sides of the can.
Use these tips and whip up a batch of bread in a can today. It’s an old-time skill many people have forgotten about.
Source : Survivopedia.com

WHAT TO READ NEXT:
5 TECHNIQUES TO PRESERVE MEAT IN THE WILD YOU SHOULD PRACTICE
HOW TO MAKE YOUR OWN BACON (STEP BY STEP GUIDE)
A RETURN TO THE OLD PATHS: HOW TO MAKE PEMMICAN LIKE THE NATIVE AMERICANS
20 LOST RECIPES FROM THE PIONEERS: WHAT THEY COOKED ON THEIR JOURNEY WESTWARD
SEVEN CLASSIC GREAT DEPRESSION ERA RECIPES GRANDMA USED TO MAKE
POTTED MEAT: A LOST SKILL OF LONG TERM MEAT STORAGE
BACK TO BASICS: HOW TO MAKE AND PRESERVE LARD
THE BEST WAY TO STOCKPILE VEGETABLES OFF-GRID
OLD FASHIONED PRESERVING-GRANDPA’S RECIPE FOR CURED SMOKED HAM
HOW TO MAKE GUNPOWDER THE OLD FASHIONED WAY
SURVIVAL HERBAL RECIPES FROM OUR ANCESTORS
HOW TO PRESERVE MEAT FOR SURVIVAL LIKE OUR GRANDFATHERS
OTHER USEFUL RESOURCES:
The 3 Pioneer Survival Lessons We Should Learn
The Most Effective Home Defense Strategies
Old School Hacks for Off-Grid Living
The Medical Emergency Crash Course
The Smart, Easy Way to Food Independence
How to Survive the Coming 100 Years Long Drought

Saved, need to try this, thanks!