
One sign of an experienced survivalist is that they have multiple plans and methods for each and every one of their survival needs.
One simple example of this is survival instructors who collect fire starting methods like some people collect baseball cards.
You never know when the method you are counting on will be unavailable or fail, so it’s a good idea to have several other options you can use, just in case.
Within the prepping community, we see this manifest in how people deal with their need for food. At the beginning, we all start out with building a food stockpile. But as time goes on, we tend to start looking at various ways of supplementing that stockpile, such as raising our own food, foraging for edible plants and hunting.
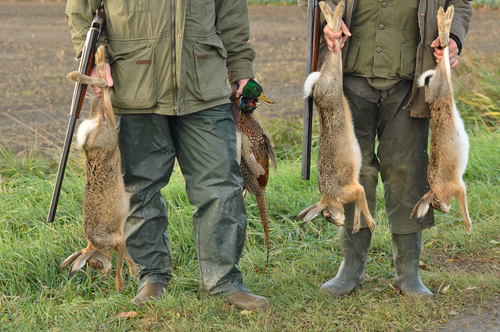
For those of us who are hunters, it makes sense to hunt for food. But what about those who are not? Granted, anyone who can shoot a rifle accurately can kill an animal, assuming they can find one to kill. That’s the hard part of hunting and the one that will give most post-apocalyptical hunters the most trouble.
You can forget about the idea of using feed corn as bait to bring the deer right into your sight picture, you’re going to have to go out and find the deer.
The other thing you’re going to have to know how to do is turn that dead animal into usable meat, once you kill it. Killing an animal is one thing, butchering it is another thing entirely. If you don’t do that correctly, the meat could be tainted and dangerous to eat.
A Few Foundational Points
Proper preparation of game meat is critical. Improper preparation of any game meat can lead to sickness and even death. This is because like us, all animals have a large number of bacteria living in their bodies, mostly in the gastrointestinal tract.
As long as they are contained there, they are safe; but if they contaminate the parts of the animal that you are going to eat, it can be extremely dangerous.
The other thing that we must take into consideration is that as soon as an animal dies, it starts to decay. Once again, this is caused by the bacteria in its body. So, the sooner the animal can be prepared and cooked, the better.
There was a time when meat was left to “age” without refrigeration. This was literally allowing the game to partially decay, before cooking it. The idea was for the bacteria to partially break down the tough fibers of the meat, making them softer and easier to chew. But if those same bacteria aren’t fully killed in the cooking process, they can be dangerous to you.
The preparation of small game and large game for use is essentially the same. I’m going to talk about this from the viewpoint of large game, but the methodologies stay the same. The only real difference is how much meat you get off the animal.
The American Indians and other indigenous groups used all of the animal, utilizing many of the internal organs as food or for other purposes. Here in the United States, we don’t do that, although there are still places in the world where many parts of the animal which we don’t consume are still consumed.
While this is possible, for the sake of this article I’m going to skip over the use of those organs. However, if you have dogs, they might enjoy the heart, liver and some of the other organs.
Finally, take care of the skin of the animal, as the skin itself is valuable. It can be tanned, converting it to either leather or furs for making clothing, shoes and even shelters. This process starts at the point of skinning the animal, so you don’t want to skin it carelessly, destroying the hide.
Outdoor Survival: Skinning, Butchering and Cooking Wild Game
Cleaning and Skinning an Animal
Once you have killed an animal, the first thing you want to do is clean it. This consists of removing the internal organs in the body cavity. Removing those organs reduces the potential for the meat to become spoiled, while also reducing the overall weight of the animal if you have to move it.
You will need a sharp knife for skinning. One with about a four inch blade is ideal. If the blade is too long, it will be more difficult to handle, increasing the chance of cutting something that you don’t want to cut. If it is too small, it will be easily turned aside when hitting bone.
A gut hook makes the process somewhat easier, but is not required. You may also need a bone saw, although that is not absolutely required.
It is a good idea to wear disposable rubber gloves while cleaning and skinning the animal, to avoid getting any contaminants on your hands. Again, that is not a requirement, but it is recommended.
Start by placing the animal on its back, propping it there with rocks or logs. The rear legs will need to be held apart, which can be done by tying the legs to available trees or by propping them apart with a stick. Of the two, tying the legs is preferable, as unless you tie the stick to the legs, there is a good chance that it will move at just the wrong moment.
You’re going to start working from the tail end of the animal. If you are hunting in normal times, you may need to keep the genitals attached to the animal to prove its sex to game wardens. Be sure to know what the law in your state says about this.
In a survival situation, this will be unnecessary; so you can start by cutting around the genitals and removing them. Be careful not to cut any deeper than necessary, so that your knife doesn’t pierce the intestines.
Split the skin of the animal down the center of the belly. If you are not keeping the head, to be mounted as a trophy, you will want to slit the skin all the way to the jawbone. This is where the gut hook comes in handy, as it allows you to do a very controlled cut, that won’t run too deep.
If you don’t have a gut hook on your knife, place your index and middle finger on either side of the knife blade, with the sharp edge of the blade towards you, to act as depth gauges. Peel the skin back from the muscle below so that the hair doesn’t come into contact with the muscle layer below.
Next you’ll want to cut through the muscle layer that covers the stomach. Once again, use the index finger and middle finger, sliding them under the muscle layer and pulling it up, so that you don’t cut through and into the intestines.
You will want to cut along the center of the stomach, from the cut you made to remove the genitals all the way to the breastbone (sternum). When cleaning a doe, cut to the side of the udder, rather than the center of the stomach.
If you are not planning on mounting the head of the animal as a trophy, cut through the cartilage of the breastbone, so that it can be spread apart.
With the animal’s body split open, you will have access to all the organs. Next, cut around the anus, so that it can be removed intact. Tie a string around it to prevent any contents from spilling out and contaminating the meat, before moving it from its position. Once tied off, pull it out of the body cavity.
Reach up inside the body cavity and cut through the esophagus and windpipe as close to the head as possible, being sure to cut them through entirely. Grab the two together with both hands and pull down hard, pulling the entrails down into the midsection of the animal.
There may be some connective tissue that holds the entrails in place, most likely along the spine. If that won’t tear, use your knife to cut through it.
Keep in mind that your bullet or arrow will most likely have caused damage to the internal organs, causing bleeding inside the body cavity. You want to try and minimize the blood spilling into the body cavity as much as possible.
This may require tying off particular organs. If there is a large amount of blood or other bodily fluids that spills into the body cavity, rinse it out thoroughly with water.
At this point, the only thing that will be holding the entrails in the animal’s body is the diaphragm, a thin layer of tissue just behind the lungs. Cut through this and then roll the animal on one side. You can then pull the entrails out of the animal. If everything doesn’t come out intact, you may need to roll the animal over on its other side to finish the job.
With the entrails removed, the animal is considered “cleaned.” You will want the body to cool as rapidly as possible, as this will help slow the decomposition process. Cut through the center of the pelvic bone with your knife or a bone saw, so that the hind legs can fall apart. Then prop the body cavity open with sticks to allow the body heat to escape.
Typically, the cleaned animal is hung, allowing the blood to drain out. If you are planning on using the head as a trophy, this is done by hanging the animal by the hind legs. But if not, hang it by the head, as this allows more blood to flow out of the body, as well as making it easier to skin the animal.
Cleaning Birds
Depending on the birds you kill, you might not want to go through all the trouble mentioned above. While the same basic process works for birds, you can also remove almost all the meat from a bird, without having to clean it.
The meat in a bird is either in the breast or the legs (specifically, the thighs). So, rather than removing the entrails from the bird, you can remove the meat form the carcass. To do this, start by peeling the skin and feathers off of the bird’s breast. With that removed, you can fillet the breast meat, much like filleting a fish; cutting the breast meat off the ribcage intact.
The other useful part is the legs, which are attached to the spine, near the tail. You can usually feel the pelvic bone and find where the thigh bones are attached to it. Cut through the flesh here, separating this joint and cutting the flesh around it. Be careful not to puncture the bowels in the process.
Skinning the Animal
Compared to cleaning the animal, skinning is easy. You have already begun the process, by cutting along the belly and starting to peel the skin back. All you are going to do is continue this process. It should be done within two hours of killing the animal, while the body is still warm.
In addition to the cut you have already made, you’ll need a cut down the inside of each leg, going from the center cut you have made, all the way down to the feet. Cut through the skin, around the leg, just above each hoof or foot. Make one additional cut, around the neck.
If the head is not being kept as a trophy, this cut can be just below the jawbone. If it is going to be used as a trophy, you’ll want to cut it near the shoulders.
Set your knife aside and grasp the skin at the cut you made at the neck. Pull downwards hard, and the skin should peel off. You may need to use your knife in a few spots, where the skin does not easily come loose from the body.
While this article does not deal with tanning the hide, if you are going to tan it yourself, you’ll want to remove as much flesh and fat from the inside of the hide as possible. This involves stretching the hide on a frame, then using the blade of your knife to scrape off this meat and fat.
Butchering Game Animals
Small game normally aren’t butchered, but instead are cooked whole. About the only time they might be butchered is for use in a soup or stew. In that case, the process is mostly about removing as much meat from the carcass as possible. Care is not needed, as you aren’t trying to maintain the integrity of any particular cut of meat.
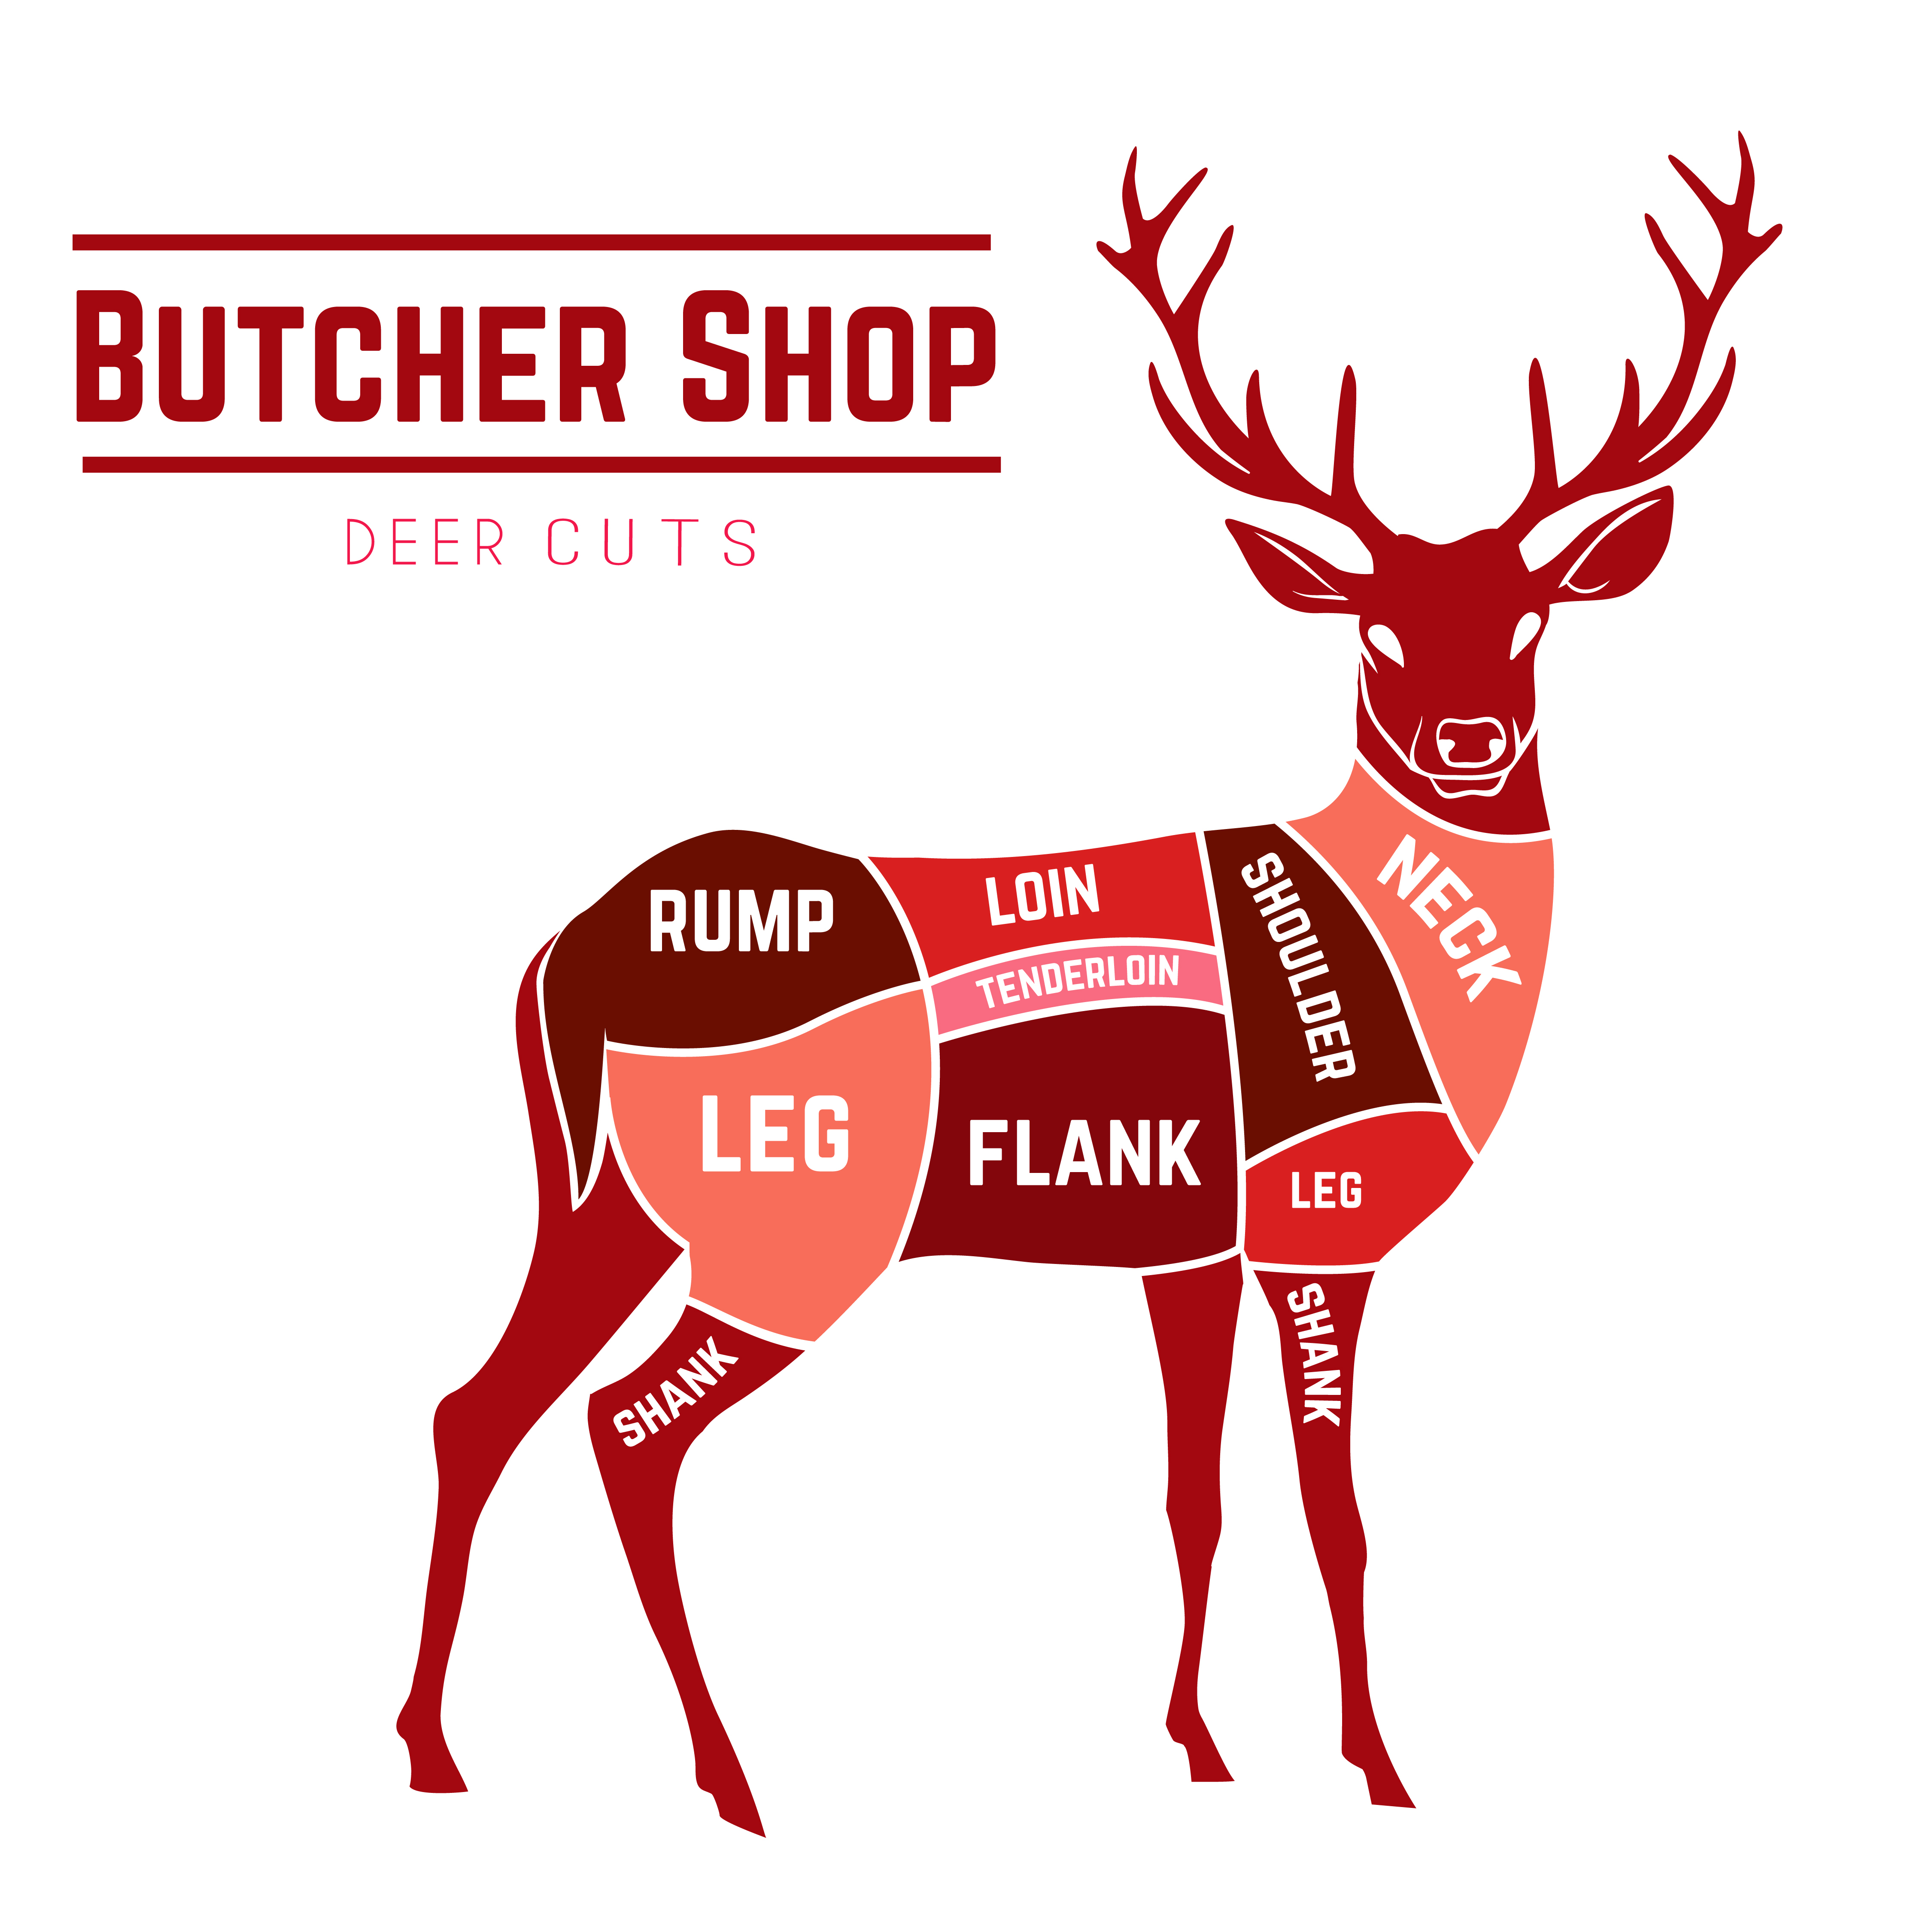
But the larger the animal, the more care you will probably want to take in how you butcher it, especially how you treat the better cuts of meat. These are considered better cuts because they are tenderer, with less sinew than other parts of the animal.
We include the backstrap, tenderloins, and the roasts associated with the hindquarters: the rump, round and sirloin in this group. Everything else is often turned into ground meat, sausage and jerky.
Where you start your butchering process will depend a lot on how you have the animal hung. If it is hung by the head, you’ll want to start with the back legs. If it is hung by the back legs, you’ll want to start with the head. Either way, the process is the same, it’s just the order that changes.
The body of a deer or other large animal basically consists of six parts from a butchering point of view. Four of those parts are the legs, then there’s the body, which consists of the ribs and back and finally the neck. The legs of many animals are actually easier to remove than you would expect, as the joint is held together with nothing more than tendons and cartilage.
©shutterstock.com
There is actually more than one way of doing this. One easy way is to cut through the meat, exposing the joints where the legs connect to the pelvic and shoulder bones; then to cut those joints to free the legs. In this manner, the legs can be cooked whole, if that is what you want.
Your other option is to actually butcher the animal, turning all the usable meat into steaks, roasts and ground products. A lot will depend on what your need is and whether you are in a survival situation.
You’ll also need to take into consideration whether you have the means of refrigerating or freezing the meat to preserve it. If you don’t, you’ll probably need to smoke or jerk it immediately.
To butcher a hanging deer (or other animal) start from the rear legs and remove the rump, round and sirloin roasts first. These are the bulk of your best cuts, which you will probably want to use as steaks and roasts. Then remove the backstrap and tenderloins, cutting them away from the backbone.
While those cuts are the best ones, everything else is still good meat that you’ll want to use. Rather than trying to butcher the remainder the same way a butcher shop would, you will probably be better of removing the meat from the bones. Without a bandsaw to cut the bones, making ribs and chops will be extremely difficult.
To debone the animal, seek to cut entire muscles free from the bones, rather than cutting the meat into sections. This is generally easier, as the only thing holding most of the meat to the bones is tendons.
With many types of game meat, such as venison, you’ll want to trim the meat, removing as much of the fat as possible. Deer fat does not taste good, so you won’t want the fat edging your steaks and roasts.
Cooking Game Meat in the Wild
There are countless recipes for cooking game meat online. But most of those are assuming that you are going to have the services of a complete kitchen to work with. I’d recommend finding some you’d like and printing them out, so that you’ll have them available to you in a survival situation.
However, if you’re in a survival situation, chances are that you’re going to have to do something with any game meat you kill, long before getting it back to your home. Unless you are fortunate enough to live just a few miles from some prime hunting ground, you’re probably going to be traveling several days to get to hunting grounds and another several days to get back home.
With that in mind, you’ll need to process and preserve your meat before making the trek back to your family.
5 Techniques To Preserve Meat In The Wild You Should Practice
I’m sure you’d cook at least some of your meat over an open fire and have a nice barbecue as a reward for the success of your hunt. But what I’m concerned about is the meat that you’re going to take back home. Unless you preserve it, it won’t be fit for your family’s consumption. That means either smoking it or jerking it.
In either case, you will need salt. This amazing substance is nature’s preservative. Salt preserves by drawing water out of cells in a process called osmosis. When it does this to bacteria cells, it kills them. So salting meat is a very important part of preserving it, both when smoking and with jerking meat.
Smoking Meat
Smoking is excellent for larger cuts of meat, whether they will be eaten as they are (roasts) or whether they will be ground up to make cured meats (sausage). Normally, the first part of the process is to soak the cuts of meat in a brine, so that the surface of the meat can soak in the salt.
This might be difficult in the wild, but you can accomplish the same thing by using a rub. Mix salt and spices together and rub a thick coat of them on the meat.
You will need to construct a temporary smokehouse in order to smoke your meat. That’s actually not as bad as it sounds. Essentially what your smokehouse needs to do is to hold in as much of the heat and smoke as possible.
A simple box structure made of tree branches, with cut branches handing from them to form walls is sufficient. You can also use rescue blankets for the walls, rather than branches.
The smokehouse will need a fire inside to create both heat and smoke. Use hardwoods for the fire, as they will produce more heat and not need to be replenished as much. To create smoke, either use green wood or soak pieces of the wood in water, before putting them on the fire.
Video First Seen On: Food Forest Cookery
Most of the smoked meats we buy today are merely cold smoked. That means that they are smoked at a temperature of 68°F to 86°F. This imparts the smoke flavor, but doesn’t preserve the meat.
To preserve it, you need to use hot smoking, which means raising the temperature inside the smoker to 126°F to 176°F and keep it there until the internal temperature of the meat is hot enough to cook it and kill any bacteria inside it.
In a wilderness situation, where you don’t have access to a thermometer, you can ensure that your meat is sufficiently smoked by smoking it for 24 hours. While it may dry out slightly, if shouldn’t dry too much, as the outside of the meat will form a tough coating that will hold most of the moisture in.
Jerking Meat
Turning meat into jerky is actually easier than smoking it, even though you have to cut it into strips to dry. These strips should be about ¼” thick and no thicker. Like smoking, the meat needs to be treated with salt. This is normally done through a marinade, but you can also use a rub on the meat, being sure to rub the salt into all exposed surfaces.
The American Indians used to jerk their meat in the sun, which works well. All that is needed is some sort of framework, made of branches, to hang the meat on. You can speed the process up by using the same sort of framework over a fire, as the added heat of the fire will speed the drying process.
One advantage of jerking over smoking is that the removal of so much water from the meat makes it much lighter. Typically, jerky weighs about 1/6 of the original weight of the meat. So you can carry a whole lot more meat back as jerky, than you can as smoked meats.
Source: survivopedia.com
WHAT TO READ NEXT:
HOW TO MAKE YOUR OWN BACON (STEP BY STEP GUIDE)
A RETURN TO THE OLD PATHS: HOW TO MAKE PEMMICAN LIKE THE NATIVE AMERICANS
20 LOST RECIPES FROM THE PIONEERS: WHAT THEY COOKED ON THEIR JOURNEY WESTWARD
SEVEN CLASSIC GREAT DEPRESSION ERA RECIPES GRANDMA USED TO MAKE
POTTED MEAT: A LOST SKILL OF LONG TERM MEAT STORAGE
BACK TO BASICS: HOW TO MAKE AND PRESERVE LARD
THE BEST WAY TO STOCKPILE VEGETABLES OFF-GRID
OLD FASHIONED PRESERVING-GRANDPA’S RECIPE FOR CURED SMOKED HAM
HOW TO MAKE GUNPOWDER THE OLD FASHIONED WAY
SURVIVAL HERBAL RECIPES FROM OUR ANCESTORS
HOW TO PRESERVE MEAT FOR SURVIVAL LIKE OUR GRANDFATHERS
Recommended Reading
THE LOST BOOK OF REMEDIES-All Medicinal Plants and Lost Cures of North America
THE LOST WAYS-Learn the long forgotten secrets that helped our forefathers survive famines,wars,economic crisis and anything else life threw at them
EASY CELLAR-AMERICA’S NATURAL NUCLEAR BUNKERS: FIND THE CLOSEST ONE TO YOUR HOME
THE LOST WAYS 2-This lost super-food will bulletproof you against any food shortage or famine
BLACKOUT USA-EMP survival and preparedness guide
DIY HOME ENERGY-Follow the step-by-step guide from A to Z and you will have a working system to reduce your electricity bills and save energy
MY SURVIVAL FARM-This hidden survival garden will keep you well fed when SHTF
MEAT FOR LIFE -THE REAL HOMEMADE AND HEALTHY MEATY TREATS OUR GRANDPARENTS USED TO MAKE…