
Love the taste of venison? I sure do. There’s almost nothing that compares to freshly prepared deer meat after a long hunt. But in order to enjoy the fruits of your labor, you need to know how to prepare the meat to eat.
Proper handling of deer meat (venison) will allow hunters to process and prepare deer while still avoiding a food-borne illness. This article is a guideline of helpful hints so that you can process and store deer meat successfully.
How To Field Dress and Process Deer Meat For Storage
So You Killed a Deer, What’s Next?
There is nothing more exciting than taking down your targeted game. It is also quite satisfying to know that you are able to use the game to feed your family.
A few things to make sure you have in order to field dress a deer: a small, sharp knife, a hatchet, rope or nylon cord, a whetstone, and disposable gloves.
You might also want to have six inch rubber bands, paper towels (or clean cloths) and sealable storage bags. A cooler is an absolute necessity for field dressing as well.
I strongly recommend the Yeti, as do other well-known outdoorsmen.
When field dressing, you should always wear disposable gloves. This will keep you from being exposed to any disease while handling the meat.
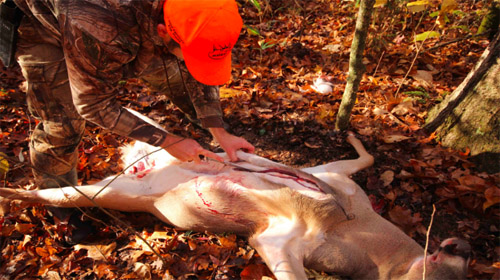
First, place the deer on its back, prop up its front legs, and its hind legs should be spread apart. You may need to use rocks or sticks to keep the deer carcass in place.
Next, you want to cut out and tie off the bung. Cut around the anus, then tie it off with the rope or rubber bands in order to prevent feces from coming in contact with the carcass.
Now, from the breastbone to the genitals cut along the mid line. As you cut, lift the skin and muscle of this area together. Be careful not to puncture the paunch and intestines because bacteria in those areas can contaminate your meat.
Notice any strange odors or discharge – if the organs smell rotten or there is a green-colored discharge, dark blood, or blood clots in any muscle, unfortunately, you will need to throw the carcass away. The meat is no good and should not be consumed.
If the meat looks good and exhibits no odor, you should next separate the diaphragm from the rib cage. Sever the windpipe and gullet at the base of the throat. Now you are ready to pull out the major organs and entrails. You are now ready to cut the edible meat away. Place this meat in the storage bags and place in your ice-filled cooler.
To insure that you prevent food-borne illness when field dressing a deer, be sure to dress the carcass and get it on ice immediately. Get rid of any meat that is dirty, bloodshot, or has come in contact with hair or feces. This is one reason I prefer hunting deer with a bow, rather than a rifle. Firstly, after 20 or so years in the game, rifle hunting just doesn’t do it for me. I need a challenge! And second of all, larger rifle cartridges can get stuck in odd places, and foul up the meat. Next up, if possible, hang the carcass so that air can circulate as you field dress the deer. You should use paper towels to wipe out the body cavity. You may also wish to wash the cavity out with water; if you do so, dry it as soon as possible in order to prevent spoiling. The sooner you can get the carcass cooled to 35 – 40 degrees, the better. This prevents bacterial growth.
A great way to do this is to pack the plastic storage bags with ice or snow and then pack the sealed ice bags in the cavity. Tying the cavity with rope or cord will keep the bags in place. Never allow the deer carcass to sit in direct sunlight. If you must transport the carcass before you can clean it, keep the hide on the carcass until you reach your destination. This will prevent contamination and keep the meat from drying out.
Speaking of transporting the carcass, it is imperative that you keep the carcass cool and out of direct sunlight during the transfer process. If you are taking the carcass to a processing facility, make sure the facility is fully refrigerated. You may choose to process the deer yourself; if you do so, do not freeze the carcass before rigor mortis has set in; if you do, you risk the meat becoming tough. While processing, wash your knife and cutting surface often with soapy water to keep any contamination from spreading from one piece of the carcass to another. It is recommended that you clean your knife often as well.
You may forgo the processing facility and process your meat yourself in your own kitchen. If so, start by thoroughly sterilizing all the equipment you plan to use from your knives and utensils to your tabletop meat grinder. Raw meat should be separated and placed on trays with a lip; store them in the refrigerator until you are ready to process that particular cut. It is imperative that meats do not touch while being stored.
If you are marinating any meat prior to processing, the meat should be kept in the refrigerator. Do not marinate or thaw outside of the refrigerator. If you plan to make deer jerky, first heat it to 160 degrees before drying. This will prevent food-borne bacteria from multiplying. Any meat that you cook should be checked with a calibrated meat thermometer to ensure that you have made it to the 160 degree mark. Jerky, once properly dried, can be stored in the refrigerator for one to two months. Canning meat is not recommended unless you have a properly working pressure canner.
Once you have finished processing the meat, you should freeze the meat. It is recommended that you freeze the meat in one-pound portions. In order to make sure that your meat does not become subject to “freezer burn,” use freezer wrap, vacuum-sealed bags, heavy-duty aluminum foil or freezer storage bags to store the processed meat. Before sealing the meat, make sure that there is no air in the packaging. Then, label the packages putting the specific date and contents on the outside. To freeze, space the packages in the freezer so that air is able to circulate around the packages. This will ensure that the meat is thoroughly frozen. After twenty-four hours, you can restack the packages to save space in your freezer. If you properly wrap your processed deer meat, it will last in the freezer for nine to twelve months. You should never thaw then refreeze any meat, especially game meat, as the quality of the meat will be drastically reduced.
Conclusion
If it’s your first time dressing and preparing deer meat (or any wild game meat) for storage, give these tips a try. It’s a fun and incredibly tasty endeavor.
Read also : 5 TECHNIQUES TO PRESERVE MEAT IN THE WILD YOU SHOULD PRACTICE
Would you like to know how the first settlers field dressed their meat and how they preserved it?
Then you really need this amazing book. It is called The Lost Ways and it contains all the knowledge of our forefathers.
 Here’s just a glimpse of what you’ll find in The Lost Ways:
From Ruff Simons, an old west history expert and former deputy, you’ll learn the techniques and methods used by the wise sheriffs from the frontiers to defend an entire village despite being outnumbered and outgunned by gangs of robbers and bandits, and how you can use their wisdom to defend your home against looters when you’ll be surrounded.
Native American ERIK BAINBRIDGE – who took part in the reconstruction of the native village of Kule Loklo in California, will show you how Native Americans build the subterranean roundhouse, an underground house that today will serve you as a storm shelter, a perfectly camouflaged hideout, or a bunker. It can easily shelter three to four families, so how will you feel if, when all hell breaks loose, you’ll be able to call all your loved ones and offer them guidance and shelter? Besides that, the subterranean roundhouse makes an awesome root cellar where you can keep all your food and water reserves year-round.
From Shannon Azares you’ll learn how sailors from the XVII century preserved water in their ships for months on end, even years and how you can use this method to preserve clean water for your family cost-free.
Mike Searson – who is a Firearm and Old West history expert – will show you what to do when there is no more ammo to be had, how people who wandered the West managed to hunt eight deer with six bullets, and why their supply of ammo never ran out. Remember the panic buying in the first half of 2013? That was nothing compared to what’s going to precede the collapse.
From Susan Morrow, an ex-science teacher and chemist, you’ll master “The Art of Poultice.” She says, “If you really explore the ingredients from which our forefathers made poultices, you’ll be totally surprised by the similarities with modern medicines.” Well…how would you feel in a crisis to be the only one from the group knowledgeable about this lost skill? When there are no more antibiotics, people will turn to you to save their ill children’s lives.
And believe it or not, this is not all…
Table Of Contents:
Making Your Own Beverages: Beer to Stronger Stuff
Ginger Beer: Making Soda the Old Fashioned Way
How North American Indians and Early Pioneers Made Pemmican
Spycraft: Military Correspondence During The 1700’s to 1900’s
Wild West Guns for SHTF and a Guide to Rolling Your Own Ammo
How Our Forefathers Built Their Sawmills, Grain Mills,and Stamping Mills
How Our Ancestors Made Herbal Poultice to Heal Their Wounds
What Our Ancestors Were Foraging For? or How to Wildcraft Your Table
How Our Ancestors Navigated Without Using a GPS System
How Our Forefathers Made Knives
How Our Forefathers Made Snow shoes for Survival
How North California Native Americans Built Their Semi-subterranean Roundhouses
Our Ancestors’Guide to Root Cellars
Good Old Fashioned Cooking on an Open Flame
Learning from Our Ancestors How to Preserve Water
Learning from Our Ancestors How to Take Care of Our Hygiene When There Isn’t Anything to Buy
How and Why I Prefer to Make Soap with Modern Ingredients
Temporarily Installing a Wood-Burning Stove during Emergencies
Making Traditional and Survival Bark Bread…….
Trapping in Winter for Beaver and Muskrat Just like Our Forefathers Did
How to Make a Smokehouse and Smoke Fish
Survival Lessons From The Donner Party
Get your paperback copy HERE
CHECK OUR survival and prepping solutions
If you found this article useful, please like our Facebook page and stay up to date with the latest articles.
WHAT TO READ NEXT:
5 TECHNIQUES TO PRESERVE MEAT IN THE WILD YOU SHOULD PRACTICE
HOW TO MAKE YOUR OWN BACON (STEP BY STEP GUIDE)
A RETURN TO THE OLD PATHS: HOW TO MAKE PEMMICAN LIKE THE NATIVE AMERICANS
20 LOST RECIPES FROM THE PIONEERS: WHAT THEY COOKED ON THEIR JOURNEY WESTWARD
SEVEN CLASSIC GREAT DEPRESSION ERA RECIPES GRANDMA USED TO MAKE
POTTED MEAT: A LOST SKILL OF LONG TERM MEAT STORAGE
BACK TO BASICS: HOW TO MAKE AND PRESERVE LARD
THE BEST WAY TO STOCKPILE VEGETABLES OFF-GRID
OLD FASHIONED PRESERVING-GRANDPA’S RECIPE FOR CURED SMOKED HAM
HOW TO MAKE GUNPOWDER THE OLD FASHIONED WAY
SURVIVAL HERBAL RECIPES FROM OUR ANCESTORS
HOW TO PRESERVE MEAT FOR SURVIVAL LIKE OUR GRANDFATHERS
OTHER USEFUL RESOURCES:
The 3 Pioneer Survival Lessons We Should Learn
The Most Effective Home Defense Strategies
Old School Hacks for Off-Grid Living
The Medical Emergency Crash Course
The Smart, Easy Way to Food Independence
How to Survive the Coming 100 Years Long Drought